AKS and Terraform: A poor man's guide to deploying kubernetes in Azure
We’re diving headfirst into the Microsoft mothership, into the churning guts of Azure, to tame its prized chimera: Kubernetes. But we'll do it on our own terms. No blank checks. No blind faith. Just raw nerve and a solid plan.
We’re staring into the abyss of modern infrastructure, a howling void of YAML files, microservices, and soul-crushing monthly bills. Some people call it “the future.” I call it a savage new frontier that will chew you up and spit you out if you show a moment of weakness. Our mission, should we choose to accept this madness, is to carve out a piece of this territory for ourselves without getting savaged by the bean-counters.
We’re diving headfirst into the Microsoft mothership, into the churning guts of Azure, to tame its prized chimera: Kubernetes. But we’ll do it on our own terms. No blank checks. No blind faith. Just raw nerve and a solid plan.
What you’ll learn
By the time the ether wears off, you’ll have stared into the digital maw and come out the other side with skills that pay the bills and a healthy dose of righteous paranoia. We will ride this whirlwind from start to finish.
- Deploy a Lean AKS Cluster on a Budget: We’re carving out our kingdom by stretching that $200 free credit as far as it’ll go. Let the fat cats have their gold-plated monstrosities; we are guerrilla fighters in the cloud wars, using the bare minimum firepower required to get the job done. This is about survival, not luxury.
- Compare Azure CLI vs. Terraform workflows: The eternal duel. In one corner, the Azure CLI: a rusty, blood-soaked shiv for quick-and-dirty work in the trenches. In the other, Terraform: the heavy artillery of Infrastructure-as-Code. A beautiful, terrifying weapon that demands respect and planning. We’ll get our hands dirty with both to understand the nature of their respective insanities.
- Deploy and expose a simple NGINX app: We need a canary in this coal mine. A simple web server, a digital flag planted on our new territory, proving to the world and ourselves that we have achieved dominance over the machine. We’ll make it sing and dance for all to see.
- Tag, cost-track, and clean up all resources: The final, and most critical, act. Covering our tracks. We will tag every component like a biologist tagging a wild animal, track its cost with the obsessive focus of a gambling addict, and then, when the time comes, vaporize the entire operation. Leave no trace. Erase the evidence. This isn’t just good housekeeping; it’s a spiritual necessity to avoid the terror of a five-figure bill for some forgotten VM humming away in a dark corner of the cloud.
So strap in. The ride gets bumpy from here. There will be challenges, there will be grit, and there will be code. Lots of it.
Right. So you’re probably thinking, “Okay, you raving lunatic, if the cloud is such a treacherous hellscape, why are we walking straight into the arms of Microsoft? Why Azure Kubernetes Service? Why this particular flavor of digital opium?”
It’s a fair question. You have to know the landscape. You have to pick your poison. In the savage world of managed Kubernetes, you could do a lot worse. We’re not choosing AKS because we love the logo; we’re choosing it because it offers a particular strategic advantage in this godforsaken war. It’s a calculated risk.
Why Azure Kubernetes Service (AKS)
Let’s break down the propaganda and see what’s really on offer.
Managed control plane (no charge)
This is the bait on the hook, and it’s a juicy one. The Kubernetes control plane—the etcd database, the API server, the scheduler—is the brains of the whole psychotic operation. Running it yourself is a fast ticket to madness, a 24/7 high-wire act over a pit of angry vipers. Microsoft, in its infinite corporate wisdom, takes that nightmare off your hands. They manage it, they patch it, they absorb the psychic damage… and they don’t send you a bill for it. The first hit is always free, kid. They want you hooked on their ecosystem, and they’re willing to give away the dealer’s cut to get you to the table. We will abuse this generosity.
Deep Azure integration
This is the golden handcuff. Once they have you in the door, they make it seductively easy to plug your cluster into the rest of the Azure machine. Need a private network? Azure VNet is right there. Need to manage who can access what? Slap an Azure Active Directory identity on it. Need to watch the whole thing burn? Azure Monitor will give you a front-row seat. This integration is a double-edged sword: it offers immense power and convenience, but it also pulls you deeper into their world. It’s how they get you. We’ll use their tools, but we’ll keep one eye on the exit.
Production-grade features
This ain’t some half-baked toy. AKS comes loaded for bear with the kind of heavy-duty features you need to survive in the wild. We’re talking built-in Role-Based Access Control (RBAC) to keep the wrong people from pushing the big red button. We’re talking a battle-hardened cluster autoscaler that can handle sudden, terrifying spikes in traffic without breaking a sweat. We’re talking Azure Policy to enforce security rules and keep your cluster from turning into a chaotic, non-compliant mess. These aren’t just features; they’re survival gear for the serious practitioner.
So, yes, we’re walking into the belly of the beast. But we’re doing it with our eyes open. AKS is a potent, dangerous tool. In the hands of a fool, it’s a fast way to get a new credit card declined. But in our hands? It’s the engine we’re going to ride straight through the heart of the storm.
Budget & Sizing Considerations
Every click in the Azure portal is a potential trap, a line item waiting to happen. Our strategy is one of extreme thrift and ruthless paranoia. We will build our rig on their dime, using their own marketing gimmicks against them.
The Price of Admission: Our War Chest and Our Workhorse
First, the good news. The AKS control plane, the brains of the entire operation, is still blessedly free. A gift from the Azure gods. But the muscle, the node that actually does the work, comes with a price tag. The dream of a free B-series VM is dead. Azure demands a machine with at least 4 vCPUs and 8 GB of RAM to run a system node pool.
There’s no way around it. This is the price of admission.
So we dip into our $200 credit. We’re requisitioning a Standard_B4pls_v2 instance. Four burstable cores, eight gigs of RAM. It’s a proper beast, but it drinks fuel. That $200 credit is our entire bankroll for this caper (and more to come). We have to make it count.
The One-Node Gambit: Our Budget Blueprint
You’ll see sane advice out there about separating your system and user workloads into different node pools. That’s for people with expense accounts and a 401k. We are not those people.
Our blueprint is simple and brutal: a single system node pool with a fixed count of one. Why one? Because that Standard_B4pls_v2 VM is the most expensive part of this whole operation, and it’s burning our credit every second it’s alive. A second node would double our burn rate, bleeding us dry twice as fast. So we live dangerously. Our applications will run right alongside the essential system pods. It’s a crowded, dirty, one-room apartment, but it keeps the meter from spinning out of control.
Avoid paid SKUs
This is where they get you. The VM might be the main expense, but the beast has other ways to bite. The “Standard” Public IP address, the “Standard” Load Balancer, the “Premium” Azure Container Registry… it’s a minefield of up-sells. Death by a thousand cuts.
We will be vigilant. We will use the Basic SKU for our public IP. We’ll use the Basic tier for ACR. We will treat every option that has the word “Standard” or “Premium” attached to it like a rattlesnake in a sleeping bag. The meter is running now. Every choice matters.
This is the path. A free brain, an expensive (but strong) body, and a kill switch to make it all disappear. It’s the only sane way to approach this beast without a corporate expense account.
Architecture Overview
Alright, let’s dial back the madness for a moment and look at the blueprint. Before you start building anything in the cloud, you need a map. Otherwise, you’re just stumbling around in the dark, and that’s how you end up with a forgotten database that costs you a grand a month.
This architecture isn’t fancy. It’s not designed to handle a Super Bowl ad. It’s a clean, simple, and most importantly, cheap machine designed for one purpose: to get a handle on Kubernetes in the Azure ecosystem without getting fleeced.
High-level diagram
Think of this as the schematic for our low-budget operation. It has exactly what we need and nothing we don’t. Every piece has a purpose, and we’re deliberately choosing the most cost-effective components.
Imagine a simple layout. You have the public internet on one side and our little Azure setup on the other. Traffic flows in, gets routed, and hits our application. Here are the moving parts:
-
AKS control plane (free) - This is Microsoft’s black box. It sits outside our network, managed entirely by Azure. We send it commands—“run this container,” “expose that port”—and it makes it so. We don’t have to patch it, secure it, or worry about its uptime. And, best of all, there’s no line item for it on the bill.
-
Single node pool in your VNet/subnet - This is our territory. We’ll create a dedicated Virtual Network (VNet), which is our own private slice of the Azure cloud. Inside that, our single
Standard_B4pls_v2worker node will live in its own subnet. This is where our containers will actually run. It’s the engine room of the whole operation. -
Basic LoadBalancer - To get traffic from the internet to our node, we need a front door. The Basic LoadBalancer is exactly that. When we expose our NGINX service, Azure will automatically provision one of these. It gets a public IP address and does the simple, dirty work of forwarding requests to the right port on our node. It’s not sophisticated, but it’s effective and aligns with our goal of avoiding extra costs.
-
Ingress controller - While the Load Balancer gets traffic to our node, an Ingress controller is a smarter traffic cop that lives inside the cluster. If we were running multiple apps, it could route traffic based on hostnames (app1.yourdomain.com) or paths (/api). For our simple NGINX deployment, it’s overkill, but it’s the logical next step for any real-world setup. We’ll stick to the Load Balancer for now, but it’s crucial to know this piece exists.
Component roles
Okay, a map is good, but it doesn’t tell you the whole story. You need to understand the function of each piece in this machine. Knowing what a component is called is one thing; knowing what it does when the pressure is on is another entirely. This is the breakdown of the roles in our little drama.
Let’s put these pieces under the microscope. No marketing fluff, just the straight dope on what each one brings to the table.
Control plane vs. node pool
This is the most fundamental split in any Kubernetes system.
- The control plane is the brain. It’s the management layer that makes all the decisions. It runs the Kubernetes API server, scheduler, and controller manager. When you type a kubectl command, you’re talking to the control plane. It decides which node will run your app and keeps track of the cluster’s desired state. In AKS, this brain is managed by Azure, floating somewhere in the ether, and we don’t have to worry about it.
- The node pool is the muscle. It’s a group of worker VMs where your applications actually run. These nodes are the factory floor, taking instructions from the control plane and doing the heavy lifting of running your containers. We control the size, type, and number of these nodes, and they are what we pay for.
VNet/Subnet for pod networking
Your containers can’t just shout into the void; they need a network to communicate.
- The VNet (Virtual Network) provides the fundamental isolation for your cluster. It’s your own private network space carved out of the massive Azure infrastructure.
- The Subnet is a specific range of IP addresses within that VNet that you dedicate to your cluster.
AKS uses an advanced networking model where each pod gets its own IP address directly from this subnet. This is a clean, effective setup that avoids a lot of the messy network translation headaches you might find in other configurations. It means your pods are first-class citizens on the network, which simplifies discovery, routing, and security rules.
LoadBalancer service vs. Ingress
Getting traffic from the outside world into your cluster is a critical job, and there are two main ways to do it.
- A LoadBalancer service is the straightforward, blunt-force approach. You declare a Kubernetes service with type: LoadBalancer, and AKS automatically provisions a real Azure Load Balancer with a new public IP address. This IP points directly to your service. It’s simple and effective for exposing a single application, but it’s not very flexible and can get expensive if you need many public IPs. It operates at Layer 4 (TCP/UDP).
- An Ingress is a smarter, more sophisticated traffic cop that lives inside your cluster. It’s an application you deploy (like NGINX or Traefik) that can manage traffic for many different services behind a single IP. It operates at Layer 7 (HTTP/S), so it can route requests based on the URL host or path (/api, /web, etc.). This is far more efficient and flexible for any real-world scenario beyond a simple demo.
Prerequisites
Here’s the inventory of what you need in your possession, your accounts, your tools, and your credentials. No exceptions.
Azure subscription
First, you need access to the casino. If you don’t have an Azure subscription, go get one. Most new accounts come with a free trial and a handsome credit (usually around $200). Forget the idea of this being a safety net; this is our goddamn bankroll. This is the seed money for the entire operation, the war chest we’ll use to pay the necessary tolls. Our mission is to make that credit last, to spend it as slowly and wisely as humanly possible, because we will be spending it. You still need a valid subscription to get in the door, but make no mistake: we are on a budget, and the meter is now running.
Local tools
This is your toolkit. Your machine needs to be armed with the right software. Don’t show up with outdated junk; version numbers matter.
- Azure CLI ≥ 2.57.0: You’ll still need the az command. It’s essential for the initial login to Azure and for fetching the Kubernetes credentials for kubectl.
- kubectl ≥ 1.27: This is the universal remote control for any Kubernetes cluster. Once our cluster is built by Terraform, you’ll use kubectl to interact with it.
- Terraform ≥ 1.12.2: This is how we build. We are not running a series of manual commands like some kind of savage. We will define our entire infrastructure—the network, the cluster, everything—as code. This is the only sane way to create a repeatable, version-controlled environment.
- Helm ≥ 3.14.0: Helm is the package manager for Kubernetes. We will use it to deploy our Ingress controller. It’s the standard for managing the lifecycle of complex applications on the cluster, and we will use it accordingly.
For instructions on installing Azure CLI, Terraform, etc, check out:
Permissions
You can have the best tools in the world, but they’re useless if you don’t have the keys to the building. You need to have the authority to actually create and modify resources in your Azure subscription.
You’ll need the Owner or Contributor role on the subscription. If you have a lesser role, like Reader, you’re just a spectator.
Specifically, your account must have permission to create Resource Groups, Virtual Networks (VNet), AKS clusters, and Public IPs.
If you’re working under a corporate account and don’t have these permissions, you’ll have to go ask the gatekeepers in your IT department. Good luck with that. For everyone else, let’s get ready to roll.
Alright, the planning is over. Time to get our hands dirty. This is where we stop talking and start building. We’re going to carve out our little piece of the Azure cloud, lay the foundation, and make sure our tools are pointed at the right target. Pay attention to the details here; a typo now can cause a world of pain later.
Environment Setup
First things first, we need to connect to Azure and create a workspace.
Azure CLI login & subscription context
Before you can do anything, you have to authenticate. This is you knocking on the front door and showing your ID.
az loginThis command will open a browser window and ask you to sign in to your Azure account. Once you’re authenticated, your terminal is connected. If you have access to multiple Azure subscriptions, you need to tell the CLI which one to work on. This is critical, you don’t want to accidentally build this cluster in your company’s production environment.
Find your subscription ID and set the context:
# List all subscriptions you have access to
az account list --output table

# Set the active subscription
az account set --subscription "<your-subscription-id>"Note: If this is a new azure account, you can safely assume that the one subscription listed and chosen during
az loginis the proper subscription, so there’s no need to run the commands above.
Resource group & naming conventions
Before we create anything we need a container to hold all the resources for this project. In Azure, this is a Resource Group. Think of it as a folder. It keeps our project tidy and makes cleanup a simple, one-command affair. We also need to be consistent with our names.
Every resource in Azure needs a location (a region). We’re picking eastus because it’s a massive, general-purpose region. Sticking to one location for all our resources is good practice, that is, unless you’re architecting for high availability or resilience, in which case it’s a terrible idea.
First, create the group itself in our chosen location:
az group create --name rg-cheap-aks-demo --location eastusFrom now on, every resource we create will be placed within this rg-cheap-aks-demo group. Our naming convention will be:
- Resource Group:
rg-cheap-aks-demo - Virtual Network:
vnet-cheap-aks-demo - Subnet:
snet-cheap-aks-demo - Cluster:
cheap-aks-demo
Networking basics
You can’t have a cluster without a network. We need to define our private network space before we can place our nodes in it. This is the foundation of our entire setup. We’ll define these resources in our Terraform code.
- Create a VNet: We’ll provision a Virtual Network with an address space of
172.16.0.0/16. This is our large, private plot of land. - Create a Subnet: Inside that VNet, we’ll create a smaller subnet with an address space of
172.16.1.0/24. This is where our Kubernetes nodes will actually live.
In our Terraform files, this will be handled by azurerm_virtual_network and azurerm_subnet resource blocks. This is the power of Infrastructure as Code: we define the desired state, and Terraform makes it happen.
But, for now, we’ll create our private Virtual Network (VNet) and a Subnet inside of it manually for our cluster nodes.
First, the VNet. This command carves out our large 172.16.0.0/16 network space.
az network vnet create \
  --resource-group rg-cheap-aks-demo \
  --name vnet-cheap-aks-demo \
  --address-prefix 172.16.0.0/16
Next, we create the subnet. This allocates a smaller portion of that VNet’s address space (172.16.1.0/24) specifically for our AKS nodes and pods.
az network vnet subnet create \
  --resource-group rg-cheap-aks-demo \
  --vnet-name vnet-cheap-aks-demo \
  --name snet-cheap-aks-demo \
  --address-prefixes 172.16.1.0/24
With the resource group and network in place, now we have a proper, prepared piece of land to build the cluster on.
Birthing the Beast: Deploying the AKS Cluster
Enough with the theory and the architectural diagrams. The planning phase is over. It’s time to enter that strange state of high-speed digital alchemy, to turn command-line incantations into a living, breathing Kubernetes cluster.
For this part, we’re going in with the brute-force method: the Azure Command-Line Interface. Think of this as working on a hot engine with a rusty wrench. It’s direct, it’s fast, and it can get messy. We’ll get to the more elegant Terraform approach later, but first, you need to know how to fight in the trenches.
This is the point of no return. The command we’re about to use is a monster, a dense block of text that tells Azure precisely what kind of fever dream we want to construct. Don’t let it intimidate you; it’s just a recipe, and we’ve already gathered all the ingredients. But be warned: a single misplaced character can lead to chaos (or a direct and reasonable error message at least).
First, let’s bottle some of that VNet information into a variable. It makes the main command cleaner, less prone to the kind of typos that send you down a rabbit hole of despair.
# Capture the Subnet ID. You'll need this.
SUBNET_ID=$(az network vnet subnet show --resource-group rg-cheap-aks-demo \
   --vnet-name vnet-cheap-aks-demo --name snet-cheap-aks-demo --query id -o tsv)
Create AKS cluster
Now, the main event. This is the az aks create command in all its glory. We’re telling Azure to build our cluster, wire it into the VNet we made, and most importantly, be gentle on our bank account.
az aks create \
    --resource-group rg-cheap-aks-demo \
    --name aks-cheap-demo-cluster \
    --node-count 1 \
    --node-vm-size Standard_B4pls_v2  \
    --network-plugin kubenet \
    --vnet-subnet-id $SUBNET_ID \
    --load-balancer-sku basic \
    --generate-ssh-keys
Let’s break down the incantation we’re feeding the Azure beast. Each flag is a deliberate choice, a move in this high-stakes game:
--name & --resource-group: Simple enough. The cluster’s handle and the sandbox it lives in.--node-count 1: One node. That’s it. No autoscaling, no redundancy. Why? Because that VM is now the primary drain on our $200 war chest. A second node means we bleed out twice as fast. We’re running lean to keep the meter from screaming.--node-vm-size Standard_B4pls_v2:The heart of the operation. This is our paid workhorse, a burstable 4-core machine that meets Azure’s minimum demands for a system pool. It’s not free, but it’s the most frugal option that won’t get us thrown out of the casino. This is what our credit is for.--network-plugin kubenet & --vnet-subnet-id: We’re using kubenet for its sheer, brutal simplicity. It’s less complex than the full Azure CNI and perfect for a single-node setup where we don’t need every pod to have its own VNet IP address. We’re still hooking it directly into the VNet and Subnet we carved out earlier, keeping our beast contained on our own turf.--load-balancer-sku basic: This is a critical move. The default is standard, which costs money. Specifying basic is a conscious choice to dodge a hidden fee. This is the kind of vigilance that keeps you off the billing department’s radar.--generate-ssh-keys: We’re letting Azure handle the keys to the back door. Simplicity is speed.
Run it. Go make a drink. This will take a few minutes as the Azure machine spirits bend to your will and construct your cluster in the digital ether. When it’s done, you’ll be greeted by a wall of JSON confirming that your gambit has paid off.
Chaining the Beast: How to Stop the Financial Bleeding
Listen closely, because this is the most important part of the entire operation. That cluster, with its powerful B4pls_v2 node, is burning through your $200 credit every second it’s running. Leaving it on when you’re not actively working is the fastest way to financial ruin. You must be ruthless. You must be disciplined. You must chain the beast when it is not needed.
The official, and only sane, way to do this is with the az aks stop command. This isn’t just pausing the workers; it’s a full-system shutdown. It stops the node, it stops the control plane, and most importantly, it stops the damn billing meter for the cluster.
# Hit the lights. Shut it all down.
az aks stop \
  --name aks-cheap-demo-cluster \
  --resource-group rg-cheap-aks-demo
With that command, the entire operation goes on ice. The resources are preserved, but they are inactive and, crucially, no longer costing you money.
When you’re ready to dive back into the madness, you bring it all back to life with a single command:
# Wake up, we've got a city to burn.
az aks start \
  --name aks-cheap-demo-cluster \
  --resource-group rg-cheap-aks-demo
This is the rhythm of survival in the cloud. Start the cluster, do your dark work, stop the cluster. Burn this into your brain. It’s the only thing standing between you and an empty bankroll.
The Siren’s Call: Gauges, Metrics, and Hidden Fees
A raw engine is fine, but for a real machine, you need gauges. You need to see the pressure, the temperature, the raw, screaming metrics from the belly of the beast. For any production rig, the monitoring addon is non-negotiable. It wires your cluster into Azure Monitor and gives you a firehose of vital data. Without it, you’re flying blind.
But this is where they get you. This is the honey pot in the middle of the minefield.
Watch closely now. This command looks innocent. It looks like you’re just flipping a switch.
# Light up the dashboard
az aks enable-addons \
  --resource-group rg-cheap-aks-demo \
  --name aks-cheap-demo-cluster \
  --addons monitoring
What you don’t see is that this “addon” is really a backdoor salesman for another paid service. The moment you run this, Azure provisions a Log Analytics Workspace to store all those beautiful metrics. And that workspace, my friend, is not free. It charges for every gigabyte of data it ingests and for how long it holds onto it. The meter starts ticking, quietly, in a corner of the casino you didn’t even know you were gambling in.
And here’s the knockout punch: once you have monitoring, you start wanting reliability. You see the option for the “Uptime SLA” on the control plane and think, “That’s the professional thing to do.” The moment you enable that for a guaranteed uptime, your previously free control plane is now on the clock, costing you $0.10 an hour, forever. Even when your node pool is scaled to zero.
They lure you in with a “free” addon that creates an appetite for paid services. It’s a brilliant, vicious, and elegant trap. For our purposes, know that this is the path to production, but it’s also the path to a drained bankroll.
Identity and a Leash: RBAC and Managed Identity
Let’s talk security. You don’t build a fortress and leave the front gate wide open. By default, your AKS cluster was born with two critical security features already baked in:
- Kubernetes RBAC: Role-Based Access Control is enabled from the start. This means it’s not a free-for-all inside the cluster. Every user and process operates on a need-to-know basis. You have to be given the keys to open any doors.
- System-Assigned Managed Identity: Instead of messing around with passwords and secrets, Azure gives the cluster its own passport, a managed identity. This is how the cluster proves who it is to other Azure services when it needs to create a load balancer or grab a storage disk. It’s clean, automatic, and secure.
There’s nothing to configure here. Just know that your cluster isn’t stumbling around in the dark; it was built with a proper security posture from the get-go.
Getting the Keys to the Kingdom
The cluster exists, but your local machine doesn’t know about it. It’s like building that secret fortress and forgetting to draw yourself a map. We need to get the credentials so your kubectl tool can connect.
This next command is the key. It reaches into Azure, grabs the access configuration for your cluster, and merges it into your local kubeconfig file.
# This command doesn't output much, but it's pure magic.
az aks get-credentials \
  --resource-group rg-cheap-aks-demo \
  --name aks-cheap-demo-cluster
Your command line is now wired directly to the cluster’s API server. For once, you are in control.
Kicking the Tires: Validation
Trust, but verify. With the keys in hand, it’s time to run a few commands to make sure the machine is alive and responding.
First, check on the worker nodes. This is the part you actually pay for.
kubectl get nodesYou’ll see one of two things: a single node with a Ready status, or No resources found. Don’t panic if you see the second one! That’s the sound of you saving money. It means our autoscaler has already spotted the idle cluster and scaled the node pool to zero. This is the desired state.
Next, let’s peek into the engine room, the kube-system namespace. These are the core pods that run Kubernetes itself.
kubectl get pods --namespace kube-system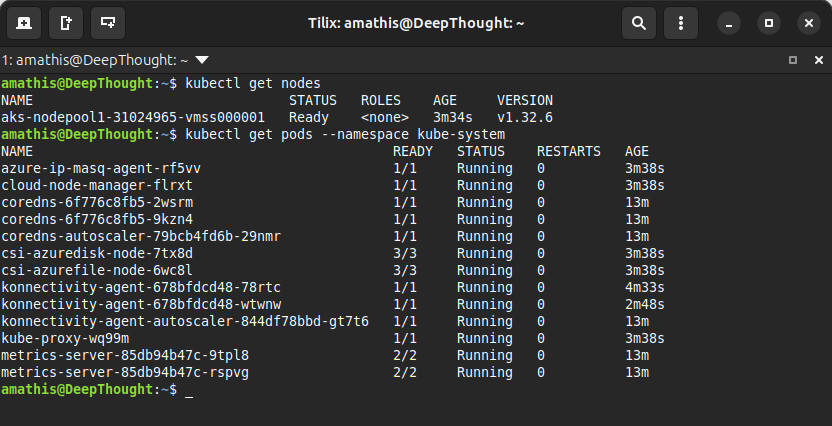
The default network should be in an active state with autostart and persistent set to yes.
Provisioning AKS via Terraform
The Azure CLI is a fine tool for a desperate, one-off job. A commando raid. But we’re not just here to raid the village; we’re here to build a fortress we can burn down and rebuild at a moment’s notice. For that, you need discipline. You need a blueprint. You need Infrastructure as Code (IaC).
Enter Terraform.
Terraform is how we turn the chaotic mess we just created into a repeatable, documented, and version-controlled recipe. It’s the difference between telling a story around a campfire and writing the damn book. With Terraform, we declare the state of the world we want, and the machine bends reality to match our will.
Project layout
Before we write the first line of this mad scripture, we need to organize the files. A good operator keeps their gear in order. This isn’t just for tidiness; it’s for sanity. This is our standard field operating procedure.
Create a directory for our project, and inside it, create these six empty files. This is our canvas.
# Make the project directory
mkdir aks-terraform-azure

# Create the empty files
touch .env .gitignore backend.tf variables.tf main.tf outputs.tf
When all is said and done, your directory structure should resemble:
aks-terraform-azure/
├── .env
├── .gitignore
├── backend.tf
├── variables.tf
├── main.tf
└── outputs.tf
Let’s start with .gitignore. This is our OpSec mandate. A list of files and patterns that Git, our version control system, will pretend don’t exist. We use it to keep our repository clean of local Terraform clutter (.terraform/, .tfstate) and, most critically, to prevent us from ever committing the secret keys in our .env file. This is the list of things we do not speak of in public. Loose lips sink ships.
# Don't commit the secret keys
.env

# Local Terraform state
*.tfstate
*.tfstate.*
crash.log

# Terraform plan output
*.tfplan

# Local override files
override.tf
override.tf.json
*_override.tf
*_override.tf.json

# Terraform provider & module caches
.terraform/
.terraform.lock.hcl

# Sensitive variable files
*.tfvars
*.tfvars.json
terraform.tfvars

# IDE/project files
.vscode/
.idea/
*.swp
.DS_Store

# CLI history
.history
Backend configuration (backend.tf)
Perhaps the most critical file for any work that isn’t a throwaway experiment. This tells Terraform where to store its state file, the sacred scroll that maps our code to the resources that actually exist in the cloud. We’ll configure this to store the state remotely, which is non-negotiable if you’re working in a team or if you can’t afford the catastrophic amnesia that comes with losing a local state file. This is the black box of our entire operation.
terraform {
  required_providers {
    azurerm = { source = "hashicorp/azurerm" }
  }
  backend "azurerm" {
    resource_group_name  = "rg-cheap-aks-demo"
    storage_account_name = "tfstatecheapaksdemo"
    container_name       = "tfstate"
    key                  = "aks.tfstate"
  }
} required_providers: This is just good supply-chain management. We’re explicitly telling Terraform that we need the officialazurermprovider from the HashiCorp registry and that we’re targeting a version compatible with 3.0. No surprises, no weird knock-offs.backend "azurerm": This is the command. We are ordering Terraform to use an Azure Storage Account for its state file.
The block’s parameters are just the coordinates to our secure facility: the resource_group_name we already created, a unique storage_account_name, the container_name to hold the file, and the key, which is the filename for the state file itself.
Now, here’s the first test of your wits: These Azure resources must exist before you can initialize Terraform. You can’t store your map in a bunker that hasn’t been built. We already have the resource group from our CLI work, but we’ll need to create the storage account and container before moving on.
Building the Bunker
Before Terraform can use our storage account, we have to create it. This is a classic chicken-and-egg problem that we solve with a quick, surgical strike from the command line.
First, we create the storage account itself. Note that storage account names must be globally unique across all of Azure, so you might have to get creative if our name is already taken. We’re picking the cheapest possible SKU, Standard_LRS (Locally-Redundant Storage), because we’re not made of money.
# Create the storage account
az storage account create \
  --resource-group rg-cheap-aks-demo \
  --name tfstatecheapaksdemo \
  --sku Standard_LRS \
  --encryption-services blob
With the account in place, we create the blob container inside it. This is the specific folder where our state file will live.
# Create the blob container
az storage container create \
  --name tfstate \
  --account-name tfstatecheapaksdemo
There. The bunker is built, the foundation is poured. The secure location for our map is ready. Now, and only now, can we initialize the grand machine.
What About Those Secrets?
Terraform can’t just waltz into your Azure account and start building things. It needs credentials. It needs a license to operate. We will create a Service Principal, a non-human identity, a robot account, with just enough power to do its job and not a shred more. This is how the pros do it.
Fire up your terminal. We’re about to create a ghost in the machine.
# Create the Service Principal, scoped to our resource group
# Set SP_JSON equal to the output of the az command, using --sdk-auth to return JSON output
SCOPE=$(az account show --query id -o tsv)  # Subscription scope
SP_JSON=$(az ad sp create-for-rbac \
  --name sp-cheap-aks-terraform \
  --role Contributor \
  --scopes /subscriptions/$SCOPE/resourceGroups/rg-cheap-aks-demo \
  --sdk-auth)

# Parse JSON and write to .env
cat > .env <<EOF
export ARM_CLIENT_ID=$(echo $SP_JSON | jq -r .clientId)
export ARM_CLIENT_SECRET=$(echo $SP_JSON | jq -r .clientSecret)
export ARM_SUBSCRIPTION_ID=$SCOPE
export ARM_TENANT_ID=$(echo $SP_JSON | jq -r .tenantId)
EOF
az ad sp create-for-rbac: The command to create a new Azure Active Directory Service Principal.--name: We give our ghost a name, for the record books.--role Contributor: This is the permission level. Contributor is a high-level clearance that lets it create, manage, and delete resources.--scopes: This is the most critical part. We are chaining our ghost to a single post. By scoping it to our resource group (rg-cheap-aks-demo), we ensure it cannot wreak havoc anywhere else in your Azure subscription. Its power is absolute, but only within these specific walls.--sdk-auth: Tell Azure CLI to return JSON that we can parse.
Without sdk-auth
{
  "appId": "xxxxxxxx-xxxx-xxxx-xxxx-xxxxxxxxxxxx",
  "displayName": "terraform-sp",
  "password": "xxxxxxxxxxxxxxxxxxxxxxxxxxxxxxxx",
  "tenant": "xxxxxxxx-xxxx-xxxx-xxxx-xxxxxxxxxxxx"
}
With sdk-auth
{
  "clientId": "xxxxxxxx-xxxx-xxxx-xxxx-xxxxxxxxxxxx",
  "clientSecret": "xxxxxxxxxxxxxxxxxxxxxxxxxxxxxxxx",
  "subscriptionId": "xxxxxxxx-xxxx-xxxx-xxxx-xxxxxxxxxxxx",
  "tenantId": "xxxxxxxx-xxxx-xxxx-xxxx-xxxxxxxxxxxx",
  "activeDirectoryEndpointUrl": "https://login.microsoftonline.com",
  "resourceManagerEndpointUrl": "https://management.azure.com/",
  "managementEndpointUrl": "https://management.core.windows.net/",
  "activeDirectoryGraphResourceId": "https://graph.windows.net/",
  "sqlManagementEndpointUrl": "https://management.core.windows.net:8443/",
  "galleryEndpointUrl": "https://gallery.azure.com/",
  "managementPortals": {
    "portalUrl": "https://portal.azure.com"
  }
}
Defining Your Variables (variables.tf)
A hard-coded plan is a brittle one. Any change requires you to perform open-heart surgery on the main logic, risking a fatal mistake. We’re not butchers. We’re architects of chaos, and that requires finesse. This file is where we define the inputs for our Terraform plan, making it flexible, reusable, and far easier to read.
Populate your variables.tf file with this loadout. We’re setting sensible defaults so we can run this particular mission on autopilot, but we’re building it the right way so these can be easily changed for the next campaign.
variable "location" {
  default = "eastus"
}
variable "resource_group_name" {
  default = "rg-cheap-aks-demo"
}

variable "node_vm_size" {
  default = "Standard_B4pls_v2"
}
variable "aks_cluster_name" {
  default = "aks-cheap-demo-cluster"
}
variable "node_count" {
  default = 1
}
Each variable block is a lever on our control panel:
- type: The kind of input we expect, usually string, number, or bool.
- description: A message in a bottle. A note to your future, amnesiac self explaining what this goddamn thing is for. It is not optional; it is a lifeline.
- default: The value Terraform will use if you don’t provide another one. By setting defaults for everything, we’ve turned our complex machine into a “one-button-push” operation for this demo.
Overriding the Plan: How to Set Variables
The default values in your variables.tf file are fine for a test run, but in the real world, you’re a moving target. You need different configurations for different environments, and you don’t want to edit the core files every time. Terraform gives you a whole arsenal of ways to override the defaults.
Command-Line Flags (The Sledgehammer)
For a quick, one-off change, you can pass variables directly on the command line. This method is brutal, direct, and overrides all other inputs.
# Deploy with a different cluster name for this run only
terraform apply -var="aks_cluster_name=aks-temp-test"
Variable Files (The Organized Approach)
This is the professional’s choice for managing different environments. You create separate .tfvars files for each scenario (e.g., staging.tfvars, prod.tfvars).
aks_cluster_name = "aks-staging-environment"
aks_node_vm_size = "Standard_D2s_v3"
You then tell Terraform which “loadout” to use with the -var-file flag:
# Deploy using the staging configuration
terraform apply -var-file="staging.tfvars"
Environment Variables (For the Machines)
This method is perfect for automated CI/CD pipelines. You can configure your build server to set environment variables, and Terraform will automatically detect and use them. The variable name must be prefixed with TF_VAR_.
# Set the environment variable
export TF_VAR_aks_cluster_name="cluster-built-by-ci"

# Now just run apply, and it will pick up the variable
terraform apply
This arsenal gives you the tactical flexibility to adapt your single blueprint to any mission without ever touching the core logic.
The Main Event: Declaring Resources in main.tf
The planning is over. This is the moment of creation. The main.tf file is where we define the actual infrastructure. It’s the scripture that Terraform reads to bend the cloud to our will. We’re not just running commands anymore; we’re describing a finished world, and Terraform will make it so.
# main.tf

# Configure the Azure Provider
provider "azurerm" {
  features {}
}

# Look up the details of the existing Resource Group
data "azurerm_resource_group" "rg" {
  name = var.resource_group_name
}

# Create a Virtual Network
resource "azurerm_virtual_network" "vnet" {
  name                = "vnet-cheap-aks"
  location            = data.azurerm_resource_group.rg.location
  resource_group_name = data.azurerm_resource_group.rg.name
  address_space       = ["172.16.0.0/16"]
}

# Create a Subnet inside the Virtual Network
resource "azurerm_subnet" "subnet" {
  name                 = "snet-cheap-aks"
  resource_group_name  = data.azurerm_resource_group.rg.name
  virtual_network_name = azurerm_virtual_network.vnet.name
  address_prefixes     = ["172.16.1.0/24"]
}

# Create the AKS cluster
resource "azurerm_kubernetes_cluster" "aks" {
  name                = var.aks_cluster_name
  location            = data.azurerm_resource_group.rg.location
  resource_group_name = data.azurerm_resource_group.rg.name
  dns_prefix          = var.aks_cluster_name

  default_node_pool {
    name       = "default"
    node_count = 1
    vm_size    = var.aks_node_vm_size
    vnet_subnet_id = azurerm_subnet.subnet.id
  }

  identity {
    type = "SystemAssigned"
  }

  network_profile {
    network_plugin     = "kubenet"
    load_balancer_sku  = "basic"
  }
}
This file will contain everything: the network, the subnet, and the AKS cluster itself. It’s the guts of the whole machine.
Dissecting the Machine
Let’s tear this down to see how it works.
provider "azurerm": This block tells Terraform we’re working in Azure. The emptyfeatures {}block is all we need; it will automatically pick up our Service Principal credentials from the.envfile we created. Magic.data "azurerm_resource_group" "rg": Pay attention here. We are not creating a new resource group. We’re using a data source to look up the one we already made with the CLI. This is how you tell Terraform to use existing infrastructure without trying to manage it.azurerm_virtual_network&azurerm_subnet: An AKS cluster needs a place to live. We’re defining our own private digital playground, a VNet and a Subnet, to keep the cluster contained.azurerm_kubernetes_cluster "aks": This is the main event. If you look closely at the arguments, you’ll see the ghost of our oldaz aks createcommand. Thevm_sizeandnode_countin thedefault_node_poolblock, thenetwork_pluginandload_balancer_skuin thenetwork_profile… it’s all here. We’ve simply translated our imperative commands into a declarative blueprint. This is the machine itself.
The After-Action Report: Declaring Outputs (outputs.tf)
When the battle is over and the smoke clears, you need a report. What did we build? Where is it? Hunting through the Azure portal is for amateurs. We’re going to have Terraform hand-deliver the key information to us on a silver platter. That’s the job of the outputs.tf file.
This file defines what Terraform will print out upon a successful run, but more than that, it allows us to pass outputs to other IaC tools like Ansible. It’s the coordinates of your new territory.
# outputs.tf

output "aks_cluster_name" {
  description = "The name of the created AKS cluster."
  value       = azurerm_kubernetes_cluster.aks.name
}

output "resource_group_name" {
  description = "The name of the resource group where the cluster is deployed."
  value       = data.azurerm_resource_group.rg.name
}

output "kube_config" {
  description = "The Kubernetes config for the created cluster. Treat this like gold."
  value       = azurerm_kubernetes_cluster.aks.kube_config_raw
  sensitive   = true
}
Here we’re asking for three things: the aks_cluster_name, the resource_group_name, and the kube_config. Notice the last one has sensitive = true. This is a critical piece of paranoia. It tells Terraform, “Yes, I want this value, but for God’s sake, don’t just splash it across the screen in plain text during the apply.” It’s a secret, and Terraform will treat it as such, hiding it from the main output.
The Moment of Truth: Unleashing the Terraform Beast
Alright, you degenerate. You’ve made it this far. The files are there, staring at you from the digital abyss, a monument to either your genius or your foolishness. We’re about to find out which. Now comes the fun part: kicking the tires and lighting the fires.
A Quick Detour: Overriding the Narrative
Before we pull the trigger, remember what we just talked about. The terraform.tfvars file is your little black book of secrets. If you need to change the story, to override the variables we so carefully laid out, that’s your ticket. Don’t come crying to me if you launch this thing into the wrong dimension because you forgot to set the right coordinates.
Taming the Existing Monsters: The Import Command
Now, for a dose of reality. You and I, we’re not working in a vacuum. We’re in the real world, a twisted landscape of pre-existing infrastructure and digital ghosts. The suits have already clicked their way through the Azure portal, creating resources with wild abandon. We have to account for that.
This is where the import command comes in. It’s our way of telling Terraform, “Hey, see that rusty old container registry over there? That’s ours now.” We’re not creating it from scratch; we’re wrestling it into submission, bringing it under the cold, hard logic of our code. We’re retrofitting the chaos. If these resources didn’t already exist, Terraform, in its infinite and terrifying wisdom, would simply conjure them out of the ether for us. But we’re not so lucky. We have to wrangle the existing beasts first.
The Grunt Work: Command-Line Wrangling
This is the price of admission, the digital chain gang. You made these resources outside the system, and now you have to formally introduce them to their new overlord, Terraform. Don’t screw this up.
First, you need to get your story straight. Your terminal is dumb; it doesn’t know your subscription or the names of the monstrosities you’ve created. You need to set some environment variables. Populate these with the real names from your Azure account.
export SUBSCRIPTION_ID="$(az account show --query id -o tsv)"
export RESOURCE_GROUP_NAME="rg-cheap-aks-demo"
export VNET_NAME="vnet-cheap-aks-demo"
export SUBNET_NAME="snet-cheap-aks-demo"
export AKS_CLUSTER_NAME="aks-cheap-demo-cluster"
Once those are locked and loaded in your shell, we need to run terraform init in the project root.
Think of it this way: init is when you load the gun. You’re downloading the Azure provider, the “driver” that lets Terraform actually talk to Microsoft’s cloud kingdom.
The import command needs that provider to know what a “resource group” or an “AKS cluster” even is. Without running init first, trying to import is like trying to make a call on a dead phone. The lines of communication aren’t even open.
Go ahead and give it a whirl…
# Make sure you have sourced your .env variables
source .env

# Initialize terraform
terraform init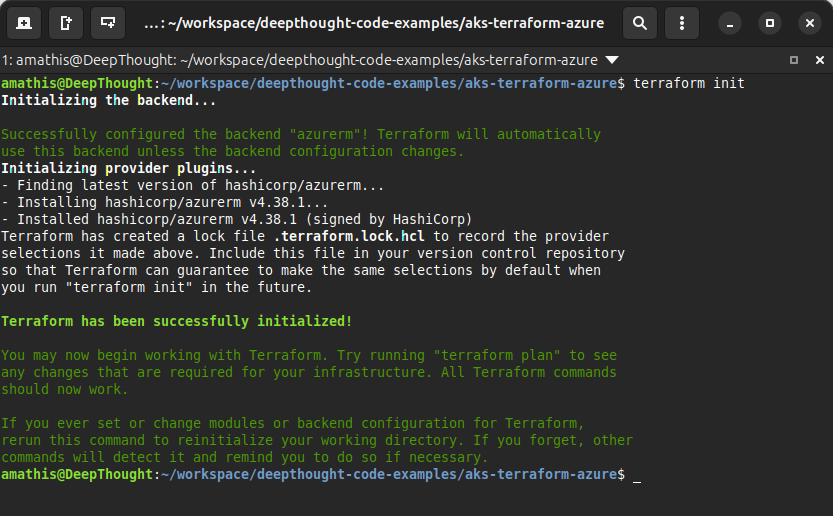
You shouldn't see any red text or errors if everything has been setup properly.
Assuming you didn’t screw it up and Terraform has been successfully initialized, you’ll need to import your existing resources. Run these commands one by one. This is you, pointing a finger at each resource and telling Terraform, “That one. It’s mine.”
1. The Virtual Network (VNet)
Your private digital highway.
terraform import azurerm_virtual_network.vnet \
   /subscriptions/$SUBSCRIPTION_ID/resourceGroups/$RESOURCE_GROUP_NAME/providers/Microsoft.Network/virtualNetworks/$VNET_NAME
2. The AKS Subnet
The specific lane for your cluster.
terraform import azurerm_subnet.subnet \
   /subscriptions/$SUBSCRIPTION_ID/resourceGroups/$RESOURCE_GROUP_NAME/providers/Microsoft.Network/virtualNetworks/$VNET_NAME/subnets/$SUBNET_NAME
3. The AKS Cluster
The main event. The beast itself.
terraform import azurerm_kubernetes_cluster.aks \
   /subscriptions/$SUBSCRIPTION_ID/resourceGroups/$RESOURCE_GROUP_NAME/providers/Microsoft.ContainerService/managedClusters/$AKS_CLUSTER_NAME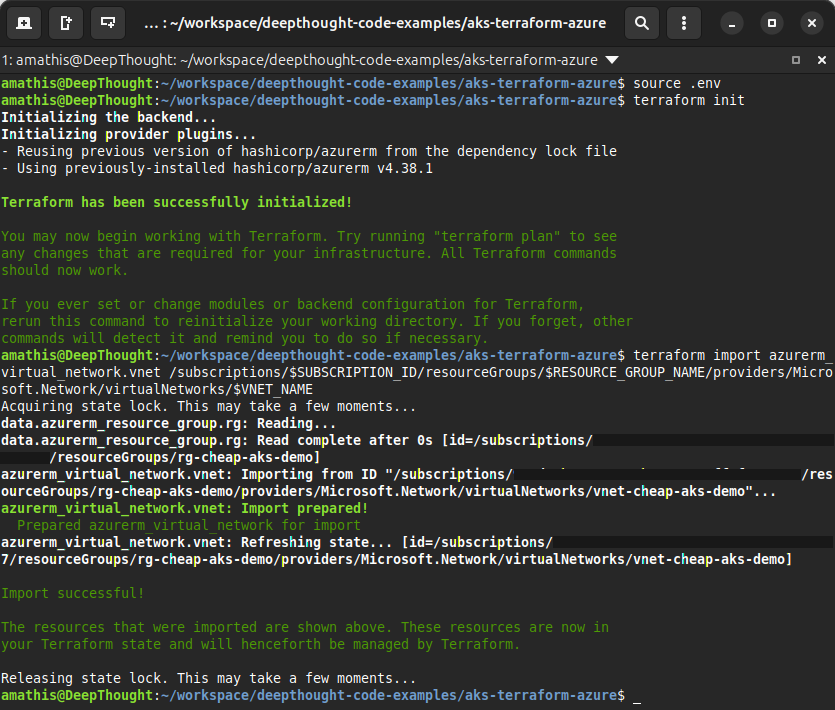
You shouldn't see any red text or errors if everything has been setup properly.
The Holy Trinity: Init, Plan, Apply
This is the ritual, the three-part invocation that separates the wizards from the squids. Get it right, and you’re a god, a creator of worlds. Get it wrong, and you’ll be cleaning up a digital superfund site until the heat-death of the universe.
terraform init: This is the handshake. You’re introducing your machine to the code, letting it download the necessary providers and plugins. It’s the first taste, the moment the machine realizes you’re about to ask it to do something truly insane.terraform plan: The dress rehearsal. Terraform will read your code, look at the state of the world, and tell you exactly what fresh hell you’re about to unleash. It’ll show you what it’s going to create, what it’s going to destroy, and what it’s going to change. Pay attention. This is your last chance to turn back before you drive the whole car off the cliff.terraform apply: The main event. The point of no return. You’ve seen the plan, you’ve accepted your fate. You type yes and watch the matrix unfold. Terraform will now reach out its ethereal tendrils and bend the cloud to your will. Resources will be born, configurations will be set, and your beautiful, terrible creation will come to life. Godspeed, you maniac.
The Final Reckoning: Plan and Apply
You’ve done the dirty work. You’ve wrestled your configuration into submission, and you’ve branded the existing resources with the import command. Now it’s time to see what the machine really thinks of your work. It’s time to see the plan.
Run the command. Stare into the digital abyss.
terraform planWhy the Node Must Die
You’ll see it right there in black and white: Terraform wants to destroy and recreate your default_node_pool. It’s marked for death, a planned execution.
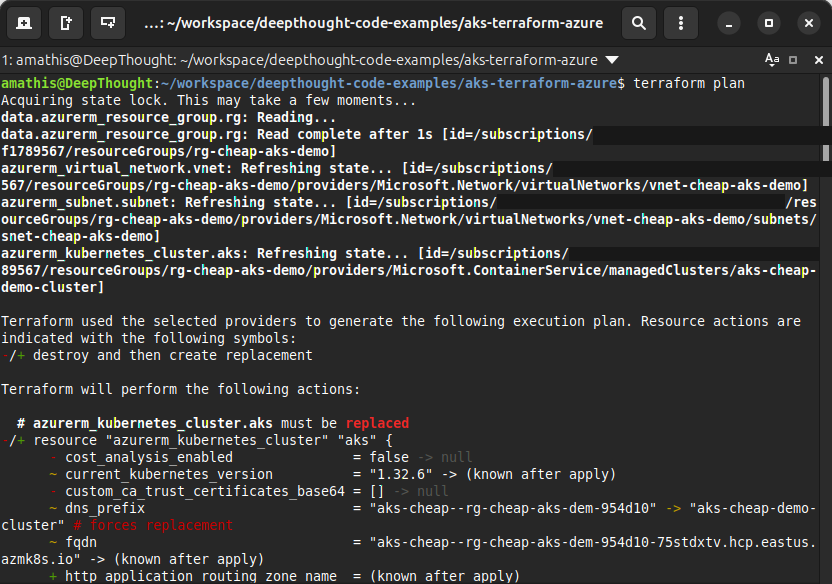
Don’t panic. This is necessary. This is the price of bringing order to chaos.
When you first created this cluster with the Azure CLI, you were fast and loose. You didn’t specify every last detail, so Azure made some choices for you, a default vm_size, a default os_disk_type. But our Terraform code… our code is scripture. It’s explicit. It demands a Standard_DS2_v2 virtual machine and it will accept no substitutes.
Terraform sees the mismatch between our righteous configuration and the lazy defaults of the existing resource. You can’t just hot-swap the engine on a running machine. The only way for Terraform to enforce your glorious, specific vision is to tear down the old node pool and forge a new one in its place.
Pulling the Trigger
You’ve seen the plan. You understand the blood sacrifice required. There’s nothing left to do but give the final order. Run the apply.
terraform applyThe terminal will show you the same grim battle plan and ask for your final consent. This is the point of no return. Type yes, hit Enter, and watch the matrix unfold. The machine is now reaching its ethereal tendrils into the cloud and bending the infrastructure to your will.
A Little NGINX for the Soul
So you’ve built this magnificent, terrifying engine. It’s sitting there in the digital ether, humming with raw power, hungry for something to do. A cluster without a workload is just a monument to your electric bill. It’s time to feed the beast.
First, you need the secret handshake. The keys to the kingdom. This command jacks your pathetic little terminal directly into the cluster’s brain stem.
# This command doesn't output much, but it's pure magic.
az aks get-credentials \
  --resource-group rg-cheap-aks-demo \
  --name aks-cheap-demo-cluster
NGINX Deployment Manifest (nginx-deploy.yaml)
This isn’t just code. This is a spell. A sacred text you feed to the machine, telling it what to build. You’re demanding one perfect copy of an NGINX web server, a ghost in the machine ready to do your bidding.
apiVersion: apps/v1
kind: Deployment
metadata:
  name: nginx-demo
spec:
  replicas: 1
  selector:
    matchLabels:
      app: nginx-demo
  template:
    metadata:
      labels:
        app: nginx-demo
    spec:
      containers:
      - name: nginx
        image: nginx:stable
        ports:
        - containerPort: 80
A Prayer to the Load Balancer Gods (nginx-svc.yaml)
Your NGINX container is trapped in the cluster’s private hell, unable to see the light of the public internet. This next piece is you, on your knees, begging the Azure gods for a wire to the outside world. A LoadBalancer service is a request for a public IP address—a single, shining beacon on the public shore.
apiVersion: v1
kind: Service
metadata:
  name: nginx-lb
spec:
  type: LoadBalancer
  ports:
  - port: 80
    targetPort: 80
  selector:
    app: nginx-demo
Light the Fuse & Run
Time’s up. No more planning. Feed the manifests into the machine and then hold your breath. You’ll stare at the terminal, waiting for the cloud to grant your wish.
kubectl apply -f nginx-deploy.yaml
kubectl apply -f nginx-svc.yaml

# Stare into the abyss until it gives you an IP address...
kubectl get svc nginx-lb --watch
When that EXTERNAL-IP appears, you’ve done it. You’ve punched a hole through the firewall. Take that IP, slap it into a browser, and witness your creation.
Network Policies (Calico)
By default, all pods in a cluster can communicate with each other. Network Policies act as a firewall for your pods, allowing you to define exactly which pods can talk to each other. To enable this, you must choose a network plugin that supports it, like Calico, during cluster creation.
- Azure CLI: Add the -
-network-policy calicoflag to your az aks create command. - Terraform: Set the
network_policyproperty within thenetwork_profileblock to “calico”.
The Bill Comes Due: Cost & Cleanup
There’s no such thing as a free lunch, especially not in the cloud. Sooner or later, the bean counters come looking for their pound of flesh.
Branding the Cattle
Tagging isn’t for fun. It’s so you can pin the blame. You’re putting a hot iron brand on every digital resource so when the bill is ten times what the suits expected, you can prove it was your genius experiment and not their failed marketing campaign.
# Tag the resource group with standard tags
az group update -n rg-cheap-aks-demo --tags env=tutorial owner=yourname
Estimate Spend
Curious what this madness is costing you? Here’s how you can get a peek at the terrifying reality of your burn rate. This is a bad acid trip through your credit card statement.
# This example checks usage for July 2025
az consumption usage list \
  --start-date 2025-07-01 --end-date 2025-07-31 \
  --query "[?contains(meterDetails.meterName,'B1s')].pretaxCost" \
  --output table
Tear Down
The party’s over. Time to burn the evidence. terraform destroy is the big red button, the self-destruct sequence. It turns your glorious creation back into the digital dust from whence it came.
terraform destroyFor anything left behind, any untracked evidence, you go back to the source. The Azure CLI will finish the job, leaving no witnesses.
az group delete --name rg-cheap-aks-demo --yes --no-waitConclusion & Next Steps
So there you have it. You staggered through the digital desert, fueled by coffee and desperation, and you built something. You stared into the abyss of Infrastructure as Code and it stared back. You created a monster of YAML and HCL, and for now, it obeys you.
But this isn’t the end. This was just the buy-in. You’ve tasted it now, haven’t you? The raw, terrifying power. And you want more. This isn’t the end; it’s the beginning of your cloud-native journey. The foundation you’ve built can now be expanded upon.
What’s Next?
- Scale Your Workloads: Why stop here? Add new node pools with monstrous GPUs and enough RAM to simulate God.
- Automate Everything: Hook this whole nightmare up to a Git repo. A fever dream of automation where every git push unleashes fresh hell on your cluster.
- Harden Security: Chain your creation to the corporate directory. Let the suits think they’re in control with their passwords and their multi-factor authentication.
Further Reading
To continue your journey, consult the official best practices and documentation from Azure and HashiCorp.
-
AKS Best Practices: https://aka.ms/aks/best-practices
-
Azure Cost Management: https://aka.ms/azure-cost-management
You’ve built the car. Now you have to drive it. Buy the ticket, take the ride. And good luck. You’re going to need it.

Aaron Mathis
Systems administrator and software engineer specializing in cloud development, AI/ML, and modern web technologies. Passionate about building scalable solutions and sharing knowledge with the developer community.
Related Articles
Discover more insights on similar topics