Infrastructure as Code in Azure: Security Hardening and Configuration With Ansible
Part 2 of our Infrastructure as Code in Azure series, where we establish security baselines and harden Azure infrastructure by integrating Terraform provisioning with Ansible-driven configuration management.

Continuing our Infrastructure as Code in Azure series, this article bridges the gap between infrastructure provisioning and application configuration by introducing Ansible for automated management. In Part 1, we launched a single VM in Azure using Terraform. Now, we’ll build on that foundation by using Ansible to harden security and configure the VM for production workloads.
Ansible is a powerful, agentless automation tool that uses SSH to execute tasks across systems. Unlike Terraform, which focuses on resource provisioning, Ansible excels at configuration management, application deployment, and orchestration. Its YAML-based playbooks are easy to read and write, making automation accessible to both developers and operations teams.
In this tutorial, you’ll learn how to:
- Combine Terraform and Ansible for a streamlined automation workflow
- Develop reusable Ansible roles to standardize configuration and security
- Automate VM setup including hardening SSH, configuring firewalls, and more
- Generate dynamic inventories that reflect your current infrastructure state
- Build deployment pipelines that integrate provisioning and configuration steps
This practical guide demonstrates how infrastructure provisioning and configuration management can work together for efficient, reliable deployments. By the end, you’ll have an automated pipeline capable of launching and configuring a secure, production-ready VM in Azure with a single command.
Prerequisites and Current State
This tutorial continues from Part 1: Infrastructure as Code in Azure – Introduction to Terraform. To proceed, ensure you have completed Part 1 and provisioned your Azure VM using Terraform. The security hardening and configuration steps in this guide assume your VM, networking, and cloud-init setup match the previous tutorial.
Completing Part 1 is essential, as the Ansible automation here depends on the infrastructure state and SSH key configuration established earlier. This ensures seamless integration between Terraform provisioning and Ansible-driven configuration management.
Install Ansible
First, we must install the required packages for Ansible:
# On Ubuntu/Debian:
sudo apt update
sudo apt install ansible

# On RHEL/CentOS/Fedora:
sudo dnf install ansible
# or on older systems:
sudo yum install ansible

# On macOS:
brew install ansible

# Alternative: Install via pip (works on any OS with Python):
pip install ansible
Also install required system packages:
# On Ubuntu/Debian:
sudo apt install jq ssh-client

# On RHEL/CentOS/Fedora:
sudo dnf install jq openssh-clients

# On macOS:
brew install jq
# (ssh is already included)
Ansible Collections
Ansible collections are distribution formats for packaging and distributing Ansible content including playbooks, roles, modules, and plugins. They extend Ansible’s core functionality by providing specialized modules for specific platforms and services.
# Install community.general collection (often useful)
ansible-galaxy collection install community.general
Project Structure
Before diving into Ansible configuration, we need to restructure our project to accommodate both Terraform and Ansible components. This organization follows DevOps best practices by separating infrastructure provisioning from configuration management while maintaining clear relationships between components.
Understanding how Ansible organizes automation content is crucial for building maintainable configurations. Ansible uses several key concepts:
- Roles: Reusable units of automation that group related tasks, variables, and files
- Playbooks: YAML files that define which roles to apply to which hosts
- Inventory: Files that define the hosts and groups that Ansible will manage
Our project structure separates these concerns while enabling seamless integration between Terraform’s infrastructure provisioning and Ansible’s configuration management.
Begin by creating a provisioning directory at the root of your project. Move all existing Terraform files into this folder to organize your infrastructure code. Next, create a configuration-management directory alongside provisioning to house your Ansible configuration and roles.
# Create provisioning directory
mkdir provisioning/

# Move all files (except .gitignore) into provisioning
mkdir provisioning && mv *.tf .env *.tfstate *.tfvars *.hcl .terraform provisioning

# Create configuration-management directory
mkdir configuration-management/
Your final project structure should look like this:
infrastructure-in-azure/
├── Makefile                           # Automation workflow integrating Terraform and Ansible
├── provisioning/
|	├── .env		                  # Environment variables for Azure authentication
|	├── .gitignore	                  # Git ignore file for Terraform state and secrets
|	├── budgets.tf                    # Resource definition for budget guardrails
|	├── main.tf                       # Primary resource definitions (VM, networking, etc.)
|	├── outputs.tf                    # Output value definitions for Ansible integration
|	└── variables.tf                  # Input variable declarations
└── configuration-management/
    ├── ansible.cfg                    # Ansible configuration file with SSH settings and output formatting
    ├── deploy.sh                      # Main deployment script that orchestrates the entire process
    ├── requirements.yml               # Ansible Galaxy collections and dependencies
    ├── site.yml                       # Main Ansible playbook that orchestrates all roles
    ├── group_vars/                    # Group-level variables for different host types
    │   ├── all.yml                    # Variables that apply to all hosts
    │   └── azure_vms.yml             # Variables specific to Azure virtual machines
    ├── inventory/
    │   └── hosts.yml                  # Dynamic inventory file with VM connection details
    └── roles/                         # Directory containing all Ansible roles for security hardening
        ├── system-hardening/          # Role for OS security hardening and updates
        │   └── tasks/
        │       └── main.yml           # System security configurations and package management
        ├── firewall/                  # Role for UFW firewall configuration
        │   ├── tasks/
        │   │   └── main.yml           # Firewall rules and network security setup
        │   └── handlers/
        │       └── main.yml           # Service restart handlers for firewall changes
        ├── ssh-hardening/             # Role for SSH security hardening
        │   ├── tasks/
        │   │   └── main.yml           # SSH daemon configuration and security settings
        │   └── handlers/
        │       └── main.yml           # SSH service restart handlers
        ├── fail2ban/                  # Role for intrusion prevention system
        │   ├── tasks/
        │   │   └── main.yml           # Fail2ban installation and configuration
        │   ├── handlers/
        │   │   └── main.yml           # Fail2ban service management handlers
        │   └── templates/
        │       └── jail.local.j2      # Fail2ban configuration template
        ├── time-sync/                 # Role for network time synchronization
        │   ├── tasks/
        │   │   └── main.yml           # Chrony installation and time sync configuration
        │   ├── handlers/
        │   │   └── main.yml           # Chrony service restart handlers
        │   └── templates/
        │       └── chrony.conf.j2     # Chrony configuration template
        ├── azure-monitor/             # Role for Azure monitoring and system metrics
        │   ├── tasks/
        │   │   └── main.yml           # Monitoring tools installation and configuration
        │   └── handlers/
        │       └── main.yml           # Monitoring service handlers
        └── cron-jobs/                 # Role for automated maintenance tasks
            └── tasks/
                └── main.yml           # System backup, log rotation, and monitoring cron jobs
Configuring Ansible for Azure VM Management
Ansible’s configuration file (ansible.cfg) defines how Ansible connects to and manages our Azure VM. Since we’re working with cloud infrastructure that can be destroyed and recreated, we need specific configuration settings that handle the dynamic nature of cloud VMs and streamline the connection process.
The configuration settings we’ll implement address several key requirements for our Azure VM automation:
- Cloud-friendly SSH settings that handle VMs being destroyed and recreated with new SSH host keys
- Authentication configuration that works seamlessly with our cloud-init user setup from Part 1
- Privilege escalation to run security hardening tasks that require root access
- Performance optimizations for reliable execution over internet connections to Azure
These settings ensure Ansible can consistently connect to our Azure VM and execute our security hardening playbook, even when the VM is destroyed and recreated during testing and development.
Create the Ansible configuration file configuration-management/ansible.cfg:
[defaults]
host_key_checking = False
inventory = inventory/hosts.yml
remote_user = azureuser
private_key_file = ~/.ssh/id_rsa
timeout = 30
interpreter_python = /usr/bin/python3
gathering = smart
fact_caching = memory
fact_caching_timeout = 86400

[ssh_connection]
ssh_args = -o ControlMaster=auto -o ControlPersist=60s -o StrictHostKeyChecking=no -o PubkeyAcceptedKeyTypes=+ssh-rsa
pipelining = True
control_path_dir = /tmp/.ansible-cp

[inventory]
enable_plugins = host_list, script, auto, yaml, ini, toml

[privilege_escalation]
become = True
become_method = sudo
become_user = root
become_ask_pass = False
Let’s break down these configuration settings:
[defaults] Section:
host_key_checking = False: Disables SSH host key verification, essential for cloud VMs that get new SSH keys when recreatedinventory = inventory/hosts.yml: Specifies the default inventory file location where our VM details are storedremote_user = azureuser: Sets the default SSH user that matches our cloud-init configuration from Part 1private_key_file = ~/.ssh/id_rsa: Points to the SSH private key file we generated in Part 1gathering = smart: Optimizes fact gathering by caching system information to improve performancefact_caching = memory: Stores gathered facts in memory for the duration of the playbook run
[ssh_connection] Section:
ssh_args: Configures SSH connection optimization with persistent connections and bypasses host key checking for cloud environmentspipelining = True: Reduces the number of SSH operations by sending multiple commands in one connection, improving performance over internet connectionscontrol_path_dir = /tmp/.ansible-cp: Specifies where SSH control sockets are stored for connection reuse
[privilege_escalation] Section:
become = True: Automatically escalates privileges using sudo for security hardening tasks that require root accessbecome_method = sudo: Specifies sudo as the privilege escalation methodbecome_ask_pass = False: Assumes passwordless sudo is configured (which our cloud-init setup from Part 1 provides)
Dynamic Inventory Generation
Unlike static environments where server details rarely change, cloud infrastructure is inherently dynamic. IP addresses, hostnames, and even the number of VMs can change with each deployment. Static inventory files become a maintenance burden and source of errors in such environments.
Dynamic inventory generation solves this challenge by programmatically extracting current infrastructure state from Terraform and converting it into Ansible-compatible inventory format. This ensures Ansible always has accurate, up-to-date information about the infrastructure it needs to manage.
Our deployment script automatically generates the inventory file by extracting the VM’s public IP address from Terraform’s output and writing it to the inventory file. This approach eliminates manual inventory management and reduces deployment errors.
Create the deployment script configuration-management/deploy.sh:
#!/bin/bash
# Ansible deployment script for Azure VM configuration
set -e

# Color codes for output
RED='\033[0;31m'
GREEN='\033[0;32m'
YELLOW='\033[1;33m'
NC='\033[0m' # No Color

# Configuration
SCRIPT_DIR="$(cd "$(dirname "${BASH_SOURCE[0]}")" &> /dev/null && pwd)"
TERRAFORM_DIR="../provisioning"
ANSIBLE_DIR="."

# Function to print colored output
print_status() {
    echo -e "${GREEN}[INFO]${NC} $1"
}

print_warning() {
    echo -e "${YELLOW}[WARN]${NC} $1"
}

print_error() {
    echo -e "${RED}[ERROR]${NC} $1"
}

# Check if Ansible is installed
check_ansible() {
    if ! command -v ansible &> /dev/null; then
        print_error "Ansible is not installed. Please install Ansible 11.x"
        exit 1
    fi

    ANSIBLE_VERSION=$(ansible --version | head -n1 | awk '{print $3}')
    print_status "Found Ansible version: $ANSIBLE_VERSION"
}

# Install Ansible collections
install_collections() {
    print_status "Installing required Ansible collections..."
    ansible-galaxy collection install -r requirements.yml --force
}

# Get VM IP from Terraform output and write inventory file
get_vm_ip() {
    if [ -f "$TERRAFORM_DIR/terraform.tfstate" ]; then
        VM_IP=$(cd "$TERRAFORM_DIR" && terraform output -raw public_ip_address 2>/dev/null || echo "")
        if [ -n "$VM_IP" ]; then
            print_status "Found VM IP from Terraform: $VM_IP"
            print_status "Writing dynamic inventory file..."

            # Write the inventory file dynamically
            cat > inventory/hosts.yml << EOF
all:
  children:
    azure_vms:
      hosts:
        demo-vm:
          ansible_host: $VM_IP
          ansible_user: azureuser
          ansible_ssh_private_key_file: ~/.ssh/id_rsa
          ansible_python_interpreter: /usr/bin/python3
      vars:
        ansible_ssh_common_args: '-o StrictHostKeyChecking=no'
        environment_name: "{{ env | default('dev') }}"
        vm_size: Standard_B1s
        location: eastus
EOF
            print_status "Inventory file updated with VM IP: $VM_IP"
        else
            print_warning "Could not get VM IP from Terraform output"
            print_warning "Please manually update inventory/hosts.yml with the correct IP"
        fi
    else
        print_warning "Terraform state file not found"
        print_warning "Please manually update inventory/hosts.yml with the VM IP"
    fi
}

# Test connectivity to VM
test_connectivity() {
    print_status "Testing connectivity to VM..."
    if ansible all -m ping -i inventory/hosts.yml &> /dev/null; then
        print_status "Successfully connected to VM"
    else
        print_error "Cannot connect to VM. Please check:"
        echo "  1. VM IP address in inventory/hosts.yml"
        echo "  2. SSH key permissions"
        echo "  3. Network security group rules"
        echo "  4. VM is running"
        exit 1
    fi
}

# Run Ansible playbook
deploy_configuration() {
    print_status "Starting Ansible deployment..."

    # Run the playbook with verbose output
    ansible-playbook -i inventory/hosts.yml site.yml \
        --ssh-extra-args='-o StrictHostKeyChecking=no' \
        -v

    if [ $? -eq 0 ]; then
        print_status "Deployment completed successfully!"
        print_status "Your secure VM is now configured and ready for use!"
    else
        print_error "Deployment failed!"
        exit 1
    fi
}

# Main execution
main() {
    print_status "Starting Azure VM configuration deployment..."

    cd "$SCRIPT_DIR"

    check_ansible
    install_collections
    get_vm_ip
    test_connectivity
    deploy_configuration

    print_status "Deployment script completed!"
}

# Run main function
main "$@"
Make sure the file is executable:
chmod +x deploy.shThis deployment script demonstrates several important DevOps automation patterns:
Error Handling and Validation:
- Uses
set -eto exit immediately on any command failure - Implements comprehensive pre-flight checks for Ansible installation and connectivity
- Provides clear, colored output to help users understand deployment progress and issues
Dynamic Infrastructure Management:
- Extracts VM IP address directly from Terraform state using
terraform output - Automatically generates inventory files, eliminating manual configuration
- Gracefully handles missing Terraform state with appropriate warnings
Modular Execution Flow:
- Separates concerns into discrete functions (connectivity testing, collection installation, etc.)
- Enables easy debugging and maintenance of individual deployment steps
- Provides a clear execution flow that matches typical deployment workflows
Create the Ansible collections requirements file configuration-management/requirements.yml:
---
# Ansible Galaxy requirements for Azure VM configuration
collections:
  - name: community.general
    version: ">=7.0.0"
  - name: ansible.posix
    version: ">=1.5.0"
This requirements file ensures we have access to extended Ansible modules for system administration and POSIX-specific operations that our hardening roles will need.
Group Variables
Group variables in Ansible provide a powerful way to define configuration values that apply to groups of hosts or all hosts in your inventory. They follow a hierarchical precedence model where more specific variables override general ones, enabling flexible configuration management across different environments and host types.
Variables defined in group_vars/all.yml apply to every host in your inventory, while variables in group_vars/azure_vms.yml apply only to hosts in the azure_vms group. This separation allows for environment-specific customization while maintaining consistent base configurations.
Create the global variables file configuration-management/group_vars/all.yml:
# Common variables for all hosts
ssh_allowed_users: ["azureuser"]
ssh_port: 22
fail2ban_maxretry: 3
fail2ban_bantime: 3600
fail2ban_findtime: 600

# System configuration
timezone: "UTC"
ntp_servers:
  - 0.pool.ntp.org
  - 1.pool.ntp.org
  - 2.pool.ntp.org
  - 3.pool.ntp.org

# Cron configuration
backup_schedule: "0 2 * * *"  # Daily at 2 AM
log_rotation_schedule: "0 3 * * *"  # Daily at 3 AM

# Azure Monitor configuration
azure_monitor_enabled: true

# Common Azure VM settings, moved from azure_vms.yml
firewall_rules:
  - port: "{{ ssh_port | default(22) }}"
    proto: tcp
    rule: allow
    src: "{{ allowed_ssh_cidr | default('any') }}"

disable_ipv6: true
kernel_parameters:
  - { name: net.ipv4.ip_forward, value: 0 }
  - { name: net.ipv4.conf.all.send_redirects, value: 0 }
  - { name: net.ipv4.conf.default.send_redirects, value: 0 }
These global variables establish security baselines and operational standards:
Security Configuration:
ssh_allowed_users: Restricts SSH access to specific user accounts, implementing the principle of least privilegefail2ban_*variables: Configure intrusion prevention thresholds (3 failed attempts, 1-hour ban, 10-minute detection window)
System Standards:
timezone: Standardizes time zone across all systems for consistent logging and schedulingntp_servers: Defines reliable time synchronization sources for accurate system clocks
Operational Automation:
backup_scheduleandlog_rotation_schedule: Establish automated maintenance windows during low-usage hoursazure_monitor_enabled: Controls whether monitoring components are installed and configured
Network Security:
firewall_rules: Defines specific firewall rules for Azure VMs, allowing SSH access while maintaining securitydisable_ipv6: Disables IPv6 to reduce attack surface in environments that don’t require it
Kernel Hardening:
net.ipv4.ip_forward: Disables IP forwarding to prevent the VM from being used as a routersend_redirectsparameters: Prevent ICMP redirect attacks by disabling redirect message transmission
The inventory file structure ties everything together. The deployment script automatically generates configuration-management/inventory/hosts.yml with the current VM IP address, but here’s the structure it creates:
all:
  children:
    azure_vms:
      hosts:
        demo-vm:
          ansible_host: <VM_IP_FROM_TERRAFORM>
          ansible_user: azureuser
          ansible_ssh_private_key_file: ~/.ssh/id_rsa
          ansible_python_interpreter: /usr/bin/python3
      vars:
        ansible_ssh_common_args: '-o StrictHostKeyChecking=no'
        environment_name: "{{ env | default('dev') }}"
        vm_size: Standard_B1s
        location: eastus
This inventory structure demonstrates YAML-based inventory format:
- Hierarchical organization: Groups hosts logically (azure_vms) while maintaining flexibility for expansion
- Host-specific variables: Individual connection parameters for each VM, with the IP address automatically populated from Terraform output
- Group-level variables: Connection and environment settings that apply to all Azure VMs
The <VM_IP_FROM_TERRAFORM> placeholder gets replaced with the actual public IP address when the deployment script runs, ensuring the inventory always reflects the current infrastructure state.
Building Reusable Ansible Roles
Ansible roles provide a structured way to organize automation tasks, variables, files, and templates into reusable components. Each role focuses on a specific aspect of system configuration, making playbooks more maintainable and enabling code reuse across different environments and projects.
Our security hardening approach implements defense-in-depth through multiple specialized roles. Each role addresses specific attack vectors and compliance requirements, working together to create a comprehensive security posture.
System Hardening Role
The system-hardening role establishes the foundation for a secure system by implementing operating system-level security controls, automated patch management, and basic system monitoring.
Create configuration-management/roles/system-hardening/tasks/main.yml:
---
- name: Update all packages
  ansible.builtin.apt:
    upgrade: dist
    update_cache: true
    autoremove: true
    autoclean: true
  register: update_result
  retries: 3
  delay: 10

- name: Install essential security packages
  ansible.builtin.apt:
    name:
      - unattended-upgrades
      - apt-listchanges
      - update-notifier-common
      - curl
      - wget
      - vim
      - htop
      - ufw
      - rsyslog
      - logrotate
    state: present

- name: Configure automatic security updates
  ansible.builtin.copy:
    dest: /etc/apt/apt.conf.d/20auto-upgrades
    content: |
      APT::Periodic::Update-Package-Lists "1";
      APT::Periodic::Unattended-Upgrade "1";
      APT::Periodic::AutocleanInterval "7";
    mode: '0644'
    backup: true

- name: Configure unattended upgrades
  ansible.builtin.copy:
    dest: /etc/apt/apt.conf.d/50unattended-upgrades
    content: |
      Unattended-Upgrade::Allowed-Origins {
          "${distro_id}:${distro_codename}";
          "${distro_id}:${distro_codename}-security";
          "${distro_id}:${distro_codename}-updates";
      };
      Unattended-Upgrade::AutoFixInterruptedDpkg "true";
      Unattended-Upgrade::MinimalSteps "true";
      Unattended-Upgrade::Remove-Unused-Dependencies "true";
      Unattended-Upgrade::Automatic-Reboot "false";
    mode: '0644'
    backup: true

- name: Set kernel parameters for security
  ansible.posix.sysctl:
    name: "{{ item.name }}"
    value: "{{ item.value }}"
    state: present
    sysctl_set: true
    reload: true
  loop: "{{ kernel_parameters }}"
  when: kernel_parameters is defined

- name: Disable IPv6 if configured
  ansible.posix.sysctl:
    name: "{{ item }}"
    value: 1
    state: present
    sysctl_set: true
    reload: true
  loop:
    - net.ipv6.conf.all.disable_ipv6
    - net.ipv6.conf.default.disable_ipv6
    - net.ipv6.conf.lo.disable_ipv6
  when: disable_ipv6 | default(false)

- name: Remove unnecessary packages
  ansible.builtin.apt:
    name:
      - telnet
      - rsh-client
      - rsh-redone-client
    state: absent
    autoremove: true

- name: Ensure rsyslog is running
  ansible.builtin.systemd:
    name: rsyslog
    state: started
    enabled: true

- name: Configure log rotation
  ansible.builtin.copy:
    dest: /etc/logrotate.d/custom
    content: |
      /var/log/*.log {
          daily
          missingok
          rotate 52
          compress
          delaycompress
          notifempty
          create 0644 root root
      }
    mode: '0644'
This role implements several critical security measures:
Automated Patch Management:
- Configures unattended-upgrades to automatically apply security patches
- Enables daily package list updates and weekly cleanup of package cache
- Implements retry logic for package updates to handle temporary network issues
Kernel Security Hardening:
- Applies sysctl parameters from group variables to harden network stack
- Optionally disables IPv6 to reduce attack surface when not needed
- Configures network parameters to prevent IP forwarding and redirect attacks
Attack Surface Reduction:
- Removes legacy remote access tools (telnet, rsh) that transmit credentials in clear text
- Installs only essential security tools and system monitoring utilities
- Configures comprehensive log rotation to prevent disk space exhaustion
Firewall Role
The firewall role implements network-level security using Ubuntu’s Uncomplicated Firewall (UFW). It follows a default-deny approach, explicitly allowing only necessary network traffic while logging denied connections for security monitoring.
Create configuration-management/roles/firewall/tasks/main.yml:
---
- name: Reset UFW to defaults
  community.general.ufw:
    state: reset
  notify: Restart ufw

- name: Set UFW default policies
  community.general.ufw:
    direction: "{{ item.direction }}"
    policy: "{{ item.policy }}"
  loop:
    - { direction: 'incoming', policy: 'deny' }
    - { direction: 'outgoing', policy: 'allow' }
    - { direction: 'routed', policy: 'deny' }

- name: Configure UFW rules
  community.general.ufw:
    rule: "{{ item.rule }}"
    port: "{{ item.port }}"
    proto: "{{ item.proto }}"
    src: "{{ item.src | default(omit) }}"
    comment: "{{ item.comment | default(omit) }}"
  loop: "{{ firewall_rules }}"
  notify: Restart ufw

- name: Enable UFW logging
  community.general.ufw:
    logging: 'on'

- name: Enable UFW
  community.general.ufw:
    state: enabled

- name: Ensure UFW is enabled and running
  ansible.builtin.systemd:
    name: ufw
    state: started
    enabled: true
Create the corresponding handler file configuration-management/roles/firewall/handlers/main.yml:
---
- name: Restart ufw
  ansible.builtin.systemd:
    name: ufw
    state: restarted

- name: Reload ufw
  ansible.builtin.command: ufw --force reload
  changed_when: true
The firewall role implements defense-in-depth network security:
Default-Deny Security Model:
- Denies all incoming traffic by default, requiring explicit rules for allowed services
- Allows outgoing traffic to support system updates and normal operations
- Denies routed traffic to prevent the VM from being used as a gateway
Flexible Rule Management:
- Uses group variables to define firewall rules, enabling environment-specific configurations
- Supports source IP restrictions for enhanced security
- Enables comprehensive logging for security monitoring and incident response
Handler-Based Service Management:
- Uses Ansible handlers to restart UFW only when configuration changes occur
- Ensures firewall service starts automatically on system boot
SSH Hardening Role
SSH hardening is critical for cloud VMs since SSH is often the primary remote access method. This role implements SSH security best practices to prevent brute force attacks, disable weak authentication methods, and enable comprehensive logging.
Create configuration-management/roles/ssh-hardening/tasks/main.yml:
---
- name: Backup original SSH config
  ansible.builtin.copy:
    src: /etc/ssh/sshd_config
    dest: /etc/ssh/sshd_config.backup
    remote_src: true
    force: false
    mode: '0600'

- name: Configure SSH hardening
  ansible.builtin.lineinfile:
    path: /etc/ssh/sshd_config
    regexp: "{{ item.regexp }}"
    line: "{{ item.line }}"
    backup: true
  loop:
    - { regexp: '^#?PermitRootLogin ', line: 'PermitRootLogin no' }
    - { regexp: '^#?PasswordAuthentication ', line: 'PasswordAuthentication no' }
    - { regexp: '^#?PubkeyAuthentication ', line: 'PubkeyAuthentication yes' }
    - { regexp: '^#?AuthorizedKeysFile ', line: 'AuthorizedKeysFile .ssh/authorized_keys' }
    - { regexp: '^#?PermitEmptyPasswords ', line: 'PermitEmptyPasswords no' }
    - { regexp: '^#?ChallengeResponseAuthentication ', line: 'ChallengeResponseAuthentication no' }
    - { regexp: '^#?UsePAM ', line: 'UsePAM yes' }
    - { regexp: '^#?X11Forwarding ', line: 'X11Forwarding no' }
    - { regexp: '^#?PrintMotd ', line: 'PrintMotd no' }
    - { regexp: '^#?TCPKeepAlive ', line: 'TCPKeepAlive yes' }
    - { regexp: '^#?ClientAliveInterval ', line: 'ClientAliveInterval 300' }
    - { regexp: '^#?ClientAliveCountMax ', line: 'ClientAliveCountMax 2' }
    - { regexp: '^#?MaxAuthTries ', line: 'MaxAuthTries 3' }
    - { regexp: '^#?MaxSessions ', line: 'MaxSessions 2' }
    - { regexp: '^#?Protocol ', line: 'Protocol 2' }
    - { regexp: '^#?LogLevel ', line: 'LogLevel VERBOSE' }
  notify: Restart ssh

- name: Configure allowed users
  ansible.builtin.lineinfile:
    path: /etc/ssh/sshd_config
    regexp: '^#?AllowUsers '
    line: 'AllowUsers {{ ssh_allowed_users | join(" ") }}'
    backup: true
  when: ssh_allowed_users is defined
  notify: Restart ssh

- name: Configure strong ciphers and MACs
  ansible.builtin.blockinfile:
    path: /etc/ssh/sshd_config
    block: |
      # Strong Ciphers and MACs
      Ciphers [email protected],[email protected],[email protected],aes256-ctr,aes192-ctr,aes128-ctr
      MACs [email protected],[email protected],hmac-sha2-256,hmac-sha2-512
      KexAlgorithms [email protected],diffie-hellman-group16-sha512,diffie-hellman-group18-sha512,diffie-hellman-group14-sha256
    marker: "# {mark} ANSIBLE MANAGED BLOCK - SSH CRYPTO"
    backup: true
  notify: Restart ssh

- name: Validate SSH configuration
  ansible.builtin.command: sshd -t
  changed_when: false

- name: Ensure SSH service is enabled
  ansible.builtin.systemd:
    name: ssh
    enabled: true
Create the SSH handler file configuration-management/roles/ssh-hardening/handlers/main.yml:
---
- name: Restart ssh
  ansible.builtin.systemd:
    name: ssh
    state: restarted
This SSH hardening role implements comprehensive SSH security:
Authentication Security:
- Disables root login and password authentication, enforcing key-based authentication
- Restricts SSH access to specific user accounts defined in group variables
- Limits authentication attempts and concurrent sessions to prevent brute force attacks
Cryptographic Hardening:
- Configures strong encryption ciphers and message authentication codes (MACs)
- Uses modern key exchange algorithms that provide forward secrecy
- Disables weak cryptographic options that could be exploited
Session Management:
- Configures client alive intervals to terminate idle sessions
- Enables verbose logging for security auditing
- Validates SSH configuration before applying changes to prevent lockouts
Fail2ban Role
Fail2ban provides automated intrusion prevention by monitoring log files for malicious activity and temporarily banning IP addresses that exceed failure thresholds. This role is particularly important for Internet-facing VMs that attract automated attacks.
Create configuration-management/roles/fail2ban/tasks/main.yml:
---
- name: Install fail2ban
  ansible.builtin.apt:
    name: fail2ban
    state: present

- name: Create fail2ban local configuration
  ansible.builtin.template:
    src: jail.local.j2
    dest: /etc/fail2ban/jail.local
    backup: true
    mode: '0644'
  notify: Restart fail2ban

- name: Create SSH jail configuration
  ansible.builtin.copy:
    dest: /etc/fail2ban/jail.d/ssh.conf
    content: |
      [sshd]
      enabled = true
      port = 22
      filter = sshd
      logpath = /var/log/auth.log
      maxretry = {{ fail2ban_maxretry }}
      bantime = {{ fail2ban_bantime }}
      findtime = {{ fail2ban_findtime }}
    mode: '0644'
    backup: true
  notify: Restart fail2ban

- name: Start and enable fail2ban
  ansible.builtin.systemd:
    name: fail2ban
    state: started
    enabled: true
Create the fail2ban handler configuration-management/roles/fail2ban/handlers/main.yml:
---
- name: Restart fail2ban
  ansible.builtin.systemd:
    name: fail2ban
    state: restarted

- name: Reload fail2ban
  ansible.builtin.systemd:
    name: fail2ban
    state: reloaded
Create the fail2ban configuration template configuration-management/roles/fail2ban/templates/jail.local.j2:
[DEFAULT]
# Ban hosts for one hour:
bantime = {{ fail2ban_bantime }}

# Override /etc/fail2ban/jail.d/00-firewalld.conf:
banaction = ufw

# A host is banned if it has generated "maxretry" during the last "findtime"
# seconds.
findtime = {{ fail2ban_findtime }}

# "maxretry" is the number of failures before a host get banned.
maxretry = {{ fail2ban_maxretry }}

# Destination email address used solely for the interpolations in
# jail.{conf,local,d/*} configuration files.
destemail = root@localhost

# Sender email address used solely for some actions
sender = root@localhost

# Email action configuration
action = %(action_mw)s

[sshd]
enabled = true
port = 22
filter = sshd
logpath = /var/log/auth.log
maxretry = {{ fail2ban_maxretry }}
bantime = {{ fail2ban_bantime }}
findtime = {{ fail2ban_findtime }}
The fail2ban role provides adaptive security through automated threat response:
Intelligent Threat Detection:
- Monitors authentication logs for failed SSH login attempts
- Uses configurable thresholds to balance security with usability
- Integrates with UFW firewall for immediate IP address blocking
Template-Based Configuration:
- Uses Jinja2 templates to generate configuration files from group variables
- Enables environment-specific tuning of detection and ban parameters
- Supports easy extension to monitor additional services
Time Synchronization Role
Accurate time synchronization is critical for security logging, authentication protocols, and distributed system coordination. This role configures chrony for reliable NTP synchronization with multiple time sources.
Create configuration-management/roles/time-sync/tasks/main.yml:
---
- name: Install chrony
  ansible.builtin.apt:
    name: chrony
    state: present
    update_cache: true

- name: Configure chrony
  ansible.builtin.template:
    src: chrony.conf.j2
    dest: /etc/chrony/chrony.conf
    backup: true
    mode: '0644'
  notify: Restart chrony

- name: Start and enable chrony service
  ansible.builtin.systemd:
    name: chrony
    state: started
    enabled: true

- name: Wait for chrony to start
  ansible.builtin.wait_for:
    timeout: 10
  delegate_to: localhost

- name: Force time synchronization
  ansible.builtin.command: chronyc makestep
  changed_when: true
  failed_when: false

- name: Check chrony sources
  ansible.builtin.command: chronyc sources -v
  register: chrony_sources
  changed_when: false

- name: Display chrony sources
  ansible.builtin.debug:
    var: chrony_sources.stdout_lines
  when: chrony_sources is defined
Create the chrony handler configuration-management/roles/time-sync/handlers/main.yml:
---
- name: Restart chrony
  ansible.builtin.systemd:
    name: chrony
    state: restarted
Create the chrony configuration template configuration-management/roles/time-sync/templates/chrony.conf.j2:
# Use public servers from the pool.ntp.org project.
{% for server in ntp_servers %}
pool {{ server }} iburst
{% endfor %}

# Record the rate at which the system clock gains/losses time.
driftfile /var/lib/chrony/drift

# Allow the system clock to be stepped in the first three updates
# if its offset is larger than 1 second.
makestep 1.0 3

# Enable kernel synchronization of the real-time clock (RTC).
rtcsync

# Enable hardware timestamping on all interfaces that support it.
#hwtimestamp *

# Increase the minimum number of selectable sources required to adjust
# the system clock.
#minsources 2

# Allow NTP client access from local network.
#allow 192.168.0.0/16

# Serve time even if not synchronized to a time source.
#local stratum 10

# Specify file containing keys for NTP authentication.
keyfile /etc/chrony/chrony.keys

# Specify directory for log files.
logdir /var/log/chrony

# Select which information is logged.
#log measurements statistics tracking
The time synchronization role ensures accurate system clocks:
Reliable Time Sources:
- Configures multiple NTP pool servers for redundancy
- Uses the
iburstoption for faster initial synchronization - Implements drift compensation for improved long-term accuracy
Template-Driven Configuration:
- Uses Jinja2 loops to iterate over NTP servers from group variables
- Enables easy customization of time sources for different environments
- Includes comprehensive logging and monitoring configuration
Azure Monitor Role
The azure-monitor role sets up system monitoring and prepares for integration with Azure’s monitoring services. While full Azure Monitor integration requires workspace credentials, this role provides comprehensive local monitoring capabilities.
Create configuration-management/roles/azure-monitor/tasks/main.yml:
---
- name: Add Microsoft GPG key
  ansible.builtin.apt_key:
    url: https://packages.microsoft.com/keys/microsoft.asc
    state: present
  when: azure_monitor_enabled | default(false)

- name: Add Microsoft Azure CLI repository
  ansible.builtin.apt_repository:
    repo: "deb [arch=amd64] https://packages.microsoft.com/repos/azure-cli/ {{ ansible_distribution_release }} main"
    state: present
    update_cache: true
  when: azure_monitor_enabled | default(false)

- name: Install Azure Monitor Agent (alternative method)
  ansible.builtin.apt:
    name:
      - azure-cli
    state: present
    update_cache: true
  when: azure_monitor_enabled | default(false)

- name: Download Azure Monitor Agent installer script
  ansible.builtin.get_url:
    url: "https://raw.githubusercontent.com/microsoft/OMS-Agent-for-Linux/master/installer/scripts/onboard_agent.sh"
    dest: /tmp/onboard_agent.sh
    mode: '0755'
  when: azure_monitor_enabled | default(false)
  failed_when: false

- name: Install Azure Monitor Agent via script (if available)
  ansible.builtin.command: /tmp/onboard_agent.sh -w YOUR_WORKSPACE_ID -s YOUR_SHARED_KEY
  when:
    - azure_monitor_enabled | default(false)
    - false  # Disabled until workspace credentials are provided
  failed_when: false
  changed_when: false

- name: Install basic monitoring tools instead
  ansible.builtin.apt:
    name:
      - sysstat
      - iotop
      - nethogs
      - ncdu
      - htop
      - nmon
    state: present

- name: Configure sysstat
  ansible.builtin.lineinfile:
    path: /etc/default/sysstat
    regexp: '^ENABLED='
    line: 'ENABLED="true"'
    backup: true
  notify: Restart sysstat

- name: Start and enable sysstat
  ansible.builtin.systemd:
    name: sysstat
    state: started
    enabled: true

- name: Create basic monitoring script
  ansible.builtin.copy:
    dest: /usr/local/bin/system-monitor.sh
    content: |
      #!/bin/bash
      # Basic system monitoring script
      echo "=== System Monitor Report ==="
      echo "Date: $(date)"
      echo "Uptime: $(uptime)"
      echo "Load Average: $(cat /proc/loadavg)"
      echo "Memory Usage:"
      free -h
      echo "Disk Usage:"
      df -h
      echo "Top 5 CPU processes:"
      ps aux --sort=-%cpu | head -6
      echo "Top 5 Memory processes:"
      ps aux --sort=-%mem | head -6
    mode: '0755'

- name: Schedule basic monitoring
  ansible.builtin.cron:
    name: "system monitor"
    minute: "*/15"
    job: "/usr/local/bin/system-monitor.sh >> /var/log/system-monitor.log 2>&1"

- name: Clean up downloaded files
  ansible.builtin.file:
    path: "{{ item }}"
    state: absent
  loop:
    - /tmp/azuremonitoragent.deb
    - /tmp/onboard_agent.sh
Create the monitoring handler configuration-management/roles/azure-monitor/handlers/main.yml:
---
- name: Restart sysstat
  ansible.builtin.service:
    name: sysstat
    state: restarted
    enabled: true
The azure-monitor role provides comprehensive system monitoring:
Azure Integration Preparation:
- Installs Azure CLI for potential cloud service integration
- Downloads Azure Monitor Agent installer for future use
- Configures conditional installation based on workspace credentials
Local Monitoring Capabilities:
- Installs essential system monitoring tools (sysstat, htop, iotop, etc.)
- Creates custom monitoring scripts for regular system health checks
- Schedules automated monitoring reports every 15 minutes
Cron Jobs Role
The cron-jobs role implements automated maintenance tasks essential for production systems, including system backups, log rotation, and proactive monitoring.
Create configuration-management/roles/cron-jobs/tasks/main.yml:
---
- name: Install necessary packages for cron
  ansible.builtin.package:
    name:
      - cron
      - logrotate
    state: present

- name: Ensure cron service is running
  ansible.builtin.systemd:
    name: cron
    state: started
    enabled: true

- name: Create backup directory
  ansible.builtin.file:
    path: /var/backups/system
    state: directory
    owner: root
    group: root
    mode: '0755'

- name: Create backup scripts directory
  ansible.builtin.file:
    path: /opt/scripts
    state: directory
    owner: root
    group: root
    mode: '0755'

- name: Create system backup script
  ansible.builtin.copy:
    dest: /opt/scripts/system_backup.sh
    content: |
      #!/bin/bash
      # System backup script
      set -e

      BACKUP_DIR="/var/backups/system"
      DATE=$(date +%Y%m%d_%H%M%S)
      BACKUP_FILE="system_backup_${DATE}.tar.gz"

      # Create backup
      tar -czf "${BACKUP_DIR}/${BACKUP_FILE}" \
          --exclude='/proc' \
          --exclude='/tmp' \
          --exclude='/sys' \
          --exclude='/dev' \
          --exclude='/var/backups' \
          --exclude='/var/cache' \
          --exclude='/var/tmp' \
          /etc \
          /home/{{ ansible_user }}/.ssh \
          /var/log 2>/dev/null || true

      # Keep only last 7 days of backups
      find "${BACKUP_DIR}" -name "system_backup_*.tar.gz" -mtime +7 -delete

      # Log backup completion
      echo "$(date): System backup completed - ${BACKUP_FILE}" >> /var/log/backup.log
    mode: '0755'

- name: Create log rotation script
  ansible.builtin.copy:
    dest: /opt/scripts/log_rotation.sh
    content: |
      #!/bin/bash
      # Log rotation script
      set -e

      # Rotate application logs
      find /var/log -name "*.log" -size +100M -exec gzip {} \;
      find /var/log -name "*.gz" -mtime +30 -delete

      # Clean old journal logs
      journalctl --vacuum-time=30d

      # Log rotation completion
      echo "$(date): Log rotation completed" >> /var/log/maintenance.log
    mode: '0755'

- name: Create system monitoring script
  ansible.builtin.copy:
    dest: /opt/scripts/system_monitor.sh
    content: |
      #!/bin/bash
      # System monitoring script
      set -e

      LOG_FILE="/var/log/system_monitor.log"

      # Check disk usage
      DISK_USAGE=$(df / | tail -1 | awk '{print $5}' | sed 's/%//')
      if [ "$DISK_USAGE" -gt 85 ]; then
          echo "$(date): WARNING - Disk usage is ${DISK_USAGE}%" >> "$LOG_FILE"
      fi

      # Check memory usage
      MEM_USAGE=$(free | grep Mem | awk '{printf("%.0f", $3/$2 * 100.0)}')
      if [ "$MEM_USAGE" -gt 90 ]; then
          echo "$(date): WARNING - Memory usage is ${MEM_USAGE}%" >> "$LOG_FILE"
      fi

      # Log system status
      echo "$(date): System check completed - Disk: ${DISK_USAGE}%, Memory: ${MEM_USAGE}%" >> "$LOG_FILE"
    mode: '0755'

- name: Set up log rotation for system logs
  ansible.builtin.cron:
    name: "logrotate system logs"
    minute: "0"
    hour: "0"
    job: "/usr/sbin/logrotate /etc/logrotate.conf"
    user: root

- name: Clean temporary files daily
  ansible.builtin.cron:
    name: "clean temp files"
    minute: "30"
    hour: "3"
    job: "find /tmp -type f -atime +7 -delete && find /var/tmp -type f -atime +30 -delete"
    user: root

- name: Update package cache weekly
  ansible.builtin.cron:
    name: "update package cache"
    minute: "0"
    hour: "2"
    weekday: "0"
    job: "apt-get update"
    user: root

- name: Security updates check
  ansible.builtin.cron:
    name: "security updates check"
    minute: "0"
    hour: "6"
    job: "apt list --upgradable 2>/dev/null | grep -i security > /var/log/security-updates.log"
    user: root

- name: Disk usage monitoring
  ansible.builtin.cron:
    name: "disk usage alert"
    minute: "*/30"
    job: "df -h | awk '$5 > 80 {print $0}' | mail -s 'Disk Usage Alert' root@localhost"
    user: root

- name: System backup (if enabled)
  ansible.builtin.cron:
    name: "system backup"
    minute: "0"
    hour: "1"
    job: "/opt/scripts/system_backup.sh"
    user: root
  when: enable_system_backup | default(false)

- name: System monitoring cron job
  ansible.builtin.cron:
    name: "system monitoring"
    minute: "*/15"
    job: "/opt/scripts/system_monitor.sh"
    user: root

- name: Log rotation cron job
  ansible.builtin.cron:
    name: "log rotation"
    minute: "0"
    hour: "2"
    job: "/opt/scripts/log_rotation.sh"
    user: root

- name: Create log files with proper permissions
  ansible.builtin.file:
    path: "{{ item }}"
    state: touch
    owner: root
    group: root
    mode: '0644'
  loop:
    - /var/log/backup.log
    - /var/log/maintenance.log
    - /var/log/system_monitor.log
    - /var/log/updates.log
The cron-jobs role automates essential maintenance tasks:
Backup Automation:
- Creates compressed system backups including configuration files and user data
- Implements automatic cleanup to prevent disk space exhaustion
- Logs backup operations for monitoring and compliance
Log Management:
- Rotates large log files to prevent disk space issues
- Compresses old logs and removes outdated archives
- Manages systemd journal logs with vacuum operations
Proactive Monitoring:
- Monitors disk and memory usage with configurable thresholds
- Generates alerts when resource usage exceeds safe limits
- Schedules regular update checks to identify available security patches
Orchestrating the Deployment
The main Ansible playbook orchestrates all roles and defines the overall deployment workflow. Playbooks use YAML syntax to describe the desired state of systems and specify which roles should be applied to which host groups.
Create the main playbook configuration-management/site.yml:
---
- name: Configure Azure VM for Production Deployment
  hosts: azure_vms
  become: true
  gather_facts: true

  pre_tasks:
  - name: Wait for cloud-init to finish
    command: cloud-init status --wait
    changed_when: false
    failed_when: false        # skip on images without cloud-init

  - name: Wait for dpkg / apt locks to clear (max 10 min)
    shell: |
      lsof /var/lib/dpkg/lock-frontend /var/lib/apt/lists/lock || true
    register: lock_check
    retries: 20               # 20 × 30 s = 10 min
    delay: 30
    until: lock_check.stdout == ""
    changed_when: false

  - name: Update package cache
    ansible.builtin.apt:
      update_cache: yes
      cache_valid_time: 3600
    retries: 5                # extra safety in case a timer kicks in
    delay: 15
    register: apt_cache
    until: apt_cache is succeeded
    tags: [system, updates]

  roles:
    - role: system-hardening
      tags: [system, security, hardening]

    - role: firewall
      tags: [security, firewall]

    - role: ssh-hardening
      tags: [security, ssh]

    - role: fail2ban
      tags: [security, fail2ban]

    - role: time-sync
      tags: [system, time]

    - role: azure-monitor
      tags: [monitoring, azure]

    - role: cron-jobs
      tags: [system, cron, backup]

  post_tasks:
    - name: Verify all services are running
      ansible.builtin.service:
        name: "{{ item }}"
        state: started
        enabled: true
      loop:
        - fail2ban
        - chrony
      tags: [verification]

    - name: Display deployment summary
      ansible.builtin.debug:
        msg:
          - "Deployment completed successfully!"
          - "SSH Port: {{ ssh_port | default('22') }}"
      tags: [summary]
This playbook demonstrates several Ansible best practices:
Structured Execution Flow:
pre_tasksrun before roles to ensure the system is ready for configuration- Roles execute in dependency order (base hardening before service-specific security)
post_tasksverify successful deployment and provide status information
Tag-Based Execution:
- Each role and task includes relevant tags for selective execution
- Enables running specific security configurations without full deployment
- Supports maintenance workflows (e.g.,
ansible-playbook site.yml --tags=security)
Error Handling and Verification:
- Includes verification steps to ensure critical services are running
- Provides deployment summary with key configuration details
- Uses
gather_factsto collect system information for template rendering
Integration with Terraform
The integration between Terraform and Ansible is orchestrated through a comprehensive Makefile that provides a unified interface for infrastructure provisioning and configuration management. This approach follows DevOps best practices by creating a single entry point for complex multi-tool workflows.
Create a new file called Makefile in the infrastructure-in-azure project root:
# Makefile for Azure VM provisioning and configuration
# This integrates Terraform (infrastructure) with Ansible (configuration)
.PHONY: help plan apply destroy configure deploy clean status ssh validate logs
# Default variables
TERRAFORM_DIR := provisioning
ANSIBLE_DIR := configuration-management
# Use full path or shell expansion for SSH key
SSH_KEY := $(HOME)/.ssh/id_rsa
# Colors for output
GREEN := \033[0;32m
YELLOW := \033[1;33m
RED := \033[0;31m
NC := \033[0m # No Color
# Force bash usage for advanced features
SHELL := /bin/bash
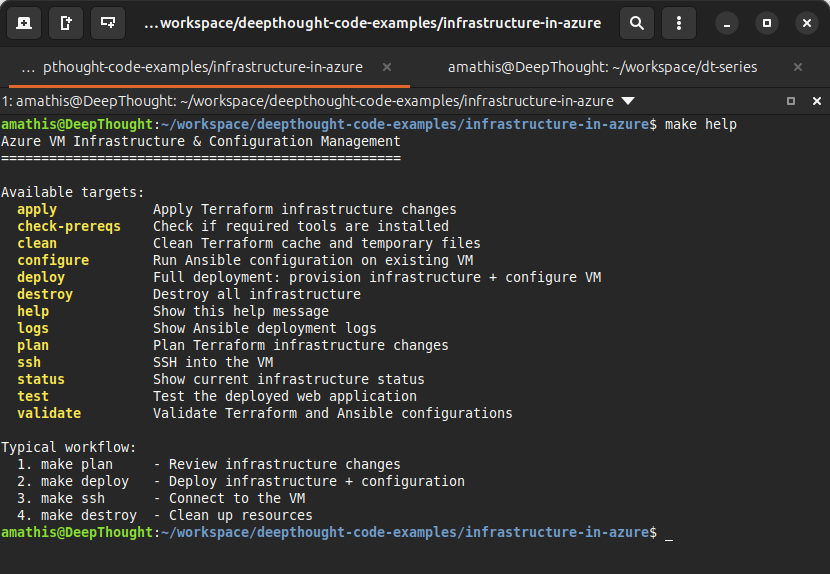
help: ## Show this help message
@echo "Azure VM Infrastructure & Configuration Management"
@echo "=================================================="
@echo ""
@echo "Available targets:"
@grep -E '^[a-zA-Z_-]+:.*?## .*$$' $(MAKEFILE_LIST) | sort | awk 'BEGIN {FS = ":.*?## "}; {printf " $(YELLOW)%-15s$(NC) %s\n", $$1, $$2}'
@echo ""
@echo "Typical workflow:"
@echo " 1. make plan - Review infrastructure changes"
@echo " 2. make deploy - Deploy infrastructure + configuration"
@echo " 3. make ssh - Connect to the VM"
@echo " 4. make destroy - Clean up resources"
check-prereqs: ## Check if required tools are installed
@echo -e "$(GREEN)Checking prerequisites...$(NC)"
@command -v terraform >/dev/null 2>&1 || { echo -e "$(RED)Error: terraform is not installed$(NC)" >&2; exit 1; }
@command -v ansible >/dev/null 2>&1 || { echo -e "$(RED)Error: ansible is not installed$(NC)" >&2; exit 1; }
@if [ -f "$(SSH_KEY)" ]; then \
echo -e "$(GREEN)✓ Found SSH key: $(SSH_KEY)$(NC)"; \
else \
echo -e "$(RED)Error: SSH key not found at $(SSH_KEY)$(NC)"; \
echo -e "$(YELLOW)Please ensure your SSH key exists at $(SSH_KEY)$(NC)"; \
exit 1; \
fi
@echo -e "$(GREEN)✓ All prerequisites satisfied$(NC)"
plan: check-prereqs ## Plan Terraform infrastructure changes
@echo -e "$(GREEN)Planning infrastructure changes...$(NC)"
cd $(TERRAFORM_DIR) && source .env && terraform init && terraform plan
@echo -e "$(GREEN)✓ Plan completed$(NC)"
apply: check-prereqs ## Apply Terraform infrastructure changes
@echo -e "$(GREEN)Applying infrastructure changes...$(NC)"
cd $(TERRAFORM_DIR) && source .env && terraform apply -auto-approve
@echo -e "$(GREEN)✓ Infrastructure deployed$(NC)"
configure: ## Run Ansible configuration on existing VM
@echo -e "$(GREEN)Configuring VM with Ansible...$(NC)"
cd $(ANSIBLE_DIR) && ./deploy.sh
@echo -e "$(GREEN)✓ VM configuration completed$(NC)"
deploy: plan apply configure ## Full deployment: provision infrastructure + configure VM
@echo -e "$(GREEN)Full deployment completed!$(NC)"
@echo ""
@echo -e "$(YELLOW)Deployment Summary:$(NC)"
@echo "=================="
@cd $(TERRAFORM_DIR) && echo "VM Name: $$(terraform output -raw vm_name)"
@cd $(TERRAFORM_DIR) && echo "Public IP: $$(terraform output -raw public_ip_address)"
@cd $(TERRAFORM_DIR) && echo "SSH Command: $$(terraform output -raw ssh_connection_command)"
@cd $(TERRAFORM_DIR) && echo "Web App: http://$$(terraform output -raw public_ip_address)"
@echo ""
@echo -e "$(GREEN)Your VM is ready for use!$(NC)"
status: ## Show current infrastructure status
@echo -e "$(GREEN)Infrastructure Status:$(NC)"
@echo "====================="
@if [ -f "$(TERRAFORM_DIR)/terraform.tfstate" ]; then \
cd $(TERRAFORM_DIR) && terraform show -json | jq -r '.values.root_module.resources[] | select(.type=="azurerm_linux_virtual_machine") | "VM Status: " + .values.name + " (" + .values.location + ")"' 2>/dev/null || echo "VM: Deployed"; \
echo "Public IP: $$(cd $(TERRAFORM_DIR) && terraform output -raw public_ip_address 2>/dev/null || echo 'Not available')"; \
echo "Resource Group: $$(cd $(TERRAFORM_DIR) && terraform output -raw resource_group_name 2>/dev/null || echo 'Not available')"; \
else \
echo -e "$(YELLOW)No infrastructure deployed$(NC)"; \
fi
ssh: ## SSH into the VM
@echo -e "$(GREEN)Connecting to VM...$(NC)"
@cd $(TERRAFORM_DIR) && $$(terraform output -raw ssh_connection_command 2>/dev/null) || { echo -e "$(RED)Cannot get SSH command. Is the VM deployed?$(NC)" >&2; exit 1; }
test: ## Test the deployed web application
@echo -e "$(GREEN)Testing web application...$(NC)"
@VM_IP=$$(cd $(TERRAFORM_DIR) && terraform output -raw public_ip_address 2>/dev/null) && \
if [ -n "$$VM_IP" ]; then \
echo "Testing HTTP connection to $$VM_IP..."; \
curl -v --connect-timeout 10 "http://$$VM_IP" || echo -e "$(YELLOW)Connection failed$(NC)"; \
else \
echo -e "$(RED)VM IP not available$(NC)"; \
fi
logs: ## Show Ansible deployment logs
@echo -e "$(GREEN)Recent deployment logs:$(NC)"
@if [ -f "$(ANSIBLE_DIR)/ansible.log" ]; then \
tail -50 "$(ANSIBLE_DIR)/ansible.log"; \
else \
echo -e "$(YELLOW)No deployment logs found$(NC)"; \
fi
clean: ## Clean Terraform cache and temporary files
@echo -e "$(GREEN)Cleaning temporary files...$(NC)"
rm -rf $(TERRAFORM_DIR)/.terraform
rm -f $(TERRAFORM_DIR)/.terraform.lock.hcl
rm -f $(TERRAFORM_DIR)/terraform.tfstate.backup
rm -f $(ANSIBLE_DIR)/ansible.log
@echo -e "$(GREEN)✓ Cleanup completed$(NC)"
validate: ## Validate Terraform and Ansible configurations
@echo -e "$(GREEN)Validating configurations...$(NC)"
cd $(TERRAFORM_DIR) && terraform fmt
cd $(TERRAFORM_DIR) && source .env && terraform init -backend=false
cd $(TERRAFORM_DIR) && source .env && terraform validate
cd $(ANSIBLE_DIR) && ansible-playbook --syntax-check site.yml -i inventory/hosts.yml
@echo -e "$(GREEN)✓ All configurations valid$(NC)"
destroy: ## Destroy all infrastructure
@echo -e "$(RED)WARNING: This will destroy all infrastructure!$(NC)"
@read -p "Are you sure? [y/N] " -n 1 -r; \
echo ""; \
if [[ $$REPLY =~ ^[Yy]$$ ]]; then \
echo -e "$(GREEN)Destroying infrastructure...$(NC)"; \
cd $(TERRAFORM_DIR) && source .env && terraform destroy -auto-approve; \
echo -e "$(GREEN)✓ Infrastructure destroyed$(NC)"; \
else \
echo -e "$(YELLOW)Destroy cancelled$(NC)"; \
fi
# Set default target
.DEFAULT_GOAL := help
This Makefile provides several key automation benefits:
Unified Workflow Management:
- Single entry point for complex multi-tool deployments
- Consistent command interface across development and production environments
- Built-in help system and colored output for improved user experience
Safety and Validation:
- Prerequisite checking ensures required tools and credentials are available
- Configuration validation prevents deployment of invalid configurations
- Interactive confirmation for destructive operations
Operational Efficiency:
- Combined
deploytarget orchestrates infrastructure provisioning and configuration - Status checking and log viewing for troubleshooting
- Cleanup targets for development environment management
Go ahead and test the makefile out by running make help to see usage information:
Testing and Validation
After deployment, it’s crucial to verify that all security hardening measures are functioning correctly. This testing approach validates both the technical implementation and the security posture of your hardened VM.
Connectivity Testing
First, test basic connectivity and verify the dynamic inventory generation:
# Test the deployment script
make deploy

# Verify connectivity using Ansible
cd configuration-management
ansible all -m ping -i inventory/hosts.yml

# Check SSH connectivity manually
ssh azureuser@<VM_IP> -i ~/.ssh/id_rsa
Security Validation
Verify that security hardening measures are active:
# SSH into the VM
make ssh

# Check firewall status
sudo ufw status

# Verify fail2ban is running
sudo systemctl status fail2ban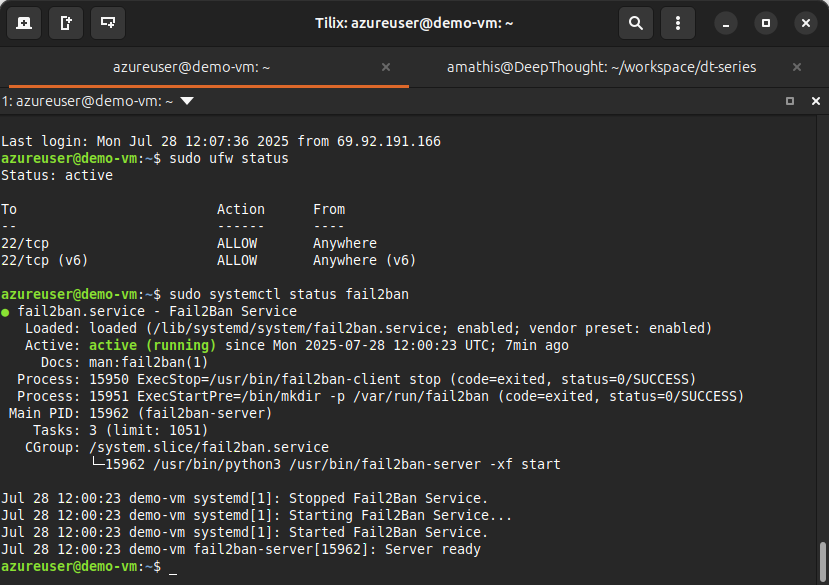
# Check SSH configuration
sudo sshd -T -f /etc/ssh/sshd_config | \
	grep -Ei '(permitrootlogin|passwordauthentication|maxauthtries|port)'

# Verify time synchronization
chronyc sources -v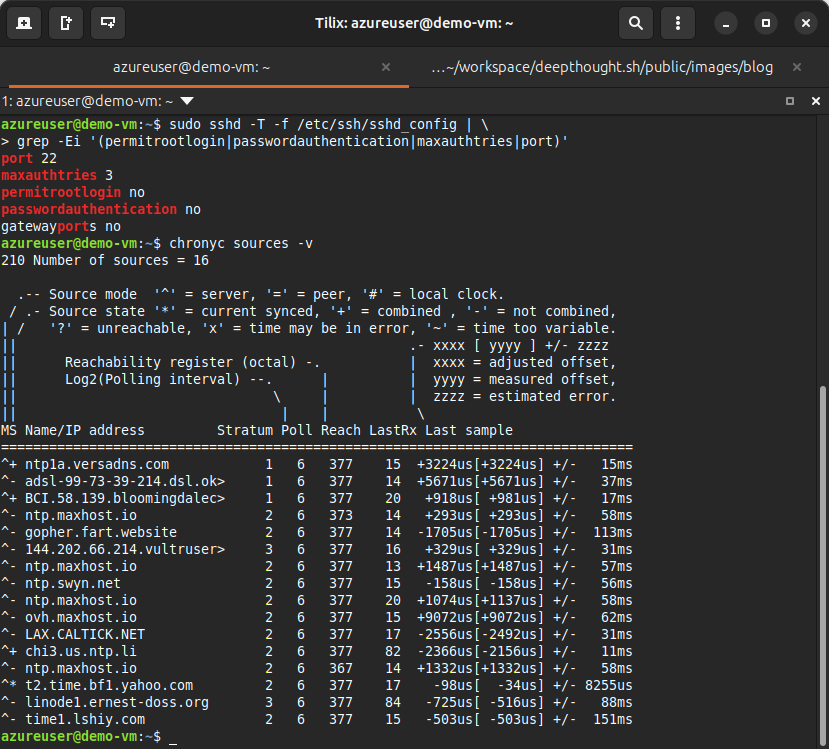
Service Monitoring
Verify that all monitoring and maintenance services are operational:
# Check cron jobs
sudo crontab -l

# Verify system monitoring logs
sudo tail -f /var/log/system_monitor.log

# Check backup operations
sudo ls -la /var/backups/system/
Tag-Based Testing
Use Ansible tags to test specific configuration areas (on your workstation):
# Test only security configurations
ansible-playbook -i inventory/hosts.yml site.yml --tags=security --check

# Verify monitoring setup
ansible-playbook -i inventory/hosts.yml site.yml --tags=monitoring --check

# Test firewall configuration
ansible-playbook -i inventory/hosts.yml site.yml --tags=firewall --check
Cleanup and Tear Down
When you’re finished with the tutorial or want to start fresh, proper cleanup prevents ongoing Azure charges and maintains a clean development environment.
Automated Cleanup
Use the Makefile for safe, interactive cleanup:
# Destroy infrastructure with confirmation
make destroy

# Clean temporary files and caches
make clean
Manual Cleanup
For more granular control over the cleanup process:
# Destroy infrastructure using Terraform directly
cd provisioning
source .env
terraform destroy

# Remove Ansible temporary files
cd ../configuration-management
rm -f ansible.log
rm -rf .ansible
Azure Resource Verification
Verify all resources are properly deleted:
# Check resource group contents
az resource list --resource-group <your-resource-group-name>

# Delete resource group if empty
az group delete --name <your-resource-group-name> --yes
Best Practices and Next Steps
Throughout this tutorial, we’ve built more than just a hardened Azure VM, we’ve created a foundation for enterprise-grade infrastructure automation that scales well beyond single-server deployments. The patterns and practices we’ve implemented here mirror those used by DevOps teams managing infrastructure at scale across major organizations.
The defense-in-depth security approach we’ve implemented demonstrates how multiple security layers work together to create a robust security posture. Rather than relying on a single security measure, we’ve combined firewall rules, SSH hardening, intrusion prevention, and automated monitoring to create overlapping security controls. This approach ensures that if one security layer is compromised, others remain in place to protect your infrastructure.
Our configuration management strategy using Ansible roles provides several key advantages that become even more valuable as your infrastructure grows. The idempotent operations we’ve built ensure that running the same playbook multiple times produces consistent results, making deployments predictable and safe. Version-controlling all our infrastructure and configuration code means every change is tracked, auditable, and reversible, critical requirements for production environments.
The operational excellence patterns we’ve established go beyond basic system administration. Automated backup and log rotation prevent the operational issues that can take down production systems, while proactive monitoring with configurable alerting thresholds helps you catch problems before they impact users. The comprehensive logging we’ve implemented supports both security auditing and troubleshooting, providing the visibility needed to maintain complex systems.
As you move toward production deployments, several scaling considerations become important. Multi-environment support requires separate variable files for development, staging, and production environments, along with environment-specific security policies and monitoring thresholds. Implementing automated testing pipelines for configuration changes ensures that infrastructure modifications are validated before reaching production systems.
For larger deployments, high availability becomes critical. This involves load balancer configuration for multi-VM deployments, database clustering and backup strategies, and comprehensive disaster recovery planning and testing. The role-based architecture we’ve built provides an excellent foundation for these more complex scenarios.
Compliance and governance requirements in enterprise environments can be addressed through automated compliance scanning and reporting, policy as code using tools like Open Policy Agent, and regular security assessments and penetration testing. The audit trails and documentation we’ve built into our Infrastructure as Code approach provide the foundation for meeting these requirements.
The skills and patterns you’ve learned in this tutorial transfer directly to larger, more complex deployments. The role-based architecture we’ve built can be extended to support additional services like web servers, databases, and application stacks. The group variable system provides the flexibility needed to manage multiple environments and host types while maintaining consistent base configurations across your infrastructure.
Conclusion
In this tutorial, we’ve successfully bridged the gap between infrastructure provisioning and application readiness by implementing comprehensive security hardening and configuration management using Ansible. Building on the foundation established in Part 1, we’ve created a production-ready virtual machine that implements security best practices and automated maintenance procedures.
The key accomplishments of this tutorial include:
Comprehensive Security Implementation:
- Multi-layered security approach including firewall configuration, SSH hardening, and intrusion prevention
- Automated security updates and patch management
- Network-level protection with intelligent threat detection and response
Automated Configuration Management:
- Dynamic inventory generation that adapts to changing infrastructure
- Reusable Ansible roles that can be applied across multiple environments
- Template-driven configuration that enables environment-specific customization
Operational Excellence:
- Automated backup and monitoring systems for proactive maintenance
- Comprehensive logging and alerting for security monitoring
- Integration workflows that combine infrastructure provisioning with application configuration
DevOps Integration:
- Unified automation workflows through Makefile orchestration
- Version-controlled infrastructure and configuration code
- Testing and validation procedures that ensure deployment reliability
This automation pipeline demonstrates real-world DevOps practices used by enterprise teams to manage cloud infrastructure at scale. The security hardening measures we’ve implemented provide a solid foundation for hosting production applications, while the automated maintenance procedures ensure long-term operational stability.
The skills and patterns learned in this tutorial directly transfer to larger, more complex deployments. The role-based architecture we’ve built can be extended to support additional services, while the group variable system provides flexibility for managing multiple environments and host types.
Further Learning Resources
To deepen your understanding of the tools and concepts covered in this tutorial, explore these comprehensive resources:
Ansible Mastery
- Official Ansible Documentation: Comprehensive guides covering all Ansible modules and best practices
- Ansible Galaxy: Community repository of roles and collections for extending Ansible functionality
- Red Hat Ansible Automation Platform: Enterprise-grade Ansible tools and training resources
Azure Cloud Platform
- Azure Documentation: Complete Azure service documentation and tutorials
- Azure Architecture Center: Cloud architecture patterns and best practices
- Azure Security Center: Cloud security monitoring and compliance guidance
Infrastructure as Code
- Terraform Documentation: Complete Terraform provider documentation and configuration syntax
- HashiCorp Learn: Interactive tutorials covering Terraform, Vault, and other HashiCorp tools
- Terraform Best Practices: Community-driven guide to Terraform best practices
DevOps and Security
- NIST Cybersecurity Framework: Comprehensive cybersecurity guidelines for organizations
- CIS Security Benchmarks: Industry-standard security configuration guidelines
- DevSecOps Foundation: Resources for integrating security into DevOps workflows
Stay Tuned for Part 3
In the next installment of our Infrastructure as Code in Azure series, we’ll take our automation to the next level by implementing GitHub Actions CI/CD pipelines for infrastructure deployment. You’ll learn how to:
Build Production-Ready CI/CD Pipelines:
- Configure GitHub Actions workflows for automated Terraform deployments
- Implement secure Azure authentication using OpenID Connect (OIDC)
- Create approval workflows with Terraform plan output review processes
Advanced DevOps Patterns:
- Multi-environment deployment strategies (dev, staging, production)
- Automated testing and validation of infrastructure changes
- Security scanning and compliance checking in CI/CD pipelines
GitOps Workflows:
- Pull request-based infrastructure changes with automated planning
- Environment promotion workflows and release management
- Rollback strategies and disaster recovery automation
Part 3 will demonstrate how to move from manual deployments to fully automated, enterprise-grade infrastructure workflows that scale to support multiple teams and environments. We’ll build on the solid foundation we’ve established with Terraform and Ansible to create a complete DevOps automation pipeline.

Aaron Mathis
Systems administrator and software engineer specializing in cloud development, AI/ML, and modern web technologies. Passionate about building scalable solutions and sharing knowledge with the developer community.
Related Articles
Discover more insights on similar topics