Infrastructure as Code in Azure: Setting Budgets, Guardrails, and Deploying Your First VM With Terraform
Part 1 of our Infrastructure as Code in Azure series, where we deploy a secure virtual machine to Azure using Terraform, establish cost guardrails, and lay the foundation for automated infrastructure management.

Welcome to our Infrastructure as Code (IaC) series focused on Microsoft Azure! Over the course of this multi-part series, we’ll build a complete end-to-end infrastructure automation workflow that mirrors real-world enterprise practices.
In this first installment, we’ll establish the foundation by deploying a secure virtual machine to Azure using Terraform. You’ll learn to set up proper authentication, configure cost guardrails to prevent unexpected bills, and deploy production-ready infrastructure with network security best practices.
Throughout this series…
…we’ll progressively build upon this foundation to create a sophisticated automation pipeline that includes:
- Part 1 (this article): Terraform basics, VM deployment, and cost management
- Part 2: Ansible configuration management for automated software installation and server hardening
- Part 3: GitHub Actions CI/CD pipelines for infrastructure deployment and testing
- Part 4: Advanced Terraform patterns including modules, remote state, and multi-environment management
By the end of this series, you’ll have hands-on experience with the same tools and techniques used by DevOps teams at scale, giving you practical skills that directly translate to professional environments. Whether you’re a systems administrator looking to modernize your infrastructure management or a developer wanting to understand the full application lifecycle, this series will provide you with actionable knowledge and real-world examples.
As always, you can find all the code examples and configuration files in our GitHub repository to follow along and experiment with the concepts we’ll explore.
Prerequisites
Before diving into this tutorial, you’ll need to complete several setup steps to ensure a smooth learning experience. We’ll sign up for an Azure account, install the Azure CLI, create a service principal for secure automation, set up a development resource group, and install Terraform for infrastructure management.
Creating Azure Account
Microsoft Azure offers a generous free tier that provides $200 in credits for your first 30 days, making it perfect for learning and experimentation. This free account includes access to over 25 services that remain free even after your trial period ends, ensuring you can continue practicing without unexpected charges.
To create your Azure account:
- Visit the Azure portal: Navigate to azure.microsoft.com/free in your web browser
- Click “Start free”: You’ll be redirected to the Microsoft account creation or sign-in page
- Provide account information: Use an existing Microsoft account or create a new one with your email address
- Verify your identity: Microsoft requires phone number verification for security purposes
- Add payment information: While required for verification, you won’t be charged during the free trial period
- Review and accept: Read through the terms and conditions, then complete your account setup
Once your account is created, you’ll have immediate access to the Azure portal and can begin exploring services. The $200 credit is automatically applied to your account and tracks usage across all billable services.
What is the Free-Tier?
Azure’s free tier is designed to help developers and IT professionals learn cloud computing without financial barriers. The free account includes three distinct categories of benefits:
- Free for 12 months: Popular services like Virtual Machines (750 hours of B1S Linux VMs), Storage (5 GB LRS file storage), and SQL Database (250 GB) are available at no cost for your first year.
- Always free: Core services including Azure Functions (1 million requests per month), Cosmos DB (1,000 request units per second), and Azure DevOps (up to 5 users) remain free indefinitely.
- $200 credit: Use this credit within your first 30 days to explore any Azure service, including premium offerings not covered by the free tiers. This credit is perfect for testing enterprise-grade services or running resource-intensive workloads during your learning phase.
The free tier provides an excellent sandbox environment for this tutorial series, allowing you to experiment with Infrastructure as Code concepts without financial risk.
Installing Azure CLI
The Azure Command-Line Interface (CLI) is a powerful cross-platform tool that allows you to manage Azure resources from your terminal or command prompt. Unlike the web-based Azure portal, the CLI enables automation, scripting, and integration with Infrastructure as Code tools like Terraform. It provides programmatic access to virtually every Azure service, making it an essential tool for DevOps practitioners and system administrators.
The Azure CLI is particularly valuable because it maintains consistent command syntax across different operating systems and can be easily incorporated into scripts, CI/CD pipelines, and automation workflows.
Linux
Installing Azure CLI in Linux is relatively simple, however there are some considerations. For example, the below ‘general use’ installer script requires Python <= 3.10 to work.
curl -L https://aka.ms/InstallAzureCli | bashIf you are using a Debian-based distro, including Ubuntu, you can use this script which utilizes the APT package manager:
curl -sL https://aka.ms/InstallAzureCLIDeb | sudo bashIf you are on a different distro and your version of Python is greater than 3.10, you can find distribution-specific instructions here
Windows
You have a few options to install Azure CLI in Windows. For this tutorial, we will use winget, the windows package manager:
winget install --exact --id Microsoft.AzureCLIMacOS (via Homebrew)
You can install the Azure CLI on macOS by updating your brew repository information, and then running the install command:
brew update && brew install azure-cliSource: Installation instructions retrieved from learn.microsoft.com - How to install the Azure CLI
Verify Installation
You can verify that Azure CLI installed correctly by running the command below:
az versionYou should get output similiar to:
amathis@DeepThought:~$ az version
{
  "azure-cli": "2.75.0",
  "azure-cli-core": "2.75.0",
  "azure-cli-telemetry": "1.1.0",
  "extensions": {}
}
amathis@DeepThought:~$
Azure Account Authentication
Azure CLI uses interactive logins or service principals. If you are experienced with Amazon Web Services, service principals are similiar to IAM Users.
When you first create your Azure account, there won’t be service principals created for you, so you will need to initially login using your azure identity via Interactive login.
az loginYou can confirm this by running:
az ad sp list --show-mineThe
show-mineflag prevents the above command from returning built-in service principals.
Creating Resource Groups
An Azure Resource Group is a logical container that holds related Azure resources for an application or project. Think of it as a folder that organizes and manages the lifecycle of all components in your infrastructure. Resource groups provide several critical benefits:
- Unified Management: All resources in a group can be deployed, updated, and deleted together as a single unit, simplifying lifecycle management and reducing the risk of orphaned resources.
- Access Control: You can apply role-based access control (RBAC) and policies at the resource group level, ensuring consistent security and governance across all contained resources.
- Cost Tracking: Azure automatically aggregates billing and usage metrics by resource group, making it easier to track costs for specific projects or environments.
- Geographic Organization: Resources in a group share the same Azure region (though this isn’t strictly required), which helps optimize performance and comply with data residency requirements.
Creating resource groups before deploying infrastructure is considered a fundamental best practice in Azure, as it provides the organizational foundation for all subsequent resource management activities.
Create a resource group for this tutorial:
az group create --name deepthoughtTerraformRG --location eastusYou should see output similiar to:
amathis@DeepThought:~$ az group create --name deepthoughtTerraformRG --location eastus
{
  "id": "/subscriptions/XXXXXXXX-XXXX-XXXX-XXXX-XXXXXXXXXXXX/resourceGroups/deepthoughtTerraformRG",
  "location": "eastus",
  "managedBy": null,
  "name": "deepthoughtTerraformRG",
  "properties": {
    "provisioningState": "Succeeded"
  },
  "tags": null,
  "type": "Microsoft.Resources/resourceGroups"
}
amathis@DeepThought:~$
I have replaced the subscription id with X’s, but you can copy your subscription ID here.
Creating Service Principals
Service principals are Azure’s equivalent to service accounts in traditional IT environments, they represent applications or automated processes rather than human users. Creating service principals with limited permissions is a security best practice that follows the principle of least privilege, ensuring your automation tools have only the permissions they need to function.
Unlike interactive user accounts, service principals are designed for programmatic access and don’t require multi-factor authentication or interactive login prompts. This makes them ideal for CI/CD pipelines, automation scripts, and Infrastructure as Code tools like Terraform. By scoping service principal permissions to specific resource groups or resources, you minimize the potential impact of credential compromise and maintain better control over your cloud environment.
For production environments, you should create separate service principals for different environments (development, staging, production) and different purposes (deployment, monitoring, backup), each with appropriately scoped permissions.
Now, we can create a service principal with limited permissions for the purpose of this tutorial.
Start by getting your subscription ID. You should have been able to copy it from the output of creating your resource group, but if you no longer have it you can get it by running:
az account show --query id --output tsvThis should output just the subscription ID:
amathis@DeepThought:~$ az account show --query id --output tsv
XXXXXXXX-XXXX-XXXX-XXXX-XXXXXXXXXXXX
amathis@DeepThought:~$
Now, copy that subscription ID and run the following command (replacing the subscription ID of course):
az ad sp create-for-rbac \
  --name terraform-sp \
  --role "Contributor" \
  --scopes "/subscriptions/XXXXXXXX-XXXX-XXXX-XXXX-XXXXXXXXXXXX"
You should see output similiar to:
amathis@DeepThought:~$ az ad sp create-for-rbac   --name terraform-sp   --role "Contributor"   --scopes "/subscriptions/XXXXXXXX-XXXX-XXXX-XXXX-XXXXXXXXXXXX/resourceGroups/deepthoughtTerraformRG"
Found an existing application instance: (id) 17d5da33-c764-462e-9632-92b902ed6994. We will patch it.
Creating 'Contributor' role assignment under scope '/subscriptions/XXXXXXXX-XXXX-XXXX-XXXX-XXXXXXXXXXXX/resourceGroups/deepthoughtTerraformRG'
The output includes credentials that you must protect. Be sure that you do not include these credentials in your code or check the credentials into your source control. For more information, see https://aka.ms/azadsp-cli
{
	"appId": "XXXXXXXX-XXXX-XXXX-XXXX-XXXXXXXXXXXX",
	"displayName": "terraform-sp",
	"password": "XXXXXXXXXXXXXXXXXXXXXXXXXXXXXXXXXXXXXX",
	"tenant": "XXXXXXXX-XXXX-XXXX-XXXX-XXXXXXXXXXXX"
}
amathis@DeepThought:~$
Note If you get an error that ‘Resource xxxx does not exist’ and you are positive you didn’t mistype your subscription ID or resource name, it is simply because the resource group has not propagated yet. Wait 1-2 minutes and try the command again.
Copy the appId, displayName, password, and tenant and save it somewhere secure for now. We will need it momentarily.
Installing Terraform
We’ll install Terraform using HashiCorp’s official APT repository, which ensures you receive authentic, up-to-date packages with proper GPG verification.
The below instructions assume you are using a debian-based distro of Linux. For other installation methods you can check out Hashicorps official documentation
Step 1: Prepare Your System
Install required packages for repository management and GPG verification:
sudo apt-get update && sudo apt-get install -y gnupg software-properties-commonStep 2: Add HashiCorp’s GPG Key
Download and install HashiCorp’s GPG signing key:
wget -O- https://apt.releases.hashicorp.com/gpg | \
gpg --dearmor | \
sudo tee /usr/share/keyrings/hashicorp-archive-keyring.gpg > /dev/null
Step 3: Verify GPG Key Integrity
Confirm the GPG key fingerprint matches HashiCorp’s official key:
gpg --no-default-keyring \
--keyring /usr/share/keyrings/hashicorp-archive-keyring.gpg \
--fingerprint
The command should display output similar to this:
/usr/share/keyrings/hashicorp-archive-keyring.gpg
-------------------------------------------------
pub   rsa4096 XXXX-XX-XX [SC]
AAAA AAAA AAAA AAAA
uid         [ unknown] HashiCorp Security (HashiCorp Package Signing) <[email protected]>
sub   rsa4096 XXXX-XX-XX [E]
Step 4: Add HashiCorp Repository
Configure your system to use HashiCorp’s official APT repository:
# Add HashiCorp repository
echo "deb [arch=$(dpkg --print-architecture) \
signed-by=/usr/share/keyrings/hashicorp-archive-keyring.gpg] \
https://apt.releases.hashicorp.com \
$(grep -oP '(?<=UBUNTU_CODENAME=).*' /etc/os-release || lsb_release -cs) \
main" | sudo tee /etc/apt/sources.list.d/hashicorp.list
Step 5: Install Terraform
Update your package index and install Terraform:
sudo apt updateInstall Terraform:
sudo apt-get install terraformVerify Installation and Configure Shell
Test that Terraform is properly installed by checking available commands:
terraform -helpFor detailed help on any specific command, use the -help flag:
terraform plan -helpEnable tab completion for improved productivity:
terraform -install-autocompleteSource: Installation steps adapted from the official Terraform documentation by HashiCorp.
Understanding Terraform Fundamentals
Before diving into configuration, let’s establish a solid understanding of Terraform’s core concepts and workflow.
What is Terraform?
Terraform is an Infrastructure as Code (IaC) tool that allows you to define and provision infrastructure using HashiCorp Configuration Language (HCL), a declarative configuration language. Unlike imperative approaches where you specify the exact steps to achieve a desired state, Terraform’s declarative model lets you describe your target infrastructure, and Terraform determines the optimal way to create, update, or destroy resources to match that state.
The Terraform Workflow
Terraform follows a predictable three-phase workflow:
- Write: Define your infrastructure in
.tfconfiguration files using HCL - Plan: Preview the changes Terraform will make to reach your desired state
- Apply: Execute the planned changes to provision or modify your infrastructure
State Management
A crucial concept in Terraform is state management. Terraform maintains a state file that tracks the current state of your managed infrastructure. This state file enables Terraform to:
- Map your configuration to real-world resources
- Determine what changes are needed when you modify your configuration
- Improve performance by caching resource attributes
- Enable collaboration when stored remotely
This approach provides consistency, reproducibility, and version control for your infrastructure, making it easier to manage complex environments and collaborate with teams.
Project Setup and Structure
Let’s organize our project with a clean directory structure that follows Terraform best practices.
Create Project Directory
Create a dedicated directory for your Terraform project:
mkdir -p infrastructure-in-azure/
cd infrastructure-in-azure
Then, create the files we will need:
touch .env main.tf variables.tf outputs.tf budgets.tfDefine Environment Variables
You will need to use your favorite text editor to add environment variables to .env. You will be using the appId, displayName, password, and tenant you saved from earlier when we created a service principal.
Modify .env, replacing everything in < > with your actual values:
# .env
export ARM_SUBSCRIPTION_ID=<subscriptionID>
export ARM_CLIENT_ID=<appId>
export ARM_CLIENT_SECRET=<password>
export ARM_TENANT_ID=<tenant>
Now, make sure to add .env to your .gitignore file. Environment files should never be pushed to a repository.
echo ".env" >> .gitignoreUsing Environment Files
When you declare environment variables in a file, it is important to note that you must make your current shell session aware of these variables. Unlike exporting variables inside .bashrc, which gets executed every time a shell session is initiated, these variables are not persistant and will only be set as long as you have the shell open.
Whenever you want to run any terraform commands, you will need to run the source command first:
source .envUnfortunately, powershell lacks this capability, but you can create a powershell script that does the same thing. Create a new file in your project root load-env.ps1:
# load-env.ps1
Get-Content .env | ForEach-Object {
    if ($_ -match "^\s*([^#][^=]*)=(.*)$") {
        $name = $matches[1].Trim()
        $value = $matches[2].Trim()
        [System.Environment]::SetEnvironmentVariable($name, $value, "Process")
    }
}
Now, when you want to run terraform commands in powershell, simply execute your script first:
.\load-env.ps1Final Project Structure
When complete, your project will have this organized structure:
infrastructure-in-azure/
├── .env		      # Environment variables
├── .gitignore	      # GitIgnore file
├── budgets.tf        # Resource Definition for Budgets
├── main.tf           # Primary resource definitions
├── outputs.tf        # Output value definitions
└── variables.tf      # Input variable declarations
This structure separates concerns and makes the configuration more maintainable and readable.
Create Github Repository
For this tutorial series, you will need to have a Github account and create a repository. For instructions on how to do this, check out the Quickstart for repositories in the official Github documentation making sure to create the repository without a README or LICENSE file.
Now, open a terminal and navigate to your project directory. Then, run the following commands:
# Create a README file
echo "# infrastructure-in-azure" >> README.md

# Initialize the project root directory as a git repository
git init

# Add all files to the staging area
git add .

# Commit the initial changes
git commit -m "first commit"

# Create a new branch
git branch -M main

# Add a remote repository, changing the URL to match your account/repo name
git remote add origin https://github.com/<username>/<reponame>.git

# Push the branch to the remote repository
git push -u origin mainNote: If you do not have git installed on your workstation, you will need to install it. See the official documentation for instructions.
Configuring the Azure Provider
Understanding Providers
In Terraform, a provider is a plugin that enables Terraform to interact with APIs of external services, cloud platforms, or infrastructure tools. Providers act as translators, converting Terraform’s generic resource operations into service-specific API calls.
For our tutorial series, we’ll use the official hashicorp/azurerm provider, which allows Terraform to manage Azure resources.
Provider Authentication
Terraform’s AzureRM provider picks up credentials in this order (highest → lowest priority):
- Environment variables (
AZURE_CLIENT_ID,AZURE_CLIENT_SECRET,AZURE_TENANT_ID, etc.) - Managed Identity (if running in Azure)
- Azure CLI login (az login)
- Interactive login prompts
If you recall, we used the az login command earlier to use the Azure CLI. This opened a browser window where we authenticated by providing our Azure identity (microsoft account).
When you run az login, the CLI caches your authentication tokens in your user profile (usually under ~/.azure/). That state is not tied to a single shell session, new terminals, scripts, even reboots will pick up the same login until it expires or you explicitly log out.
Access token:
- Valid for 1 hour by default
- Used to call Azure REST APIs
- Automatically refreshed by the CLI when needed
Refresh token:
- Valid for up to 90 days (sliding window) for interactive user logins
- Stored in
~/.azure/msal_token_cache.jsonor similar - As long as it’s valid, the CLI will obtain new access tokens without prompting you again
Go ahead and list any active tokens. You should see a token from when we used az login earlier (assuming you didn’t take a break in between then and now):
az account get-access-tokenTo be sure that our AzureRM provider uses the service principal we created earlier, we can logout and clear any cached tokens. This isn’t mandatory, but it is a good way to demonstrate that terraform is using our environment variables:
az logout          # logs out the current account
az account clear   # clears all cached subscriptions and tokens
Provider Configuration
To begin building our Azure infrastructure with Terraform, start by opening main.tf and defining the azurerm provider. Although not strictly required, it’s considered best practice to declare your provider configuration at the top of main.tf to ensure clarity and maintainability as your project grows.
terraform {
  required_providers {
    azurerm = {
      source  = "hashicorp/azurerm"
      version = ">=3.0"
    }
  }
}

provider "azurerm" {
  features {}
}

data "azurerm_subscription" "primary" {}
Configuration Breakdown
This configuration serves two critical functions:
- terraform block: Declares the required provider (azurerm) and version constraints to ensure consistent and reproducible infrastructure deployments.
- provider block: Configures the azurerm provider to authenticate using a Service Principal defined in a
.envfile. This approach avoids interactive logins and ensures that Terraform runs in a fully automated, environment-specific context, ideal for CI/CD pipelines or scoped automation.
Initialize Terraform
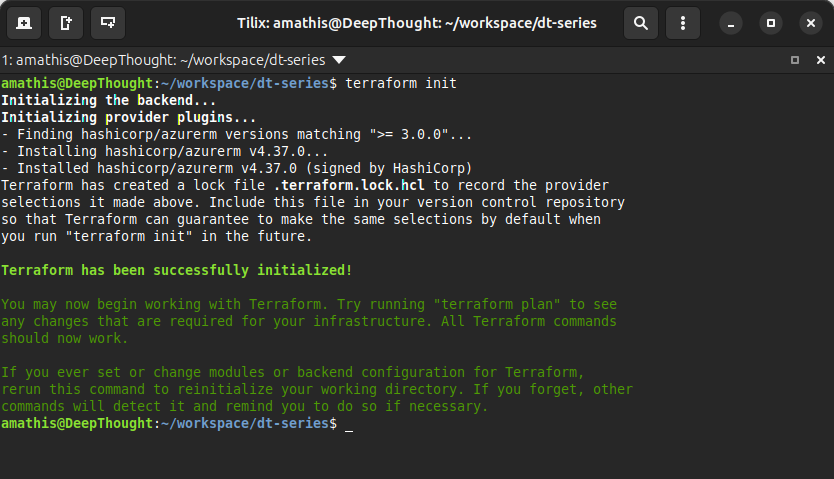
Before you can use Terraform to provision resources, you need to run terraform init in your project root directory. This command initializes your working directory by downloading the necessary provider plugins (such as the AzureRM provider we just configured), setting up the backend for state management, and preparing the environment for subsequent Terraform commands.
Running terraform init ensures that your configuration is ready to interact with Azure and that all required dependencies are installed, allowing you to proceed confidently with planning and applying your infrastructure changes.
Go ahead and run the terraform init command:
terraform initYou should see output similiar to:
Implementing Infrastructure with Resources
A resource in Terraform represents a piece of infrastructure, such as a virtual machine, network, or storage volume. Resources are the fundamental building blocks of your infrastructure configuration. Each resource has:
- A type (like
azurerm_linux_virtual_machinefor VMs orazurerm_public_ipfor a public IP address) - A unique name within your configuration
- Arguments that define the resource’s properties
- Attributes that are computed after creation
Terraform uses resource definitions to understand what infrastructure components to create, modify, or destroy.
For this tutorial, our goal is to deploy a virtual machine in Azure. In order to do so, we must not only define that virtual machine, but we must also define the ancillary resources needed to run a virtual machine in Azure, including:
- Virtual network
- Virtual subnet
- Network Security Group
- Virtual network interface (NIC)
- Public IP Address
Let’s define the resources we will be creating in main.tf, starting with the resource group:
resource "azurerm_resource_group" "rg" {
  name     = var.resource_group_name
  location = var.location
  tags = { environment = var.environment }
}
The above code defines our resource group, including its name, location, and tags. If you notice, the definitions reference var.* indicating that the value is a terraform variable.
Go ahead and save main.tf and let’s take a moment to talk about terraform variables.
Parameterizing with Variables
Understanding Variables
Variables in Terraform serve as input parameters that make your configurations flexible and reusable. Instead of hardcoding values like IP addresses or resource sizes, variables allow you to parameterize your infrastructure code, enabling the same configuration to work across different environments.
The key benefits of variables include:
- Flexibility: Same configuration for different environments
- Reusability: Share configurations across teams
- Security: Separate sensitive values from code
- Maintainability: Central location for configuration values
Creating Variable Definitions
Let’s start by defining the variables needed for our resource group resource above. Open variables.tf and add the following variables:
variable "resource_group_name" {
  description = "Name of the Resource Group"
  type        = string
  default     = "deepthoughtTerraformRG"
}

variable "environment" {
  description = "Deployment environment tag"
  type        = string
  default     = "dev"
}

variable "location" {
  description = "Azure location"
  type        = string
  default     = "eastus"
}
We set the environment variable to dev and the location to eastus. This is the azure region in which we want to deploy our resources.
However, notice how the default resource_group_name is set to deepthoughtTerraformRG? This is the same name that we used earlier when we manually create a resource group in order to create a service principal with scoped permissions.
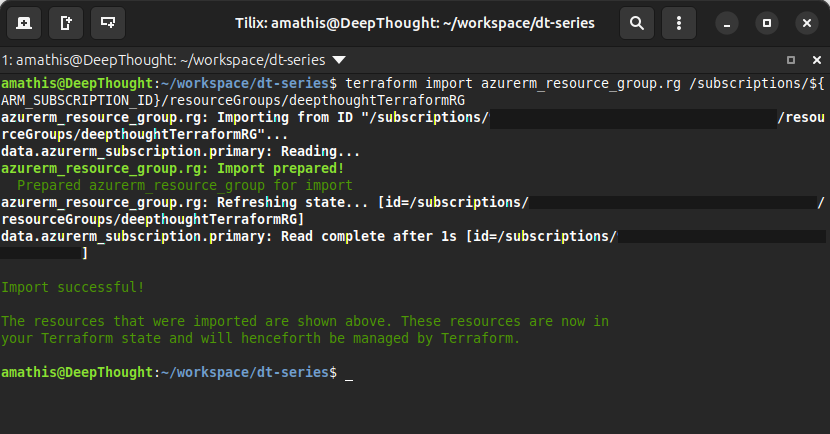
When you define a resource in Terraform, such as an Azure resource group, and that resource already exists in your Azure subscription, Terraform will attempt to manage it only if it was originally created by Terraform and tracked in the state file. If the resource was created outside of Terraform, it will not be managed automatically and Terraform may try to create a duplicate unless you use the import command to bring the existing resource into Terraform’s state. This ensures that Terraform can track and manage the lifecycle of the resource without conflicts or unintended changes.
Importing Existing Resources
Run this command to import the existing resource group into the Terraform state (make sure you have run source .env to set ARM_SUBSCRIPTION_ID in your shell session):
terraform import azurerm_resource_group.rg /subscriptions/${ARM_SUBSCRIPTION_ID}/resourceGroups/deepthoughtTerraformRGYou should see output similiar to:
Variable Assignment Methods
Terraform provides multiple ways to set variable values, listed in order of precedence:
- Command-line flags:
-varand-var-fileoptions - Auto-loaded files:
*.auto.tfvarsandterraform.tfvars - Environment variables: Prefixed with
TF_VAR_ - Default values: Specified in variable declarations
Examples for our SSH key variable: CLI:
terraform apply -var="ssh_public_key_path=~/.ssh/id_rsa.pub"File:
ssh_public_key_path = "~/.ssh/id_rsa.pub"` in `terraform.tfvarsEnvironment:
export TF_VAR_ssh_public_key_path="~/.ssh/id_rsa.pub"Choose the method that best fits your security requirements and workflow.
Planning a Deployment
The terraform plan command is a critical step in the Terraform workflow. It analyzes your configuration files and compares them to the current state of your infrastructure, then generates an execution plan detailing the actions Terraform will take to achieve your desired state. This includes creating, updating, or deleting resources as necessary.
Running terraform plan is especially useful because it allows you to preview changes before they are applied, helping you catch potential mistakes, understand the impact of your modifications, and maintain control over your infrastructure. By reviewing the plan output, you can ensure that only the intended changes will be made, reducing the risk of accidental disruptions or misconfigurations.
At this point in the tutorial we have:
- Configured the Azure provider
- Initialized Terraform
- Added a resource definition for the Azure resource group
Let’s run terraform plan to see what the output looks like:
terraform planYou should see output similiar to:
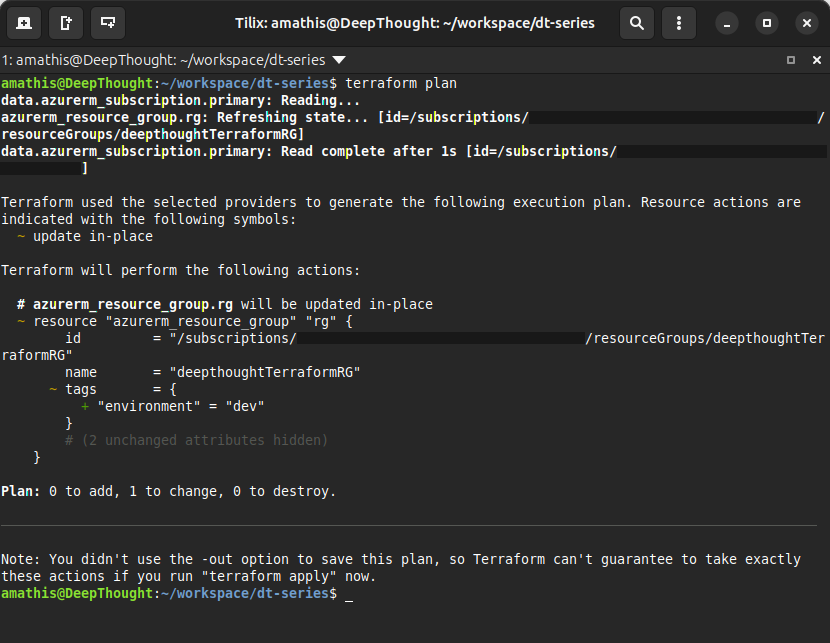
Looking at the output, we can see that Terraform indicates that if we were to run terraform apply, one resource would be updated in place. Additionally, we see that the resource to be updated (our azure resource group) would have a tag applied to it.
Defining Virtual Network
Now that we’ve discussed resources and variables in Terraform and we have covered initializing and planning, let’s continue defining our virtual network.
Define Resources
First, let’s add some resource definitions to main.tf:
resource "azurerm_virtual_network" "vnet" {
  name                = var.vnet_name
  address_space       = [var.vnet_address_space]
  location            = azurerm_resource_group.rg.location
  resource_group_name = azurerm_resource_group.rg.name
  tags                = azurerm_resource_group.rg.tags
}

resource "azurerm_subnet" "subnet" {
  name                 = var.subnet_name
  resource_group_name  = azurerm_resource_group.rg.name
  virtual_network_name = azurerm_virtual_network.vnet.name
  address_prefixes     = [var.subnet_prefix]
}

resource "azurerm_public_ip" "public_ip" {
  name                = "${var.vm_name}-pip"
  location            = azurerm_resource_group.rg.location
  resource_group_name = azurerm_resource_group.rg.name
  sku                 = "Standard"
  allocation_method   = "Static"
  tags                = azurerm_resource_group.rg.tags
}

resource "azurerm_network_security_group" "ssh_nsg" {
  name                = "${var.vm_name}-nsg"
  location            = azurerm_resource_group.rg.location
  resource_group_name = azurerm_resource_group.rg.name
  tags                = azurerm_resource_group.rg.tags

  security_rule {
    name                       = "Allow-SSH"
    priority                   = 1001
    direction                  = "Inbound"
    access                     = "Allow"
    protocol                   = "Tcp"
    source_address_prefix      = var.ssh_allowed_cidr
    destination_address_prefix = "*"
    source_port_range          = "*"
    destination_port_range     = "22"
  }

  security_rule {
    name                       = "Deny-All-Inbound"
    priority                   = 4096
    direction                  = "Inbound"
    access                     = "Deny"
    protocol                   = "*"
    source_address_prefix      = "*"
    destination_address_prefix = "*"
    source_port_range          = "*"
    destination_port_range     = "*"
  }
}
Explanation
This Terraform configuration defines several key Azure networking resources:
- Virtual Network (
azurerm_virtual_network): Creates a private network using the name and address space from variables. It is scoped to the resource group and location you previously defined. - Subnet (
azurerm_subnet): Establishes a subnet within the virtual network, using its own address prefix. - Public IP (
azurerm_public_ip): Allocates a dynamic public IP address for resources like virtual machines. - Network Security Group (
azurerm_network_security_group): Sets up firewall rules. The first rule allows SSH access only from your public IP, while the second rule denies all other inbound traffic for security.
Each resource uses variables for names and addresses, promoting reusability and clarity. The security group configuration ensures only authorized SSH access is permitted, following best practices for cloud security.
Define Variables
The resource definitions above referenced several Terraform variables. Let’s add them now to variables.tf:
variable "vnet_name" {
  description = "Name of the Virtual Network"
  type        = string
  default     = "demo-vnet"
}

variable "vnet_address_space" {
  description = "Address space for the VNet"
  type        = string
  default     = "10.0.0.0/16"
}

variable "subnet_name" {
  description = "Name of the subnet"
  type        = string
  default     = "default"
}

variable "subnet_prefix" {
  description = "Address prefix for the subnet"
  type        = string
  default     = "10.0.1.0/24"
}

variable "vm_name" {
  description = "Name of the Virtual Machine"
  type        = string
  default     = "demo-vm"
}
Go ahead and rerun terraform plan and see how the plan has changed. This is also a good time to look for any errors that may arise.
Define the Virtual Machine
Now that we have a virtual network setup, let’s finish continue by defining the virtual machine we intend to launch.
Continue editing main.tf:
resource "azurerm_network_interface" "nic" {
  name                = "${var.vm_name}-nic"
  location            = azurerm_resource_group.rg.location
  resource_group_name = azurerm_resource_group.rg.name
  tags                = azurerm_resource_group.rg.tags

  ip_configuration {
    name                          = "internal"
    subnet_id                     = azurerm_subnet.subnet.id
    private_ip_address_allocation = "Dynamic"
    public_ip_address_id          = azurerm_public_ip.public_ip.id
  }
}

resource "azurerm_network_interface_security_group_association" "nic_nsg_assoc" {
  network_interface_id      = azurerm_network_interface.nic.id
  network_security_group_id = azurerm_network_security_group.ssh_nsg.id
}

resource "azurerm_linux_virtual_machine" "vm" {
  name                  = var.vm_name
  resource_group_name   = azurerm_resource_group.rg.name
  location              = azurerm_resource_group.rg.location
  size                  = var.vm_size
  admin_username        = var.admin_username
  network_interface_ids = [azurerm_network_interface.nic.id]

  admin_ssh_key {
    username   = var.admin_username
    public_key = file(var.ssh_public_key_path)
  }
  os_disk {
    caching              = "ReadWrite"
    storage_account_type = "Standard_LRS"
  }
  source_image_reference {
    publisher = var.image_publisher
    offer     = var.image_offer
    sku       = var.image_sku
    version   = var.image_version
  }
  tags = azurerm_resource_group.rg.tags
}
More Variables…
The virtual machine resource we defined above uses several more Terraform variables. Let’s add them to variables.tf:
variable "vm_size" {
  description = "Size of the Virtual Machine"
  type        = string
  default     = "Standard_B1s"
}

variable "admin_username" {
  description = "Admin username for the VM"
  type        = string
  default     = "azureuser"
}

variable "ssh_public_key_path" {
  description = "Path to the SSH public key"
  type        = string
  default     = "~/.ssh/id_rsa.pub"
}

variable "ssh_allowed_cidr" {
  description = "CIDR range allowed to SSH"
  type        = string
  default     = "0.0.0.0/0"
}

variable "image_publisher" {
  description = "VM image publisher"
  type        = string
  default     = "Canonical"
}

variable "image_offer" {
  description = "VM image offer"
  type        = string
  default     = "UbuntuServer"
}

variable "image_sku" {
  description = "VM image SKU"
  type        = string
  default     = "18.04-LTS"
}

variable "image_version" {
  description = "VM image version"
  type        = string
  default     = "latest"
}
Note: Make sure to set your variables for
ssh_allowed_cidrto restrict ssh access. Setssh_public_key_pathto the path of your public SSH key.
Extracting Information with Outputs
Outputs in Terraform expose information about your infrastructure after creation, making important details available for:
- Integration: Sharing data between Terraform configurations
- Automation: Feeding information into scripts and tools
- Documentation: Displaying connection details and important values
- Debugging: Extracting resource attributes for troubleshooting
Creating Output Definitions
Define useful outputs for our infrastructure:
output "public_ip_address" {
  description = "Public IP address of the Virtual Machine"
  value       = azurerm_public_ip.public_ip.ip_address
}

output "vm_name" {
  description = "Name of the deployed Virtual Machine"
  value       = azurerm_linux_virtual_machine.vm.name
}

output "resource_group_name" {
  description = "Name of the Resource Group"
  value       = azurerm_resource_group.rg.name
}

output "ssh_connection_command" {
  description = "SSH command to connect to the VM"
  value       = "ssh ${var.admin_username}@${azurerm_public_ip.public_ip.ip_address}"
}
After running terraform apply, these values appear in the terminal output and can be retrieved later using terraform output [output_name].
Deploying Your Infrastructure
Now that we have all components defined, let’s deploy our Azure infrastructure. First, let’s run a final plan to review our complete configuration:
# Source environment variables
source .env

# Run terraform plan to review all changes
terraform plan
If the plan looks correct and shows the resources you expect to create, proceed with the deployment:
# Deploy the infrastructure
terraform apply
Terraform will prompt you to confirm the deployment by typing yes. The deployment process typically takes 3-5 minutes as Azure provisions your virtual machine and networking components.
Upon successful completion, Terraform will display the output values we defined, including the public IP address and SSH connection command for your new virtual machine.
Infrastructure Summary
Congratulations! You’ve successfully deployed a complete, production-ready virtual machine infrastructure to Azure using Terraform. Let’s review what we’ve created:
Core Infrastructure Components:
- Resource Group: Logical container organizing all resources with consistent tagging
- Virtual Network & Subnet: Private network (10.0.0.0/16) with dedicated subnet (10.0.1.0/24) for VM placement
- Network Security Group: Firewall rules allowing SSH access only from your IP address while blocking all other inbound traffic
- Public IP Address: Static IP for internet connectivity and remote access
- Network Interface: Virtual NIC connecting the VM to the subnet with dynamic private IP assignment
- Linux Virtual Machine: Ubuntu 18.04 LTS instance (Standard_B1s size) with SSH key authentication
Security Features Implemented:
- SSH key-based authentication (no password login)
- Network-level access control restricting SSH to your IP address
- Minimal attack surface with only port 22 exposed
- Proper tagging for resource identification and management
Cost Optimization:
- Standard_B1s VM size provides the lowest-cost option while remaining functional
- Standard LRS storage for cost-effective disk storage
- Static IP allocation prevents changing IPs but maintains predictable costs
This infrastructure follows Azure Well-Architected Framework principles, providing a secure, cost-effective foundation that can be expanded for more complex applications.
Setting Up Cost Guardrails
One of the most important aspects of learning cloud technologies is preventing unexpected bills that can quickly escalate, especially when experimenting with different services or accidentally leaving resources running. Azure provides robust cost management tools, and implementing budget alerts through Terraform ensures you’re always aware of your spending patterns.
Cost guardrails are particularly crucial when learning because:
- Experimentation Safety: You can explore services without fear of surprise charges
- Budget Predictability: Clear spending limits help you plan your learning budget
- Early Warning System: Alerts notify you before costs become problematic
- Good Habits: Establishes cost-conscious practices that carry into production environments
Azure’s consumption budgets can monitor spending at various scopes (subscription, resource group, or individual resources) and trigger actions when thresholds are reached. By implementing these through Infrastructure as Code, your cost controls are version-controlled and consistently applied across environments.
Let’s add a monthly budget with email notifications to budgets.tf:
resource "azurerm_consumption_budget_subscription" "monthly_budget" {
  name            = "monthly-budget"
  subscription_id = "/subscriptions/${data.azurerm_subscription.primary.subscription_id}"
  amount          = var.budget_amount
  time_grain      = "Monthly"

  time_period {
    start_date = "${formatdate("YYYY-MM-01", timestamp())}T00:00:00Z"
  }

  notification {
    enabled        = true
    operator       = "GreaterThan"
    threshold      = var.budget_threshold_percentage
    threshold_type = "Actual"

    contact_emails = var.alert_emails
  }

  notification {
    enabled        = true
    operator       = "GreaterThan"
    threshold      = 100
    threshold_type = "Forecasted"

    contact_emails = var.alert_emails
  }
}
More Variables
Add the remaining budget-related variables to variables.tf:
variable "budget_amount" {
  description = "Monthly budget amount in USD"
  type        = number
  default     = 100
}

variable "budget_threshold_percentage" {
  description = "Threshold percent to notify"
  type        = number
  default     = 80
}

variable "alert_emails" {
  description = "Emails notified when threshold is met"
  type        = list(string)
  default     = ["[email protected]"]
}Important: Make sure to update the alert_emails variable with your actual email address to receive budget notifications.
After adding the budget configuration, deploy it with:
terraform plan
terraform apply
This budget will monitor your subscription-level spending and send email alerts when you reach 80% of your $100 monthly budget, giving you early warning to review your resource usage and costs.
Testing Your Infrastructure
Let’s verify that your infrastructure is working correctly by connecting to your virtual machine:
- Get the connection details:
terraform output ssh_connection_command- Connect to your VM:
ssh azureuser@<your-public-ip>- Verify the connection: Once connected, you can run basic commands to confirm everything is working:
# Check system information
uname -a

# Verify network connectivity
ip addr show

# Check available disk space
df -h- Test internet connectivity:
curl -I https://www.google.comIf all tests pass successfully, congratulations! You have a fully functional, secure virtual machine running in Azure.
Cleaning Up Resources
When you’re finished experimenting with your infrastructure, it’s important to clean up resources to avoid unnecessary charges. Terraform makes this process simple:
# Review what will be destroyed
terraform plan -destroy

# Destroy all resources
terraform destroy
Type yes when prompted to confirm the destruction. Terraform will remove all resources in the reverse order of their dependencies, ensuring a clean teardown.
Key Takeaways and Best Practices
Through this tutorial, you’ve learned several fundamental concepts and best practices for Azure Infrastructure as Code:
Security Best Practices:
- Use service principals with scoped permissions for automation
- Implement network security groups with minimal required access
- Use SSH key authentication instead of passwords
- Apply consistent tagging for resource management
Cost Management:
- Implement budget alerts before deploying resources
- Choose appropriate VM sizes for your workload requirements
- Clean up resources when no longer needed
- Monitor costs regularly through Azure Cost Management
Infrastructure as Code Benefits:
- Version-controlled infrastructure definitions
- Reproducible deployments across environments
- Clear documentation of your infrastructure
- Easy cleanup and resource management
Terraform Workflow:
- Always run
terraform planbefore applying changes - Use variables for flexibility and reusability
- Implement outputs for important information
- Organize code with logical file structure
These practices form the foundation for scaling your infrastructure management as your projects grow in complexity.
What’s Next: A Sneak Preview of Part 2
In the next installment of our Azure Infrastructure as Code series, we’ll take your newly deployed virtual machine to the next level by introducing Ansible for configuration management. Here’s what you can expect:
Automated Software Installation: Learn how to use Ansible playbooks to automatically install and configure software packages, eliminating manual setup tasks and ensuring consistent server configurations.
Security Hardening: Implement automated security configurations including firewall rules, user account management, SSH hardening, and system updates to transform your basic VM into a production-ready server.
Configuration Management: Explore Ansible’s declarative approach to system configuration, where you describe the desired state of your servers and Ansible ensures they match that specification.
Integration with Terraform: Discover how to seamlessly combine Terraform’s infrastructure provisioning with Ansible’s configuration management, creating a complete end-to-end automation pipeline.
Playbook Organization: Learn best practices for structuring Ansible playbooks, using roles and variables, and creating reusable automation that scales across multiple servers and environments.
By the end of Part 2, you’ll have a fully automated pipeline that not only provisions infrastructure but also configures it to your exact specifications—all through code that can be version-controlled, tested, and shared with your team.
Further Learning Resources
Ready to dive deeper into Azure and Infrastructure as Code? Here are some excellent resources to continue your learning journey:
Official Documentation
- Terraform Azure Provider Documentation - Comprehensive reference for all Azure resources
- Azure Well-Architected Framework - Microsoft’s guidance for building robust cloud solutions
- Azure CLI Reference - Complete command reference for Azure CLI
Books and Courses
- Terraform: Up & Running by Yevgeniy Brikman - Comprehensive guide to Terraform best practices
- Azure DevOps Explained - Deep dive into Azure’s DevOps ecosystem
- Infrastructure as Code Patterns - Advanced patterns for IaC implementation
Hands-On Practice
- Azure Free Account - Continue experimenting with $200 in credits
- HashiCorp Learn - Interactive Terraform tutorials
- Azure Architecture Center - Real-world architecture examples and patterns
Community Resources
- Terraform Community - Get help and share knowledge with other practitioners
- Azure Community - Connect with Azure experts and enthusiasts
- Reddit r/Terraform - Active community for questions and discussions
Advanced Topics to Explore
- Remote State Management: Learn to store Terraform state in Azure Storage for team collaboration
- Terraform Modules: Create reusable infrastructure components
- Azure Resource Manager (ARM) Templates: Microsoft’s native IaC solution
- Azure Blueprints: Governance and compliance automation
- Azure Policy: Automated compliance and security enforcement
Remember, the best way to learn cloud technologies is through hands-on practice. Don’t hesitate to experiment, break things, and rebuild them—that’s how you develop the confidence and skills needed for real-world infrastructure management.
Stay tuned for Part 2 of our series, where we’ll add Ansible configuration management to create a complete infrastructure automation workflow!

Aaron Mathis
Systems administrator and software engineer specializing in cloud development, AI/ML, and modern web technologies. Passionate about building scalable solutions and sharing knowledge with the developer community.
Related Articles
Discover more insights on similar topics