Building an Image Classifier – Part 4: Containerizing with Docker and Orchestrating with Kubernetes
Part 4 of our series on building and deploying a full-stack image classification system. Learn to containerize your FastAPI application with Docker and deploy it at scale using Kubernetes for production-ready container orchestration.
Prerequisites: This tutorial is Part 4 of our image classification series. You’ll need the FastAPI application from Part 3: Creating a Production-Grade FastAPI Web Service, which requires the trained PyramidNet model from Part 2: Training a PyramidNet Model from Scratch and the preprocessing pipeline from Part 1: Preprocessing and Preparing the CIFAR-10 Dataset. Ensure your FastAPI application is working locally before proceeding.
Welcome to Part 4 of our image classification series! We’ve come a remarkable distance: we’ve preprocessed CIFAR-10 data, trained a high-accuracy PyramidNet model, and built a production-grade FastAPI service. Now it’s time to take the next crucial step in modern software deployment, containerization and orchestration.
In this tutorial, we’ll transform our local FastAPI application into a containerized service using Docker, then deploy it at scale using Kubernetes. But this isn’t just about getting our app running in containers, we’ll implement production-ready patterns including multi-stage builds, health checks, resource management, and horizontal auto-scaling.
Container technologies might seem complex at first, but they solve fundamental problems that every production application faces: “How do I ensure my app runs consistently across different environments?” and “How do I scale my service to handle varying loads?” By the end of this post, you’ll understand how Docker and Kubernetes work together to provide reliable, scalable deployment infrastructure for machine learning services.
If you’d like, you can find all the code for this tutorial at our GitHub repository, but I highly recommend you follow along and create the files yourself.
Understanding Containerization: Why Docker Changes Everything
Before we start writing Dockerfiles and Kubernetes manifests, let’s understand why containerization has become the standard for modern application deployment, especially for machine learning services.
The “It Works on My Machine” Problem
Every developer has experienced this scenario: your application works perfectly on your development machine, but when you deploy it to production, everything breaks. Different Python versions, missing system libraries, varying configurations—the list of potential issues is endless.
Traditional deployment challenges:
- Environment inconsistency: Development, staging, and production environments differ
- Dependency conflicts: Different applications requiring incompatible library versions
- Configuration drift: Settings that work locally but fail in production
- Scaling complexity: Manually provisioning and configuring multiple servers
- Resource isolation: Applications interfering with each other on shared servers
How Docker Solves These Problems
Docker packages your application and all its dependencies into a lightweight, portable container that runs consistently anywhere. Think of it as a shipping container for software, just as shipping containers revolutionized global trade by standardizing how goods are packaged and transported, Docker containers standardize how applications are packaged and deployed.
┌─────────────────────────────────┐
│           Your App              │
│  ┌─────────────────────────┐    │
│  │    Python Application   │    │
│  │  ┌─────────────────┐    │    │
│  │  │   Your Code     │    │    │
│  │  │   Dependencies  │    │    │
│  │  │   Configuration │    │    │
│  │  └─────────────────┘    │    │
│  └─────────────────────────┘    │
│           Runtime               │
│  ┌─────────────────────────┐    │
│  │   Python Runtime        │    │
│  │   System Libraries      │    │
│  │   Operating System      │    │
│  └─────────────────────────┘    │
└─────────────────────────────────┘
      Docker Container
Key Docker benefits for ML applications:
- Reproducible environments: Same Python version, same libraries, everywhere
- Isolation: Your PyramidNet model won’t conflict with other services
- Efficiency: Containers share the host OS kernel, using fewer resources than virtual machines
- Portability: Runs on your laptop, on AWS, on Google Cloud, anywhere Docker runs
Understanding Kubernetes: Container Orchestration at Scale
While Docker solves the “packaging” problem, Kubernetes solves the “orchestration” problem. Kubernetes is like having an intelligent datacenter manager that automatically handles deployment, scaling, load balancing, and failure recovery for your containerized applications.
Kubernetes provides:
- Automatic scaling: More users uploading images? Kubernetes spins up more containers
- Self-healing: Container crashes? Kubernetes restarts it automatically
- Load balancing: Traffic distributed evenly across multiple application instances
- Rolling updates: Deploy new model versions with zero downtime
- Resource management: Ensure your ML model gets the CPU and memory it needs
Real-world example: Imagine your image classification API becomes popular and starts receiving 1000 requests per minute instead of 10. With traditional deployment, you’d need to manually provision new servers, configure load balancers, and hope you sized everything correctly. With Kubernetes, you simply tell it “keep response time under 100ms” and it automatically adds or removes containers as needed.
Docker + Kubernetes for ML: A Perfect Match
Machine learning services have unique requirements that make containerization especially valuable:
Model consistency: Your PyramidNet model uses specific PyTorch versions, CUDA libraries, and Python dependencies. Containers ensure these exact versions run everywhere.
Resource management: ML models can be memory-intensive. Kubernetes can guarantee your containers get the GPU/CPU resources they need and isolate them from other workloads.
A/B testing: Want to test a new model version? Kubernetes can route 10% of traffic to the new model while keeping 90% on the stable version.
Cost efficiency: Auto-scaling means you only pay for compute resources when you actually need them, crucial for variable ML workloads.
Now let’s implement these concepts by containerizing our FastAPI application.
Creating a Production Docker Image
Docker images are built using a Dockerfile, a text file containing instructions for assembling your application container. For machine learning applications, we need to carefully consider base images, dependency installation, and optimization strategies.
Understanding Multi-Stage Docker Builds
We’ll use a multi-stage build strategy that separates dependency building from the final runtime image. This approach significantly reduces image size and improves security by excluding build tools from production containers.
┌─────────────────┐    ┌─────────────────┐    ┌─────────────────┐
│   Build Stage   │───▶│  Runtime Stage  │───▶│  Final Image    │
│                 │    │                 │    │                 │
│ • Install build │    │ • Copy app      │    │ • Minimal size  │
│   tools         │    │ • Copy deps     │    │ • Security      │
│ • Compile deps  │    │ • Runtime only  │    │ • Fast startup  │
│ • Heavy lifting │    │ • Optimized     │    │ • Production    │
└─────────────────┘    └─────────────────┘    └─────────────────┘
Creating the Dockerfile
Create a new file called Dockerfile in your project root:
# Dockerfile
# Multi-stage Docker build for PyramidNet Image Classifier API
# Optimized for production deployment with minimal image size and security

#==============================================================================
# Build Stage: Install dependencies and prepare application
#==============================================================================
FROM python:3.11-slim as builder

# Install system dependencies needed for building Python packages
RUN apt-get update && apt-get install -y \
    build-essential \
    curl \
    && rm -rf /var/lib/apt/lists/*

# Create and activate virtual environment for isolation
RUN python -m venv /opt/venv
ENV PATH="/opt/venv/bin:$PATH"

# Upgrade pip and install wheel for efficient package installation
RUN pip install --no-cache-dir --upgrade pip wheel

# Copy requirements first to leverage Docker layer caching
COPY requirements.txt .

# Install PyTorch with CPU support for production efficiency
# For GPU support, change index-url to include CUDA version
RUN pip install --no-cache-dir torch torchvision torchaudio \
    --index-url https://download.pytorch.org/whl/cpu

# Install remaining Python dependencies
RUN pip install --no-cache-dir -r requirements.txt

#==============================================================================
# Runtime Stage: Create minimal production image
#==============================================================================
FROM python:3.11-slim as runtime

# Add metadata labels for image management
LABEL maintainer="Aaron Mathis <[email protected]>"
LABEL description="PyramidNet Image Classifier API - Production Container"
LABEL version="1.0.0"

# Install minimal runtime dependencies
RUN apt-get update && apt-get install -y \
    curl \
    && rm -rf /var/lib/apt/lists/* \
    && apt-get clean

# Create non-root user for security
RUN groupadd -r apiuser && useradd -r -g apiuser -s /bin/false apiuser

# Copy virtual environment from builder stage
COPY --from=builder /opt/venv /opt/venv
ENV PATH="/opt/venv/bin:$PATH"

# Set working directory
WORKDIR /app

# Copy application code with proper ownership
COPY --chown=apiuser:apiuser . .

# Create necessary directories with correct permissions
RUN mkdir -p /app/logs /app/models && \
    chown -R apiuser:apiuser /app/logs /app/models

# Switch to non-root user for security
USER apiuser

# Expose port (documentation - doesn't actually publish the port)
EXPOSE 8000

# Configure environment variables
ENV PYTHONPATH=/app
ENV PYTHONUNBUFFERED=1
ENV CLASSIFIER_ENVIRONMENT=production
ENV CLASSIFIER_HOST=0.0.0.0
ENV CLASSIFIER_PORT=8000

# Health check to ensure container is responding
HEALTHCHECK --interval=30s --timeout=30s --start-period=60s --retries=3 \
    CMD curl -f http://localhost:8000/health/ || exit 1

# Default command to run the application
CMD ["gunicorn", "--bind", "0.0.0.0:8000", "--workers", "4", "--worker-class", "uvicorn.workers.UvicornWorker", "api.main:app"]
Understanding the Dockerfile Components
Let’s break down each section and understand why it’s important for production deployment:
Build Stage Optimizations
FROM python:3.11-slim as builderWhy Python 3.11-slim? The slim variant includes Python and essential libraries while excluding unnecessary packages, reducing image size by ~100MB compared to the full Python image.
RUN apt-get update && apt-get install -y \
    build-essential \
    curl \
    && rm -rf /var/lib/apt/lists/*
Package management best practices:
- Install only necessary build tools
- Clean package lists to reduce image size
- Combine RUN commands to minimize Docker layers
RUN python -m venv /opt/venv
ENV PATH="/opt/venv/bin:$PATH"
Virtual environment in containers: Even though containers provide isolation, using virtual environments ensures dependency management consistency and makes local development match production exactly.
Dependency Installation Strategy
COPY requirements.txt .
RUN pip install --no-cache-dir torch torchvision torchaudio \
    --index-url https://download.pytorch.org/whl/cpu
Why copy requirements first? Docker’s layer caching means if your application code changes but requirements.txt doesn’t, Docker reuses the cached dependency installation layer, speeding up builds significantly.
CPU vs GPU PyTorch: We use CPU-only PyTorch for better compatibility and smaller image size. For GPU support, you’d change the index URL to include CUDA versions.
Runtime Stage Security
RUN groupadd -r apiuser && useradd -r -g apiuser -s /bin/false apiuser
USER apiuser
Security principle: Never run containers as root. Creating a dedicated user with minimal privileges reduces security risks if the container is compromised.
HEALTHCHECK --interval=30s --timeout=30s --start-period=60s --retries=3 \
    CMD curl -f http://localhost:8000/health/ || exit 1
Container health monitoring: Kubernetes uses health checks to determine if containers are running correctly and need to be restarted.
Extended Requirements for Docker
We need to add some dependencies specifically for containerized deployment. Update your requirements.txt:
# Core FastAPI dependencies (from Part 3)
fastapi==0.104.1
uvicorn[standard]==0.24.0
python-multipart==0.0.6
aiofiles==23.2.1

# ML dependencies
torch==2.1.0
torchvision==0.16.0
torchaudio==2.1.0
torchsummary==1.5.1
scikit-learn==1.3.2
numpy==1.24.4
pandas==2.1.4
Pillow==10.1.0
opencv-python-headless==4.8.1.78

# API and validation
pydantic==2.5.0
pydantic-settings==2.1.0

# Security and monitoring
python-jose[cryptography]==3.3.0
passlib[bcrypt]==1.7.4

# Testing (for container testing)
pytest==7.4.3
httpx==0.25.2
pytest-asyncio==0.21.1

# Production dependencies
gunicorn==21.2.0

# Ensure we have curl for health checks
# (curl is installed via apt in Dockerfile)
Environment Configuration for Containers
Create a .env.docker file for container-specific configuration:
# .env.docker - Container environment configuration
CLASSIFIER_ENVIRONMENT=production
CLASSIFIER_DEBUG=false
CLASSIFIER_HOST=0.0.0.0
CLASSIFIER_PORT=8000
CLASSIFIER_LOG_LEVEL=INFO
CLASSIFIER_MODEL_DEVICE=cpu
CLASSIFIER_RELOAD=false
CLASSIFIER_ACCESS_LOG=true
CLASSIFIER_MAX_CONCURRENT_REQUESTS=50
Building and Testing the Docker Image
Now let’s build and test our Docker image:
# Build the image with a descriptive tag
docker build -t pyramidnet-api:v1.0.0 .
Now check the image was created:
docker images pyramidnet-apiRun the container locally to test:
docker run -d \
    --name pyramidnet-test \
    -p 8000:8000 \
    --env-file .env.docker \
    pyramidnet-api:v1.0.0
Check if it’s running:
docker psTest the API:
curl http://localhost:8000/health/View logs:
docker logs pyramidnet-testFinally, stop and remove test container:
docker stop pyramidnet-test
docker rm pyramidnet-test
Docker Image Optimization
Our multi-stage build produces a significantly smaller and more secure image:
# Check image size
docker images pyramidnet-api

# Compare with a single-stage build (if you were to create one)
# Single-stage: ~2.5GB (includes build tools, compilers, etc.)
# Multi-stage: ~800MB (runtime only)
# Size reduction: ~70% smaller!
Security benefits:
- No build tools in production image (reduced attack surface)
- Non-root user execution
- Minimal package installation
- Clear separation of build and runtime dependencies
Performance benefits:
- Faster container startup (smaller image)
- Reduced network transfer time during deployment
- Better resource utilization in Kubernetes clusters
Now that we have a production-ready Docker image, let’s deploy it to Kubernetes.
Preparing for Kubernetes Deployment
Before we create Kubernetes manifests, we need to understand the components we’ll deploy and how they work together. Kubernetes uses YAML manifests to declaratively define your desired infrastructure state.
Understanding Kubernetes Components for Our ML API
Our deployment will include several Kubernetes resources, each serving a specific purpose:
┌─────────────────────────────────────────────────────────────┐
│                     Kubernetes Cluster                      │
│                                                             │
│  ┌─────────────────┐    ┌─────────────────┐                 │
│  │    Service      │────│  Load Balancer  │ ◀── Internet    │
│  │  (pyramidnet)   │    │   (External)    │                 │
│  └─────────────────┘    └─────────────────┘                 │
│           │                                                 │
│  ┌─────────────────┐    ┌─────────────────┐                 │
│  │   Deployment    │    │   ConfigMap     │                 │
│  │  (pyramidnet)   │    │ (configuration) │                 │
│  │                 │    │                 │                 │
│  │  ┌───────────┐  │    │  Environment    │                 │
│  │  │   Pod 1   │  │    │  Variables      │                 │
│  │  │ Container │  │    │  App Settings   │                 │
│  │  └───────────┘  │    └─────────────────┘                 │
│  └─────────────────┘                                        |
└─────────────────────────────────────────────────────────────┘
Component responsibilities:
- Deployment: Manages multiple instances (replicas) of our application
- Service: Provides stable networking and load balancing between pods
- ConfigMap: Stores configuration data separate from application code
- HorizontalPodAutoscaler (HPA): Automatically scales pods based on CPU/memory usage
- Ingress: Handles external traffic routing and SSL termination
Kubernetes Directory Structure
Let’s organize our Kubernetes manifests properly:
mkdir -p k8s/{base,overlays/{development,production}}This structure supports Kustomize, a Kubernetes-native configuration management tool that allows us to maintain base configurations and environment-specific overlays.
k8s/
├── base/                          # Base Kubernetes manifests
│   ├── deployment.yaml           # Application deployment
│   ├── service.yaml              # Service definition
│   ├── configmap.yaml            # Configuration
│   ├── hpa.yaml                  # Horizontal Pod Autoscaler
│   └── kustomization.yaml        # Kustomize configuration
└── overlays/
    ├── development/               # Development-specific configs
    │   ├── kustomization.yaml
    │   └── ingress.yaml
    └── production/                # Production-specific configs
        ├── kustomization.yaml
        ├── ingress.yaml
        └── resource-limits.yaml
This structure follows Kubernetes best practices and makes it easy to maintain different configurations for different environments while avoiding duplication.
Creating Kubernetes Manifests
Now let’s create the Kubernetes manifests that will deploy our containerized FastAPI application. Each manifest defines a specific aspect of our deployment.
ConfigMap: Managing Configuration
ConfigMaps store configuration data that can be consumed by pods as environment variables or mounted files. Create k8s/base/configmap.yaml:
# k8s/base/configmap.yaml
apiVersion: v1
kind: ConfigMap
metadata:
  name: pyramidnet-config
  labels:
    app: pyramidnet-api
    component: config
data:
  # Application configuration
  CLASSIFIER_ENVIRONMENT: "production"
  CLASSIFIER_HOST: "0.0.0.0"
  CLASSIFIER_PORT: "8000"
  CLASSIFIER_DEBUG: "false"
  CLASSIFIER_LOG_LEVEL: "INFO"
  CLASSIFIER_RELOAD: "false"
  CLASSIFIER_ACCESS_LOG: "true"

  # Model configuration
  CLASSIFIER_MODEL_DEVICE: "cpu"
  CLASSIFIER_MODEL_PATH: "models/best_pyramidnet_model.pth"

  # Performance settings
  CLASSIFIER_MAX_CONCURRENT_REQUESTS: "50"
  CLASSIFIER_WORKER_TIMEOUT: "300"
  CLASSIFIER_PREDICTION_TIMEOUT: "30"

  # Security settings (non-sensitive values only)
  CLASSIFIER_MAX_REQUEST_SIZE: "10485760"  # 10MB

  # CORS settings
  CLASSIFIER_CORS_ORIGINS: '["http://localhost:3000","https://deepthought.sh"]'
Deployment: Managing Application Instances
The Deployment manages our application pods, ensuring the desired number of replicas are running and handling rolling updates. Create k8s/base/deployment.yaml:
# k8s/base/deployment.yaml
apiVersion: apps/v1
kind: Deployment
metadata:
  name: pyramidnet-api
  labels:
    app: pyramidnet-api
    component: api
spec:
  replicas: 3  # Start with 3 instances for high availability
  strategy:
    type: RollingUpdate
    rollingUpdate:
      maxSurge: 1        # Allow 1 extra pod during updates
      maxUnavailable: 0  # Ensure zero downtime during updates
  selector:
    matchLabels:
      app: pyramidnet-api
      component: api
  template:
    metadata:
      labels:
        app: pyramidnet-api
        component: api
      annotations:
        prometheus.io/scrape: "true"
        prometheus.io/port: "8000"
        prometheus.io/path: "/metrics"
    spec:
      # Security context for the pod
      securityContext:
        runAsNonRoot: true
        runAsUser: 1000
        runAsGroup: 1000
        fsGroup: 1000

      containers:
      - name: pyramidnet-api
        image: pyramidnet-api:v1.0.0
        imagePullPolicy: IfNotPresent

        ports:
        - containerPort: 8000
          name: http
          protocol: TCP

        # Environment variables from ConfigMap
        envFrom:
        - configMapRef:
            name: pyramidnet-config

        # Resource limits and requests
        resources:
          requests:
            memory: "512Mi"    # Minimum memory guaranteed
            cpu: "250m"        # Minimum CPU (0.25 cores)
          limits:
            memory: "2Gi"      # Maximum memory allowed
            cpu: "1000m"       # Maximum CPU (1 core)

        # Health checks
        livenessProbe:
          httpGet:
            path: /health/live
            port: http
          initialDelaySeconds: 60  # Wait for model loading
          periodSeconds: 30
          timeoutSeconds: 10
          failureThreshold: 3

        readinessProbe:
          httpGet:
            path: /health/ready
            port: http
          initialDelaySeconds: 30
          periodSeconds: 15
          timeoutSeconds: 10
          failureThreshold: 20

        # Startup probe for slow-starting applications (model loading)
        startupProbe:
          httpGet:
            path: /health/live
            port: http
          initialDelaySeconds: 30
          periodSeconds: 15
          timeoutSeconds: 10
          failureThreshold: 20

        # Security context for container
        securityContext:
          allowPrivilegeEscalation: false
          readOnlyRootFilesystem: true  # Set root filesystem to read-only
          capabilities:
            drop:
            - ALL

        # Volume mounts for writable directories
        volumeMounts:
        - name: tmp-volume
          mountPath: /tmp
        - name: log-volume
          mountPath: /app/logs
        - name: cache-volume
          mountPath: /app/.cache

      # Volumes for writable directories
      volumes:
      - name: tmp-volume
        emptyDir: {}
      - name: log-volume
        emptyDir: {}
      - name: cache-volume
        emptyDir: {}

      # Pod termination grace period
      terminationGracePeriodSeconds: 30
Understanding Deployment Configuration
Let’s break down the key deployment concepts:
Rolling Update Strategy
strategy:
  type: RollingUpdate
  rollingUpdate:
    maxSurge: 1
    maxUnavailable: 0
Zero-downtime deployments: This configuration ensures that during updates, new pods are created before old ones are terminated, maintaining service availability.
Resource Management
resources:
  requests:
    memory: "512Mi"
    cpu: "250m"
  limits:
    memory: "2Gi"
    cpu: "1000m"
Requests vs. Limits:
- Requests: Guaranteed resources that Kubernetes reserves for your pod
- Limits: Maximum resources your pod can consume before being throttled/terminated
These settings ensure your ML model has enough memory to load while preventing it from consuming all cluster resources.
Health Check Strategy
livenessProbe:   # "Is the container alive?"
readinessProbe:  # "Is the container ready to serve traffic?"
startupProbe:    # "Has the container finished starting up?"
Why three different probes?
- Startup: Gives extra time for model loading (ML models can take time to initialize)
- Liveness: Detects if the container is stuck and needs restart
- Readiness: Ensures traffic only goes to containers ready to handle requests
This configuration works well for ML APIs that can experience sudden traffic spikes (like going viral on social media) but typically have predictable baseline loads.
Service: Networking and Load Balancing
Services provide stable network endpoints for accessing pods. Create k8s/base/service.yaml:
# k8s/base/service.yaml
apiVersion: v1
kind: Service
metadata:
  name: pyramidnet-service
  labels:
    app: pyramidnet-api
    component: service
spec:
  type: ClusterIP  # Internal service only
  ports:
  - port: 80         # Service port
    targetPort: 8000 # Container port
    protocol: TCP
    name: http
  selector:
    app: pyramidnet-api
    component: api
Horizontal Pod Autoscaler: Automatic Scaling
The HPA automatically scales your deployment based on resource usage. Create k8s/base/hpa.yaml:
# k8s/base/hpa.yaml
apiVersion: autoscaling/v2
kind: HorizontalPodAutoscaler
metadata:
  name: pyramidnet-hpa
  labels:
    app: pyramidnet-api
    component: autoscaler
spec:
  scaleTargetRef:
    apiVersion: apps/v1
    kind: Deployment
    name: pyramidnet-api

  minReplicas: 1   # Higher minimum for production
  maxReplicas: 3   # Allow more scaling for production traffic

  metrics:
  - type: Resource
    resource:
      name: cpu
      target:
        type: Utilization
        averageUtilization: 70  # More conservative CPU threshold

  - type: Resource
    resource:
      name: memory
      target:
        type: Utilization
        averageUtilization: 80  # More conservative memory threshold

  # Custom metrics (if Prometheus adapter is available)
  - type: Pods
    pods:
      metric:
        name: http_requests_per_second
      target:
        type: AverageValue
        averageValue: "100"

  behavior:
    scaleUp:
      stabilizationWindowSeconds: 30  # Faster scale-up for production
      policies:
      - type: Percent
        value: 100  # Can double pods quickly if needed
        periodSeconds: 30
      - type: Pods
        value: 4    # Or add up to 4 pods at once
        periodSeconds: 30
      selectPolicy: Max

    scaleDown:
      stabilizationWindowSeconds: 600  # Wait 10 minutes before scaling down
Base Kustomization Configuration
Create k8s/base/kustomization.yaml to tie everything together:
apiVersion: kustomize.config.k8s.io/v1beta1
kind: Kustomization

metadata:
  name: pyramidnet-base

labels:
- includeSelectors: true
  includeTemplates: true
  pairs:
    app: pyramidnet-api
    version: v1.0.0

resources:
- configmap.yaml
- deployment.yaml
- service.yaml
- hpa.yaml

images:
- name: pyramidnet-api
  newTag: v1.0.0
Now let’s create environment-specific overlays that customize the base configuration for different deployment scenarios.
Environment-Specific Configurations
Different environments (development, staging, production) require different configurations. Kustomize overlays allow us to maintain a base configuration while customizing specific aspects for each environment.
Development Environment Overlay
Development environments prioritize debugging and flexibility over security and performance. Create k8s/overlays/development/kustomization.yaml:
apiVersion: kustomize.config.k8s.io/v1beta1
kind: Kustomization

metadata:
  name: pyramidnet-api

resources:
- ../../base
- ingress-dev.yaml

patches:
- path: deployment-dev.yaml
  target:
    kind: Deployment
    name: pyramidnet-api

configMapGenerator:
- name: pyramidnet-config
  behavior: merge
  literals:
  - CLASSIFIER_ENVIRONMENT=development
  - CLASSIFIER_DEBUG=true
  - CLASSIFIER_LOG_LEVEL=DEBUG
  - CLASSIFIER_CORS_ORIGINS=["http://localhost:3000","http://localhost:8080"]

namespace: pyramidnet-dev
Create the development deployment patch k8s/overlays/development/deployment-dev.yaml:
# k8s/overlays/development/deployment-dev.yaml
apiVersion: apps/v1
kind: Deployment
metadata:
  name: pyramidnet-api
spec:
  replicas: 1  # Single instance for development
  template:
    spec:
      containers:
      - name: pyramidnet-api
        # Reduced resource requirements for development
        resources:
          requests:
            memory: "2Gi"
            cpu: "250m"
          limits:
            memory: "6Gi"
            cpu: "1000m"
Create development ingress k8s/overlays/development/ingress-dev.yaml:
# k8s/overlays/development/ingress-dev.yaml
apiVersion: networking.k8s.io/v1
kind: Ingress
metadata:
  name: pyramidnet-ingress
  annotations:
    kubernetes.io/ingress.class: "nginx"
    nginx.ingress.kubernetes.io/rewrite-target: /
spec:
  rules:
  - host: pyramidnet-dev.local
    http:
      paths:
      - path: /
        pathType: Prefix
        backend:
          service:
            name: pyramidnet-service
            port:
              number: 80
Production Environment Overlay
Production environments prioritize security, performance, and reliability. Create k8s/overlays/production/kustomization.yaml:
# k8s/overlays/production/kustomization.yaml
apiVersion: kustomize.config.k8s.io/v1beta1
kind: Kustomization

metadata:
  name: pyramidnet-production

# Include base configurations
bases:
- ../../base

# Production-specific patches
patchesStrategicMerge:
- deployment-prod.yaml
- hpa-prod.yaml

# Production-specific resources
resources:
- ingress-prod.yaml

# Production configuration
configMapGenerator:
- name: pyramidnet-config
  behavior: merge
  literals:
  - CLASSIFIER_ENVIRONMENT=production
  - CLASSIFIER_DEBUG=false
  - CLASSIFIER_LOG_LEVEL=INFO
  - CLASSIFIER_MAX_CONCURRENT_REQUESTS=100
  - CLASSIFIER_CORS_ORIGINS=["https://yourdomain.com","https://www.yourdomain.com"]

# Namespace for production
namespace: pyramidnet-prod

# Name prefix for production resources
namePrefix: prod-
Create the production deployment patch k8s/overlays/production/deployment-prod.yaml:
# k8s/overlays/production/deployment-prod.yaml
apiVersion: apps/v1
kind: Deployment
metadata:
  name: pyramidnet-api
spec:
  replicas: 5  # Higher replica count for production
  template:
    metadata:
      annotations:
        # Production monitoring annotations
        prometheus.io/scrape: "true"
        prometheus.io/port: "8000"
        prometheus.io/path: "/metrics"
    spec:
      # Production security settings
      securityContext:
        runAsNonRoot: true
        runAsUser: 1000
        runAsGroup: 1000
        fsGroup: 1000
        seccompProfile:
          type: RuntimeDefault

      containers:
      - name: pyramidnet-api
        # Production resource settings
        resources:
          requests:
            memory: "1Gi"
            cpu: "500m"
          limits:
            memory: "4Gi"
            cpu: "2000m"

        # Strict health checks for production
        livenessProbe:
          initialDelaySeconds: 90
          periodSeconds: 30
          timeoutSeconds: 10
          failureThreshold: 3

        readinessProbe:
          initialDelaySeconds: 60
          periodSeconds: 10
          timeoutSeconds: 5
          failureThreshold: 3

        startupProbe:
          initialDelaySeconds: 30
          periodSeconds: 10
          timeoutSeconds: 10
          failureThreshold: 18  # Allow 3 minutes for production startup

        # Enhanced security context
        securityContext:
          allowPrivilegeEscalation: false
          readOnlyRootFilesystem: true  # Set root filesystem to read-only
          capabilities:
            drop:
            - ALL

        # Volume mounts for writable directories
        volumeMounts:
        - name: tmp-volume
          mountPath: /tmp
        - name: log-volume
          mountPath: /app/logs
        - name: cache-volume
          mountPath: /app/.cache

      # Volumes for writable directories
      volumes:
      - name: tmp-volume
        emptyDir: {}
      - name: log-volume
        emptyDir: {}
      - name: cache-volume
        emptyDir: {}
Create production HPA patch k8s/overlays/production/hpa-prod.yaml:
# k8s/overlays/production/hpa-prod.yaml
apiVersion: autoscaling/v2
kind: HorizontalPodAutoscaler
metadata:
  name: pyramidnet-hpa
spec:
  minReplicas: 3   # Higher minimum for production
  maxReplicas: 20  # Allow more scaling for production traffic

  metrics:
  - type: Resource
    resource:
      name: cpu
      target:
        type: Utilization
        averageUtilization: 60  # More conservative CPU threshold

  - type: Resource
    resource:
      name: memory
      target:
        type: Utilization
        averageUtilization: 70  # More conservative memory threshold

  # Custom metrics (if Prometheus adapter is available)
  - type: Pods
    pods:
      metric:
        name: http_requests_per_second
      target:
        type: AverageValue
        averageValue: "100"

  behavior:
    scaleUp:
      stabilizationWindowSeconds: 30  # Faster scale-up for production
      policies:
      - type: Percent
        value: 100  # Can double pods quickly if needed
        periodSeconds: 30
      - type: Pods
        value: 4    # Or add up to 4 pods at once
        periodSeconds: 30
      selectPolicy: Max

    scaleDown:
      stabilizationWindowSeconds: 600  # Wait 10 minutes before scaling down
Create production ingress with SSL k8s/overlays/production/ingress-prod.yaml:
# k8s/overlays/production/ingress-prod.yaml
apiVersion: networking.k8s.io/v1
kind: Ingress
metadata:
  name: pyramidnet-ingress
  annotations:
    kubernetes.io/ingress.class: "nginx"
    nginx.ingress.kubernetes.io/ssl-redirect: "true"
    nginx.ingress.kubernetes.io/proxy-body-size: "10m"  # Allow 10MB uploads
    cert-manager.io/cluster-issuer: "letsencrypt-prod"  # Automatic SSL certificates
    nginx.ingress.kubernetes.io/rate-limit: "100"       # Rate limiting
spec:
  tls:
  - hosts:
    - api.yourdomain.com
    secretName: pyramidnet-tls

  rules:
  - host: api.yourdomain.com
    http:
      paths:
      - path: /
        pathType: Prefix
        backend:
          service:
            name: pyramidnet-service
            port:
              number: 80
Understanding Environment Differences
The overlay system allows us to maintain consistency while adapting to environment-specific needs:
Development Characteristics:
- Single replica for simplicity
- Reduced resource requirements
- Debug logging enabled
- Relaxed health checks
- Local domain access
Production Characteristics:
- Multiple replicas for high availability
- Higher resource allocations
- Strict security policies
- Conservative auto-scaling
- SSL termination and rate limiting
This approach ensures your development environment closely matches production while optimizing for the specific needs of each environment.
Deploying to Kubernetes
Now that we have our manifests ready, let’s deploy our FastAPI application to a Kubernetes cluster. We’ll cover both local testing with minikube and cloud deployment strategies.
Setting Up a Local Kubernetes Environment
For development and testing, we’ll use minikube, which creates a local Kubernetes cluster on your machine.
Installing Minikube and kubectl
# Install kubectl (Kubernetes command-line tool)
# For macOS using Homebrew:
brew install kubectl

# For Linux:
curl -LO "https://dl.k8s.io/release/$(curl -L -s https://dl.k8s.io/release/stable.txt)/bin/linux/amd64/kubectl"
sudo install -o root -g root -m 0755 kubectl /usr/local/bin/kubectl

# Install minikube
# For macOS:
brew install minikube

# For Linux:
curl -LO https://storage.googleapis.com/minikube/releases/latest/minikube-linux-amd64
sudo install minikube-linux-amd64 /usr/local/bin/minikube

# Copy config to local destination
export KUBECONFIG=~/.kube/config
mkdir -p ~/.kube
sudo k3s kubectl config view --raw > "$KUBECONFIG"
chmod 600 "$KUBECONFIG"
echo "export KUBECONFIG=~/.kube/config" >> ~/.bashrc
source ~/.bashrc

# Start minikube with adequate resources for ML workloads
minikube start --memory=8192 --cpus=4 --disk-size=20g

# Enable necessary addons
minikube addons enable ingress
minikube addons enable metrics-server
Building and Loading Your Docker Image
Since minikube runs in its own Docker environment, we need to make our image available to the cluster:
What does
eval $(minikube docker-env)do? This command is a shortcut that points your local terminal’s Docker client to the Docker daemon running inside the minikube virtual machine. After running it, anydockercommands you execute (likedocker build) will run within minikube’s environment, not your host machine’s. This is the easiest way to make your locally built image available to your local Kubernetes cluster without needing to push it to a remote registry. To switch back to your host’s Docker daemon, you can runeval $(minikube docker-env -u).
# Option 1: Use minikube's Docker daemon (recommended for development)
eval $(minikube docker-env)
docker build -t pyramidnet-api:v1.0.0 .

# Option 2: Load image from local Docker (if already built)
# minikube image load pyramidnet-api:v1.0.0

# Verify the image is available in minikube
minikube image ls | grep pyramidnet
Deploying to Development Environment
Let’s deploy our development configuration:
# Create the development namespace
kubectl create namespace pyramidnet-dev

# Deploy using kustomize
kubectl apply -k k8s/overlays/development/

# Check the deployment status
kubectl get all -n pyramidnet-dev

# Watch the deployment roll out
kubectl rollout status deployment/pyramidnet-api -n pyramidnet-dev

# Check pod logs to ensure the model loads successfully
kubectl logs -f deployment/pyramidnet-api -n pyramidnet-dev
Understanding Deployment Status
Let’s examine what’s happening during deployment:
# Check pod status in detail
kubectl describe pods -n pyramidnet-dev

# Monitor events for troubleshooting
kubectl get events -n pyramidnet-dev --sort-by=.metadata.creationTimestamp

# Check if health checks are passing
kubectl get pods -n pyramidnet-dev
# STATUS should show "Running" and READY should show "1/1"
Common Deployment Issues and Solutions
Issue: Pod stuck in Pending state
# Check for resource constraints
kubectl describe pod <pod-name> -n pyramidnet-dev
# Look for events like "Insufficient cpu" or "Insufficient memory"

# Solution: Reduce resource requests or increase cluster resources
minikube stop
minikube start --memory=16384 --cpus=6
Issue: Pod in CrashLoopBackOff
# Check pod logs for errors
kubectl logs <pod-name> -n pyramidnet-dev

# Common causes and solutions:
# 1. Model file not found - ensure model is built into image
# 2. Import errors - check Python dependencies
# 3. Port conflicts - verify container port configuration
Issue: Health checks failing
# Check health endpoint directly
kubectl port-forward deployment/pyramidnet-api 8000:8000 -n pyramidnet-dev
curl http://localhost:8000/health/

# Adjust health check timings if model loading takes longer
Testing Your Deployment
Once the deployment is successful, let’s test it:
# Port forward to access the service locally
kubectl port-forward service/pyramidnet-service 8080:80 -n pyramidnet-dev

# Test health endpoint
curl http://localhost:8080/health/

# Test prediction with an image
curl -X POST "http://localhost:8080/predict/" \
     -H "Content-Type: multipart/form-data" \
     -F "file=@path/to/test/image.jpg"

# Check the metrics endpoint
curl http://localhost:8080/metrics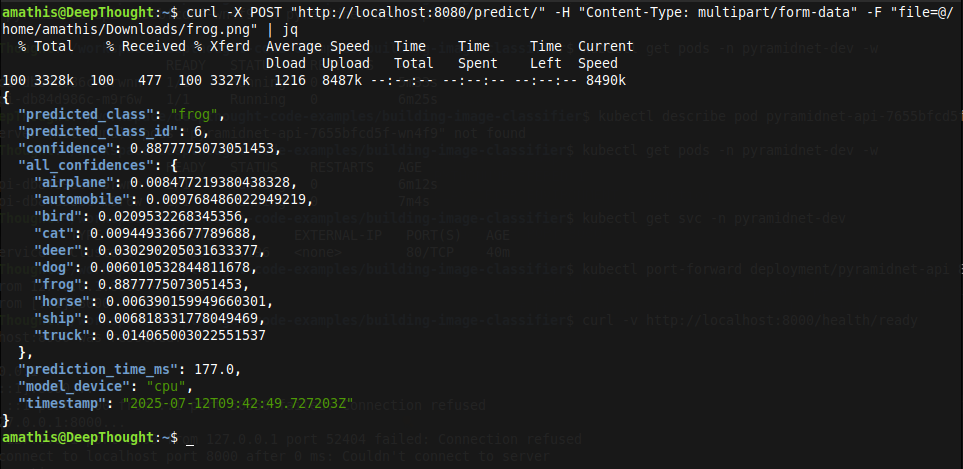
As you can see, our image prediction API has been successfully deployed via Kubernetes and its making accurate predictions!
Setting Up Ingress for External Access
To access your API through a domain name instead of port forwarding:
# Get minikube IP
minikube ip

# Add to your /etc/hosts file (Linux/macOS) or C:\Windows\System32\drivers\etc\hosts (Windows)
echo "$(minikube ip) pyramidnet-dev.local" | sudo tee -a /etc/hosts

# Test ingress access
curl http://pyramidnet-dev.local/health/
Monitoring Your Deployment
Kubernetes provides excellent observability tools:
# Watch resource usage
kubectl top pods -n pyramidnet-dev

# Monitor HPA status
kubectl get hpa -n pyramidnet-dev

# View detailed HPA information
kubectl describe hpa pyramidnet-hpa -n pyramidnet-dev

# Check service endpoints
kubectl get endpoints -n pyramidnet-dev
Scaling Your Application
Test the auto-scaling functionality:
# Generate load to trigger scaling (in another terminal)
# Install apache2-utils for `ab` command
sudo apt-get install apache2-utils  # Ubuntu/Debian
# or
brew install httpie  # macOS alternative

# Generate load
ab -n 1000 -c 10 http://pyramidnet-dev.local/health/

# Watch scaling happen
kubectl get pods -n pyramidnet-dev -w

# Check HPA status during load test
kubectl get hpa pyramidnet-hpa -n pyramidnet-dev -w
Deploying to Production Environment
For production deployment, the process is similar but with production-specific configurations:
# Create production namespace
kubectl create namespace pyramidnet-prod

# Deploy production configuration
kubectl apply -k k8s/overlays/production/

# Monitor production deployment
kubectl rollout status deployment/prod-pyramidnet-api -n pyramidnet-prod

# Check production-specific resource usage
kubectl top pods -n pyramidnet-prod
Understanding Kubernetes Dashboard
Enable the Kubernetes dashboard for visual cluster management:
# Start the dashboard
minikube dashboard

# This opens a web interface showing:
# - Pod status and logs
# - Resource usage graphs
# - Service endpoints
# - ConfigMap and Secret management
# - Deployment scaling controls
The dashboard provides a user-friendly way to monitor and manage your deployment without command-line tools.
Production Deployment Considerations
When deploying to a production Kubernetes cluster (EKS, GKE, AKS), consider these additional factors:
Security:
- Use Kubernetes secrets for sensitive configuration
- Implement network policies for pod-to-pod communication
- Enable pod security policies or admission controllers
Monitoring:
- Deploy Prometheus and Grafana for metrics collection
- Set up log aggregation with ELK stack or similar
- Configure alerting for critical failures
Backup and Recovery:
- Regular etcd backups
- Persistent volume backup strategies
- Disaster recovery procedures
Performance:
- Node auto-scaling for cluster resources
- Cluster-level monitoring and optimization
- Cost optimization through resource rightsizing
Wrapping Up: From Container to Live Service
Congratulations! You have successfully containerized your machine learning API and deployed it to a functioning Kubernetes cluster. This is a massive step from running a local script to having a scalable, resilient service.
What We Built
- A Containerized Application: We created an optimized, multi-stage Dockerfile that packages our FastAPI application and all its dependencies into a portable and secure container.
- Declarative Infrastructure: We defined our application’s desired state using Kubernetes manifests for a Deployment, Service, ConfigMap, and Horizontal Pod Autoscaler.
- A Scalable Deployment: We deployed our application to a local Kubernetes cluster, complete with self-healing capabilities, internal load balancing, and automatic scaling based on CPU load.
- A Foundation for Production: We established a solid project structure and a set of manifests that serve as the foundation for more advanced, production-grade deployments.
Current Project Structure
Your project now includes the infrastructure definitions needed to run the service anywhere Kubernetes is available.
deepthought-image-classifier/
├── api/
│   ├── __init__.py
│   ├── main.py                        # FastAPI application
│   ├── config.py                      # Configuration management
│   ├── models/
│   │   ├── __init__.py
│   │   └── prediction.py              # Pydantic models
│   ├── routers/
│   │   ├── __init__.py
│   │   ├── health.py                  # Health check endpoints
│   │   └── predict.py                 # Prediction endpoints
│   ├── services/
│   │   ├── __init__.py
│   │   ├── model_service.py           # Model loading and inference
│   │   └── image_service.py           # Image preprocessing
│   └── middleware/
│       ├── __init__.py
│       ├── logging.py                 # Request logging
│       ├── security.py                # Security headers
│       └── rate_limiting.py           # Rate limiting
├── models/
│   └── best_pyramidnet_model.pth      # Trained model from Part 2
├── Dockerfile
├── tests/
│   ├── __init__.py
│   └── test_api.py                    # Comprehensive test suite
├── logs/                              # Application logs
├── processed/
│   └── prepared_train_dataset.pt      # From Part 1
├── k8s/
|   ├── base/                          # Base Kubernetes manifests
|   │   ├── deployment.yaml           # Application deployment
|   │   ├── service.yaml              # Service definition
|   │   ├── configmap.yaml            # Configuration
|   │   ├── hpa.yaml                  # Horizontal Pod Autoscaler
|   │   └── kustomization.yaml        # Kustomize configuration
|   └── overlays/
|       ├── development/               # Development-specific configs
|       │   ├── kustomization.yaml
|       │   └── ingress.yaml
|       └── production/                # Production-specific configs
|           ├── kustomization.yaml
|           ├── ingress.yaml
|           └── resource-limits.yaml
├── .env                               # Environment configuration
├── .env.docker
├── preprocessing.py                   # From Part 1
├── train_model.py                     # From Part 2
└── requirements.txt
Key Production Patterns We Implemented
- Containerization: Isolating the application and its dependencies ensures consistency across all environments.
- Declarative Configuration: Defining our system in YAML files makes deployments repeatable and version-controllable.
- Health Checks: Implementing startup, readiness, and liveness probes allows Kubernetes to manage the application lifecycle intelligently.
- Auto-scaling: The Horizontal Pod Autoscaler provides a mechanism to respond to changes in demand automatically.
Looking Ahead
The Complete Series Journey
Reflecting on your complete journey through this series:
- Part 1: Transformed raw CIFAR-10 data into clean, model-ready datasets
- Part 2: Built and trained a state-of-the-art PyramidNet achieving 94%+ accuracy
- Part 3: Created a production-grade FastAPI service with comprehensive features
- Part 4: Containerized and deployed the system to Kubernetes
You’ve experienced the complete lifecycle of a machine learning project: from research and development to production deployment at scale. We have a working deployment, but there is more to do to make it truly ready for a production environment. In Part 5 of this series, we will harden our deployment by exploring advanced Kubernetes features. You will learn how to:
- Enhance Security: Implement Network Policies and Pod Security Standards.
- Improve Reliability: Use Pod Disruption Budgets to ensure availability during cluster maintenance.
- Set Up Advanced Monitoring: Integrate with Prometheus and Grafana for detailed observability.
- Implement Sophisticated Deployment Strategies: Explore blue-green and canary releases for zero-downtime updates.
Later, in Part 6, we will take this entire configuration and deploy it to a managed Kubernetes service in the cloud, such as Amazon EKS.
Key Takeaways
Building a container and defining a basic deployment are the foundational skills for modern MLOps. The patterns you have implemented here are not just for machine learning; they are standard practice for deploying any scalable web service. You now have a system that is portable, consistent, and ready to scale.
References and Further Reading
Kubernetes Official Documentation. (2024). Kubernetes Documentation. https://kubernetes.io/docs/
Docker Official Documentation. (2024). Docker Documentation. https://docs.docker.com/
Burns, B., & Beda, J. (2022). Kubernetes: Up and Running (3rd ed.). O’Reilly Media.
Hightower, K., Burns, B., & Beda, J. (2017). Kubernetes: Up and Running. O’Reilly Media.
National Institute of Standards and Technology. (2017). Application Container Security Guide (NIST Special Publication 800-190). https://doi.org/10.6028/NIST.SP.800-190
Center for Internet Security. (2024). CIS Kubernetes Benchmark. https://www.cisecurity.org/benchmark/kubernetes
Rice, L. (2020). Container Security: Fundamental Technology Concepts that Protect Containerized Applications. O’Reilly Media.

Aaron Mathis
Systems administrator and software engineer specializing in cloud development, AI/ML, and modern web technologies. Passionate about building scalable solutions and sharing knowledge with the developer community.
Related Articles
Discover more insights on similar topics